
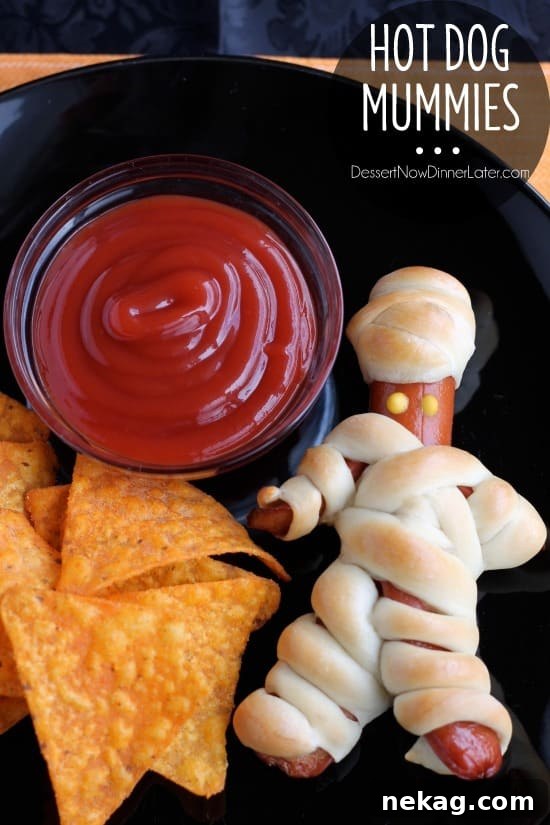
Hot Dog Mummies are a fun Halloween food your kids can help make!
*This post is proudly brought to you by Rhodes Bake-N-Serv. We appreciate you supporting the brands that make delicious recipes like this possible.
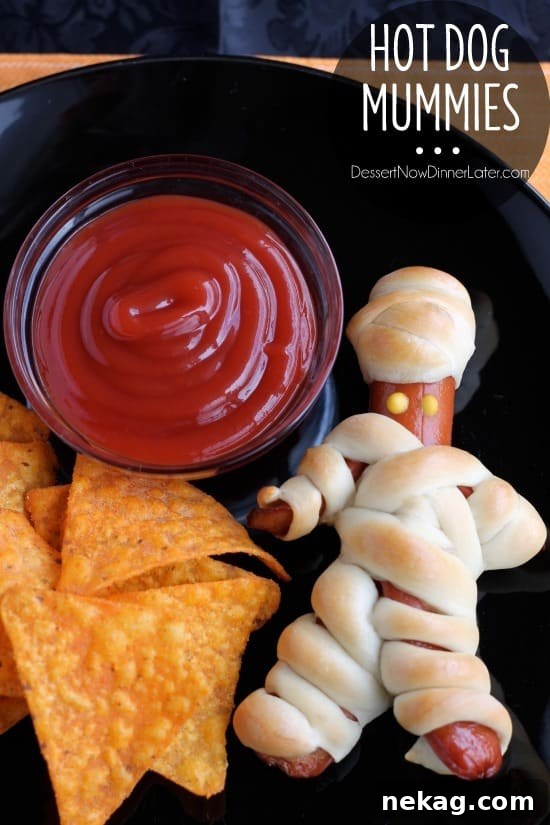
Easy & Fun Hot Dog Mummies: The Ultimate Kid-Friendly Halloween Recipe
As the leaves begin to change and a crispness fills the autumn air, a special kind of excitement takes hold—it’s Halloween season! For many families, myself included, October isn’t just a month; it’s a countdown to costumes, candy, and all things delightfully spooky. My children, much like yours, are absolutely thrilled as soon as the calendar flips to October. We’ve been enjoying classic Halloween movies and planning our trick-or-treat strategy for months! While I tend to shy away from the truly scary aspects of Halloween, I absolutely adore the whimsical, cute side of the holiday. This is why I’m so excited to share a recipe that perfectly captures that playful spirit: these charming and incredibly easy Hot Dog Mummies. They’re the ideal fun meal to enjoy with your family before you head out the door for a night of trick-or-treating!
Unwrap the Fun: Why Hot Dog Mummies are a Halloween Essential
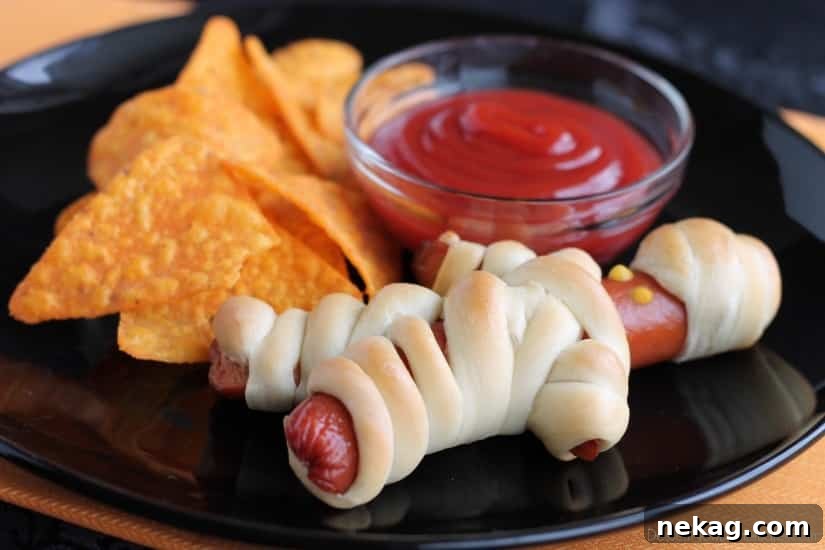
When envisioning the perfect Halloween meal, you want something that’s not only thematic but also simple to execute. Hot Dog Mummies are a culinary stroke of genius that ticks every box! They’re delightfully fun to make and even more enjoyable to eat. What makes this recipe truly special is how it transforms cooking into a playful, interactive experience for the whole family. Your kids will absolutely love being involved in every step, from rolling the soft dough into “bandages” to meticulously wrapping their hot dogs to create their very own edible mummies. There’s an undeniable giggle factor as they dip a “mummy arm” or “mummy leg” into a blob of ketchup, playfully exclaiming about eating a “spooky friend.” These aren’t just snacks; they’re memories being baked right in your kitchen.
You’ll hardly believe how effortlessly these adorable creations come together. With just a few common ingredients and a straightforward process, you can quickly whip up a batch, ensuring you have more precious time for last-minute costume adjustments, festive decorations, and planning the ultimate candy haul. This recipe is a testament to how simple ingredients can yield truly memorable results, making it a go-to for busy Halloween evenings.
Gather Your Supplies: Simple Ingredients for Spooky Success
The beauty of this captivating recipe lies in its elegant simplicity. Forget about obscure ingredients or complicated techniques; all you need are a handful of pantry staples to bring these friendly mummies to life! For this recipe, we heartily recommend Rhodes Bake-N-Serv white dinner rolls. Their convenience and consistent quality make them an absolute dream to work with, ensuring your “bandages” are perfectly fluffy and golden every time. They truly streamline the process, allowing for maximum fun with minimum fuss.
- Bun-Length Hot Dogs: The foundation of our mummies! Choose your family’s preferred brand and type, whether all-beef, turkey, or pork. Bun-length hot dogs are ideal because their longer size provides ample “body” to create distinct arms and legs, making the wrapping process easier and the final mummies more impressive. However, standard hot dogs or even smaller cocktail sausages (for mini mummies) work wonderfully too.
- Rhodes White Dinner Rolls: These convenient frozen rolls are the secret to our soft, golden “bandages.” It’s crucial that they are thawed, but still cold. This state ensures the dough is pliable and easy to roll into long, thin strips without becoming overly sticky or tearing, making the wrapping process smooth and enjoyable.
- Mustard: The perfect edible medium for creating those signature mummy eyes! A squeeze bottle makes it easy to add precise dots. For a different look or taste, you can also use small dabs of ketchup, cream cheese, or even tiny edible candy eyes for extra whimsy.
- Essential Tools: A sharp kitchen knife is needed for carefully cutting the hot dogs. Kitchen scissors can also be very helpful for cutting dough strips, especially if little hands are assisting, offering a safer alternative to a knife. A baking sheet lined with parchment paper or a silicone mat will also be invaluable for easy cleanup.
Crafting Your Mummy Army: A Step-by-Step Guide
Get ready to unleash your inner ancient Egyptian craftsman! This step-by-step guide will walk you through transforming ordinary hot dogs into a spooky (but sweet!) legion of Hot Dog Mummies.
1. Prepare Your Hot Dogs: Creating Limbs for Wrapping
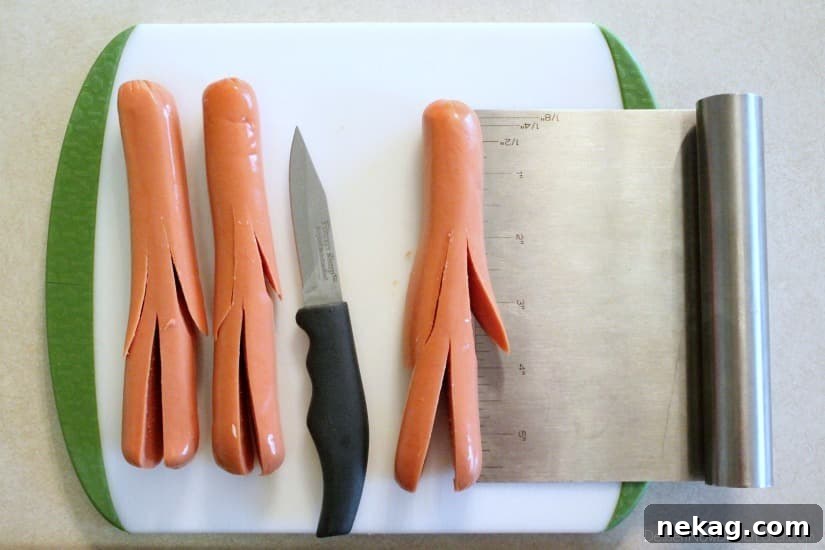
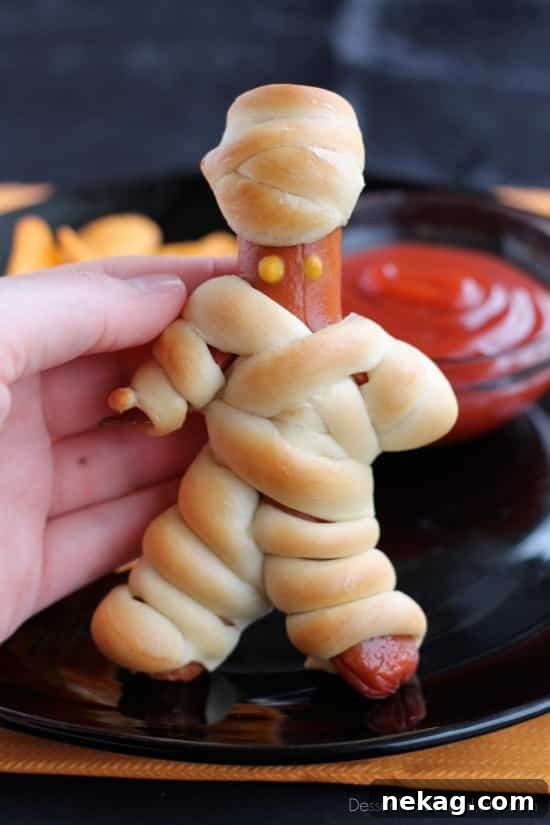
The first exciting step is to give your hot dogs their characteristic mummy shape! Lay a bun-length hot dog flat. Using a sharp knife (with adult supervision if kids are helping!), carefully make cuts to form the “arms” and “legs.” Start by leaving approximately 1½ inches at one end uncut – this will serve as the mummy’s head. Below this head section, make two parallel cuts on each side, extending about halfway through the hot dog’s diameter and roughly an inch long, to create the “arms.” Move to the opposite end and repeat the process, making two similar cuts to form the “legs,” leaving a solid “torso” section in the middle. Your hot dog should now resemble a slightly splayed figure, perfectly poised for its doughy transformation. Precision isn’t paramount; a little rustic charm only adds to their ancient appeal!
2. Dough Preparation: The Perfect Bandage Base
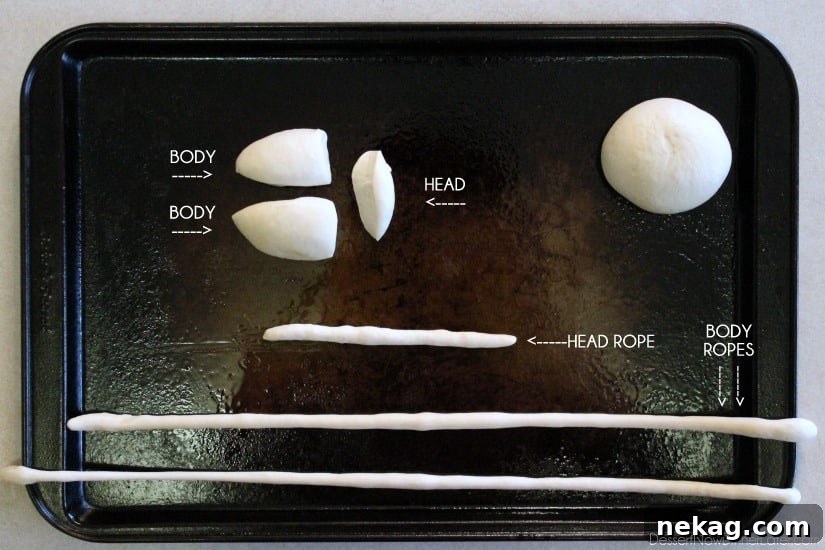
Now, let’s get those “bandages” ready! Take one of your Rhodes dinner rolls, ensuring it’s thawed but still pleasantly cool to the touch. The chill is incredibly important here; it keeps the dough firm and manageable, preventing it from becoming too sticky and difficult to work with. Gently pinch off a small portion of the dough, roughly a quarter of the entire roll. This smaller piece will be reserved specifically for wrapping the mummy’s head. Set it aside for later. Take the remaining, larger piece of the roll and carefully cut it in half. You now have three distinct pieces of dough: one small piece for the head and two larger pieces ready for the body and limbs.
3. Roll Out Your Dough: Crafting the Mummy Strips
It’s time to create the “bandages” that will encase your hot dogs! Take the small piece of dough you reserved for the head. On a lightly floured surface or between your palms, roll it into a thin rope, aiming for a length of approximately 6-7 inches. This strip should be delicate enough to create a distinct head wrap but strong enough not to break. Next, pick up each of the two larger dough pieces. Roll these out into much longer, thinner ropes—each about 18-20 inches in length. Aim for a consistent thickness across the entire length of each rope to ensure an even “bandaged” appearance. If the dough starts to feel too sticky during this process, a very light dusting of flour on your hands or work surface can help, but avoid excessive flour as it can alter the dough’s texture.
4. Begin the Body Wrap: Side One
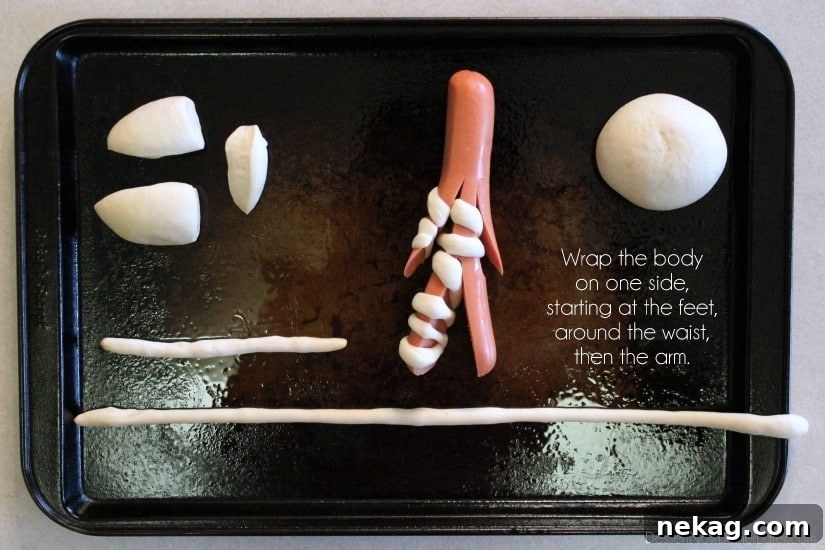
Now, the wrapping truly begins! Take one of your prepped hot dogs and one of the long dough ropes. Start by securing one end of the dough rope firmly at the base of one of the hot dog’s “feet.” Begin spiraling the dough upwards around that leg, overlapping it slightly, about 4 or 5 times to create a bandaged look. Continue the spiral motion up to the “waist” area, wrapping around the body 2 to 3 times. From the waist, guide the dough strip upwards, draping it over one “shoulder,” and then spiral it down that “arm” about 3 or 4 times. The goal is to create an authentic, slightly haphazard mummy appearance, leaving small gaps here and there to mimic ancient, worn bandages. Don’t strive for absolute perfection; the more unique each mummy looks, the better!
5. Completing the Body Wrap: Side Two
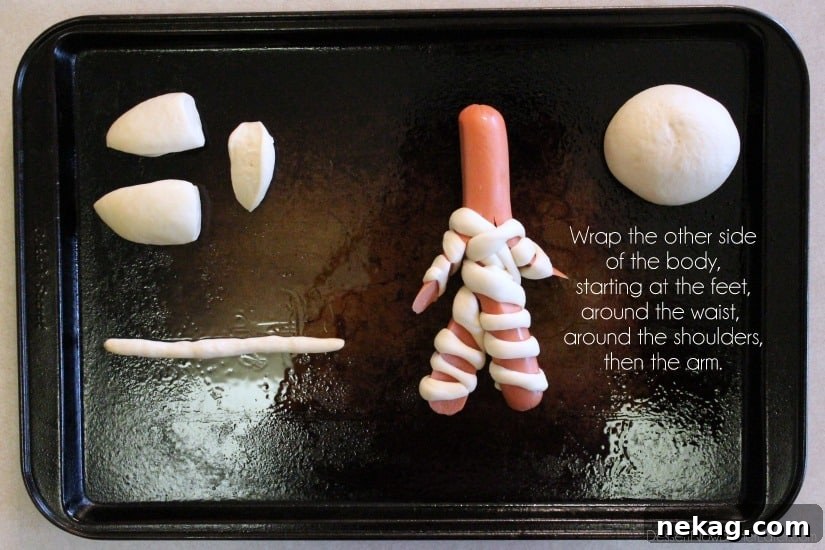
With the first side done, pick up your second long dough rope and continue the wrapping process on the other side of the hot dog. Begin again at the other “foot,” spiraling the dough up the second leg, around the central torso, across the remaining “shoulder,” and down the second “arm.” Overlap the dough strips as needed, ensuring most of the hot dog body is covered but with strategic peeks of the hot dog showing through the “bandages.” This adds to the authentic, aged mummy effect. Once you reach the end of your dough rope, gently press the end piece into the main body of the wrapped hot dog to secure it, preventing any unraveling during baking. At this point, only the small head section of the hot dog should remain unwrapped.
6. The Head Wrap: Bringing Your Mummy to Life
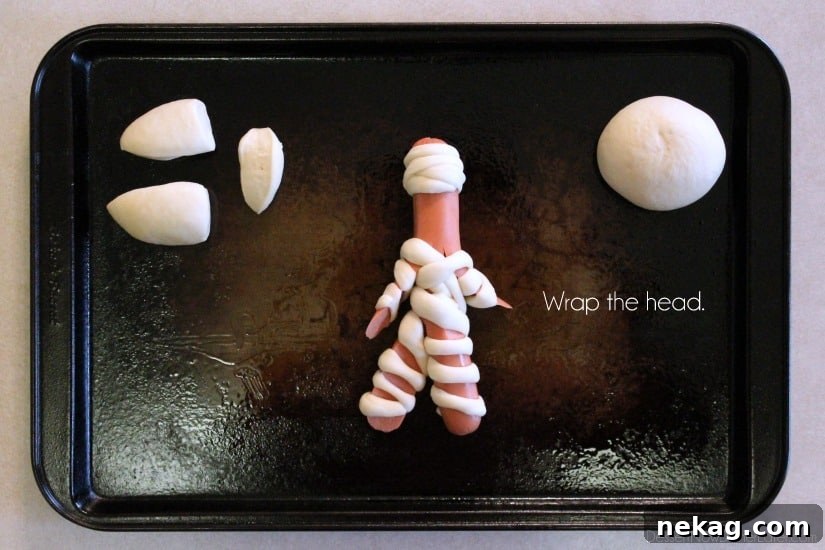
For the final touch, take the short dough rope that you set aside earlier for the head. Carefully begin wrapping this strip around the top, unwrapped section of the hot dog. Spiral it around about 2 or 3 times, making sure to leave a small, uncovered gap in the front—this is where your mummy’s eyes will eventually peer out! Secure the end of the dough gently by pressing it into the existing wraps. Repeat this entire wrapping process for all your hot dogs and Rhodes dinner rolls. Place your completed mummies on a baking sheet that has been lightly sprayed with non-stick cooking spray or lined with parchment paper, ensuring they have a little space between each one.
7. Bake to Golden-Brown Perfection
With your army of Hot Dog Mummies assembled on the baking sheet, it’s time to bake them to a beautiful golden perfection! Preheat your oven to 350°F (175°C). Carefully transfer the baking sheet to the preheated oven. Bake for approximately 15 minutes. The precise baking time may vary slightly depending on your oven, so keep a watchful eye. You’re looking for the dough to expand, become wonderfully fluffy, and achieve a delightful golden-brown color. The hot dogs inside will also heat through, becoming deliciously warm. Once they reach this appetizing stage, carefully remove them from the oven.
8. The Final Touch: Adding Spooky Eyes
After taking your baked Hot Dog Mummies out of the oven, allow them to cool for a few minutes on the baking sheet. They will be quite hot, so patience is key! Once they’ve cooled slightly and are safe to handle, it’s time for the most important step: giving them their characteristic spooky (yet still adorable) eyes! Grab your mustard squeeze bottle or a toothpick dipped in mustard. Carefully apply two small dots of mustard in the small space you left on each mummy’s head. These tiny dots will instantly bring your mummies to life, giving them their iconic festive look. Your Hot Dog Mummies are now officially ready to be served warm and enjoyed by your eagerly awaiting family!
The Complete Hot Dog Mummies Recipe Card
Hot Dog Mummies
A fun, easy, and delicious Halloween meal or snack that kids will love to help make!
- Prep Time: 20 minutes
- Cook Time: 15 minutes
- Total Time: 35 minutes
- Yields: Varies (typically 8-12 mummies, depending on rolls/hot dogs)
Ingredients
- Rhodes Dinner Rolls, thawed but still cold (number depends on how many mummies you want to make; one roll per hot dog)
- Bun-length hot dogs (one hot dog per roll)
- Mustard, for eyes (and optional dipping)
- Optional: Ketchup, BBQ sauce, or other favorite dipping sauces
Instructions
- Carefully cut slits into each hot dog to create “arms” and “legs.” Leave approximately 1.5 inches uncut at one end for the head, and a solid section for the torso in the middle.
- Take one thawed and cold Rhodes dinner roll. Pinch off about a quarter of the dough; set this aside for the head wrap. Cut the remaining large piece of dough in half.
- Roll the small head-wrap dough piece into a rope about 6-7 inches long. Roll each of the two larger dough pieces into longer ropes, approximately 18-20 inches long each.
- Using one of the long dough ropes, start at a hot dog’s “foot” and wrap the dough around one leg (3-4 times), then around the torso (2-3 times), up over a “shoulder,” and down one arm (3-4 times). Gently press the end to secure.
- Repeat the wrapping process on the other side of the hot dog with the second long dough rope, ensuring the hot dog is mostly covered, leaving some gaps for a bandaged effect. Secure the end.
- Wrap the small dough rope around the top uncut section of the hot dog to form the mummy’s head, leaving a small gap in the front for the eyes.
- Place your assembled hot dog mummies on a lightly greased or parchment-lined baking sheet, leaving some space between them.
- Bake in a preheated oven at 350°F (175°C) for 15 minutes, or until the dough is beautifully golden brown and the hot dogs are heated through.
- Remove from the oven and let cool slightly for a few minutes. Then, apply two small dots of mustard (or preferred edible medium) in the head gap to create the mummy’s eyes.
- Serve warm with a selection of dipping sauces and enjoy your festive, delicious Hot Dog Mummies!
Recipe created by Amber Brady.
Mastering Mummy-Making: Expert Tips for Success
To ensure your Hot Dog Mummies turn out perfectly fluffy, golden, and spooky-cute every time, keep these helpful tips in mind:
- Maintain the Coldness of the Dough: This cannot be stressed enough! Cold dough is significantly easier to work with. It’s less sticky and holds its shape better, allowing for cleaner cuts and more controlled wrapping. If your dough starts to feel too warm or sticky, simply place it back in the refrigerator for 5-10 minutes to chill before resuming.
- Avoid Overworking the Dough: While rolling the dough into strips is necessary, avoid excessive kneading or handling. Overworking can develop the gluten too much, leading to a tougher texture in the final baked rolls. Work quickly and with a gentle touch.
- Embrace Imperfection: Remember, these are mummies, not perfectly sculpted statues! Some wraps can be tight and neat, others more loose and haphazard. The variations in wrapping styles actually enhance their ancient, bandaged charm. Let creativity guide you!
- Secure Those Ends: To prevent your mummy bandages from unraveling during baking, make sure to gently press the ends of the dough strips firmly into the main body of the wrapped hot dog. A little pinch or tuck can go a long way.
- Involve the Whole Family: This recipe is a fantastic family activity! Assign age-appropriate tasks to your children. Younger kids can help with rolling the dough ropes or adding the mustard eyes. Older children can assist with wrapping the hot dogs (with supervision for knife use during initial hot dog prep). It’s a wonderful way to bond and create lasting Halloween memories.
Beyond the Basic Mummy: Serving Suggestions & Fun Variations
While Hot Dog Mummies are a showstopper all on their own, you can easily elevate your Halloween feast with creative serving ideas and playful variations:
- A Dip Station Extravaganza: Offer more than just ketchup and mustard! Create a “bloody” marinara sauce for dipping, a “swamp” green guacamole, a creamy ranch dressing, or a gooey cheese dip. Let kids choose their favorite concoction for extra fun.
- Spooky Sidekicks: Pair your mummies with other festive sides. Think “witch’s brew” (a vibrant green vegetable soup), “spider web” deviled eggs, or “monster eyeball” fruit skewers. A simple side of potato chips or a fresh salad can also complement this fun meal perfectly.
- Mini Mummy Appetizers: For a Halloween party or as a snack, use smaller cocktail sausages instead of bun-length hot dogs. Cut your Rhodes rolls into smaller portions to create miniature dough strips. These tiny mummies are adorable and perfect for popping in your mouth!
- Cheesy Mummies: Who doesn’t love cheese? Before wrapping, make a small lengthwise slit in each hot dog (without cutting all the way through) and insert a thin strip of cheddar or mozzarella cheese. As the mummies bake, the cheese will melt into a delicious, gooey surprise.
- Sweet Mummies (A Different Kind!): If you’re feeling extra creative, extend the mummy theme to dessert! You can wrap banana halves or strawberries in puff pastry, bake them, and then add chocolate chip “eyes” for a delightful sweet treat.
A Halloween Tradition in the Making
Ultimately, making these Hot Dog Mummies is more than just cooking a meal; it’s about weaving new traditions into the fabric of your family’s Halloween celebrations. The shared laughter, the collaborative effort in the kitchen, and the sheer delight on your children’s faces as they admire (and then devour!) their creations all contribute to the unforgettable magic of the autumn season. It’s a simple recipe, yet it brings so much joy and warmth to what can often be a “spooky” holiday.
So, this October, gather your little ghouls and goblins, grab your convenient Rhodes dinner rolls, and embark on a wonderfully fun and delicious culinary adventure. These easy, kid-friendly Hot Dog Mummies are destined to become a monstrous hit, making your pre-trick-or-treat dinner both delightful and truly memorable. May your Halloween be filled with fun, laughter, and plenty of delicious treats!
Happy Halloween, and happy mummy-making!
Did you make this?
Don’t forget to leave a rating below and make sure to follow on Pinterest and Instagram for more delicious recipes and fun family ideas!