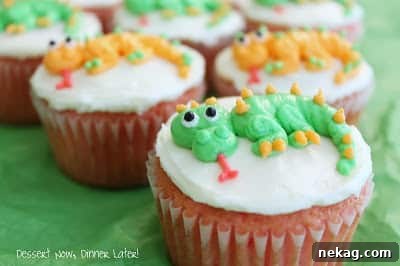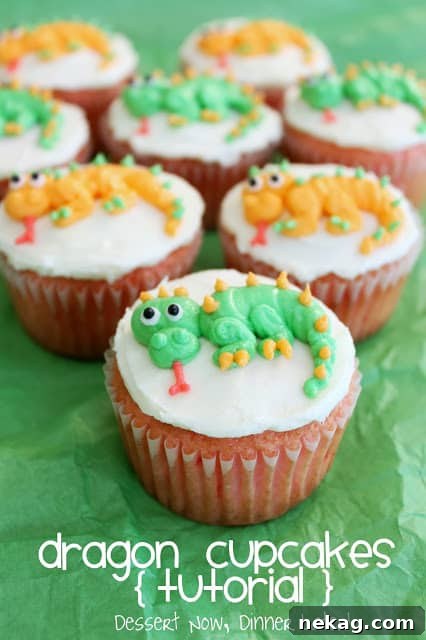
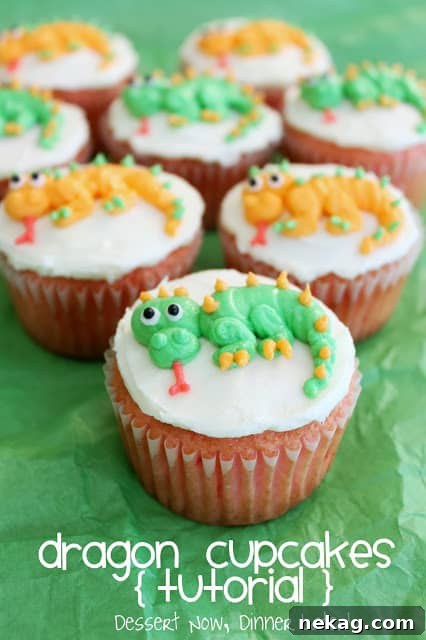
The magic of birthdays, especially for our little ones, often revolves around a central, delightful treat: the cake. This year, my little boy, who just turned four, had a very specific request for his special day: dragons! Where he conjured this idea, I’m not entirely sure. He does occasionally enjoy watching ‘Jane & The Dragon’, but it’s not a regular fixture. Regardless, when a four-year-old makes such an imaginative demand, you simply embrace it! It’s all part of making their day truly unforgettable.
Instead of a traditional large cake, I opted for cupcakes. With his sister’s birthday following just three days after his, I usually prepare both celebrations simultaneously, and individual cupcakes always seem to simplify things. They’re easier to serve, result in less mess, and each child gets their own perfectly portioned, decorated delight. Plus, they offer a fantastic canvas for creative themes! So, while you’re busy admiring these fantastic dragon creations, stay tuned for my next post, where I’ll share the tutorial for her adorable birthday cupcakes. In the meantime, let’s dive into creating these incredibly easy and charming dragon cupcakes that are sure to be the highlight of any little one’s birthday party.
Unleash the Fun: Easy Dragon Cupcakes for a Roaring Birthday Bash!
Planning a child’s birthday party is always an adventure, and finding the perfect theme can often be the most exciting part. For many kids, dragons evoke a sense of wonder, adventure, and playful mystery. Imagining fierce yet friendly creatures soaring through skies or guarding treasure captivates young minds. That’s why a dragon-themed birthday party, complete with awe-inspiring dragon cupcakes, is an absolute recipe for success. Not only are these treats visually stunning, but they also ignite the imaginations of your young guests, transporting them to a fantastical realm where dragons roam freely and magic is real.
Opting for cupcakes over a large cake has numerous advantages, especially when catering to a group of enthusiastic children. First and foremost, portion control is a breeze. Each child receives their own individual cupcake, eliminating the need for cutting and serving, which can often be a messy ordeal. This also means less waste and a fairer distribution of the coveted “best piece.” Secondly, cupcakes are incredibly versatile. They can be decorated individually, allowing for slight variations and personal touches, making each dragon unique. Finally, they are far more hygienic, as there’s no communal cutting or handling. Simply grab and enjoy!
Gather Your Arsenal: What You’ll Need for Your Dragon Cupcakes
Creating these magical dragon cupcakes doesn’t require an advanced degree in pastry arts. With a few basic tools and a dash of creativity, you’ll be well on your way to crafting a legendary spread. Here’s a detailed list of what you’ll need to transform ordinary cupcakes into mythical beasts:
- Cupcakes: You’ll need 24 baked and cooled cupcakes. You can either bake them from scratch using your favorite recipe or, for a time-saving hack, use a high-quality boxed mix. Ensure they are completely cooled before frosting to prevent your buttercream from melting.
- Buttercream Icing: Prepare 1 (3-cup) recipe of buttercream icing. I highly recommend Wilton’s Fluffy Buttercream Frosting recipe for its excellent consistency and ease of coloring. Its smooth texture is ideal for piping intricate details.
- Food Coloring: You’ll need green for the dragon’s body, orange for the spikes, red for a fiery tongue, and both white and black for the eyes. Gel food colorings are preferred as they provide vibrant colors without thinning the frosting.
- Piping Tips:
- Wilton #2 Tip (x5): This fine-point tip is crucial for delicate details like the spikes, the definition of the eyes, and the thin, flickering tongue. Having multiple #2 tips means you won’t have to clean and refill constantly between colors.
- Wilton #10 or #12 Tip: These larger round tips are perfect for piping the main structural elements of the dragon, including the head, snout, and robust body. The choice between #10 and #12 depends on the desired size and plumpness of your dragon features.
- Pastry Bags & Couplers: You’ll need several pastry bags to hold your various colored icings. Couplers are a fantastic invention, allowing you to easily switch between different piping tips with the same color of icing, saving you time and extra bags.
Step-by-Step Guide: Crafting Your Dragon Cupcakes
Now that you have all your supplies, let’s embark on the exciting journey of bringing these dragons to life. Remember, the key to beautiful piping is steady hands, consistent pressure, and a little bit of patience. Don’t be afraid to practice on a piece of parchment paper first!
Step 1: Prepare Your Canvas
Once your 24 cupcakes are completely cool, apply a thin, even layer of the prepared white buttercream icing to each. This serves as your base coat, creating a smooth surface for your dragon features and helping the subsequent layers adhere better. Make sure to save a small amount of white buttercream for the eyes later on.
Step 2: Color Your Frosting and Fill Pastry Bags
Divide the remaining buttercream into separate bowls for coloring. Add green food coloring for the main body, orange for the spikes, red for the tongue, and black for the pupils and nostrils. Mix thoroughly until you achieve vibrant, consistent colors. Fill your pastry bags with the colored buttercream, fitting them with the appropriate tips (or couplers for flexibility). For instance, green buttercream will go into a bag with a #10 or #12 tip, while orange, red, and black will go into bags with #2 tips.
Step 3: Sculpt the Head, Snout, and Body
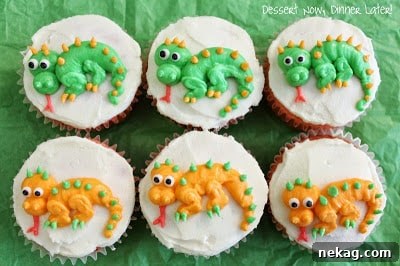
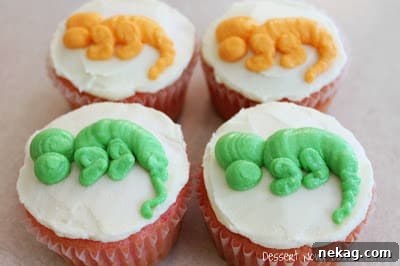
Using the pastry bag filled with green buttercream and fitted with the #10 (or #12) tip, begin by piping the head of your dragon onto one side of the cupcake. Imagine an oval or a rounded rectangle shape. Immediately after, pipe a slightly smaller, elongated shape extending from the head to form the snout. Then, pipe a larger, curved shape for the dragon’s body, extending across the cupcake. Think of it as creating the main structure of your dragon, allowing enough space for the tail and legs.
Step 4: Add the Legs and Tail Tip
Switch to a pastry bag with the green buttercream and a #2 tip (if you don’t have a separate #2 tip for green, clean one or use a coupler to switch it). Pipe four small, stubby legs extending from the body. These don’t need to be perfectly defined at this stage. Also, use the #2 tip to create a pointed tip for the dragon’s tail, giving it a more defined finish. If you notice any rough edges or uneven parts in your piping, gently smooth them out with a light dab of water on your finger. This technique helps create a polished, professional look.
Step 5: Define with Spikes and Claws
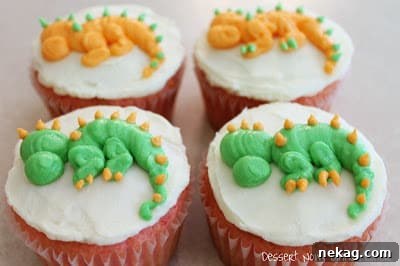
Now, for some fierce details! Using the pastry bag with the orange buttercream and a #2 tip, pipe spikes along the dragon’s back, from the head down to the tail. To achieve a sharp, pointed effect, squeeze the bag firmly and then quickly pull the tip upwards and away. Experiment with different sizes and spacing for a dynamic look. Next, pipe small, sharp claws onto the feet of the legs, giving your dragons a more menacing (but still cute!) appearance.
Step 6: Bring Your Dragon to Life with Eyes, Nostrils, and Tongue
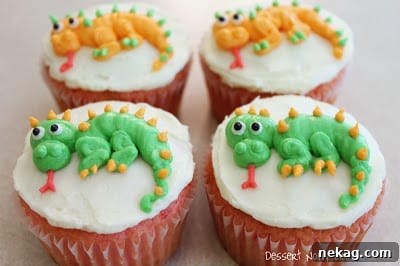
This is where your dragons truly come to life! Using the saved white buttercream and a #2 tip, pipe two small, round dots for the eyes on the head. Immediately after, switch to the black buttercream and a #2 tip to pipe smaller dots in the center of the white for the pupils. Also, use the black tip to pipe two tiny dots for the nostrils on the snout. Finally, with the red buttercream and a #2 tip, pipe a small, flickering tongue emerging from the front of the snout. A slight ‘v’ shape or a simple curved line works perfectly.
Voila! You’ve done it! Easy, right? It’s amazing how a few simple piping techniques can transform plain cupcakes into an army of adorable, fire-breathing creatures ready to celebrate.
Tips and Tricks for Dragon Cupcake Success
To ensure your dragon cupcake adventure is as smooth and enjoyable as possible, here are a few extra tips:
- Practice Makes Perfect: If you’re new to piping, don’t hesitate to practice on parchment paper before tackling the actual cupcakes. You can scrape the practice frosting back into the bag and reuse it.
- Consistency is Key: Your buttercream should be firm enough to hold its shape but soft enough to pipe smoothly. If it’s too stiff, add a tiny bit of milk or cream. If it’s too soft, refrigerate it for a few minutes.
- Keep Your Hands Cool: The warmth from your hands can melt the frosting in the pastry bag. If you find your frosting getting too soft, take a break or chill the bag for a few minutes.
- Color Vibrancy: For deeper, richer colors, add your food coloring gradually and let the frosting sit for about 10-15 minutes. Colors often deepen as they rest.
- Storage: Once decorated, these dragon cupcakes can be stored in an airtight container at room temperature for up to 2-3 days, or refrigerated for up to a week. Let them come to room temperature before serving for the best flavor and texture.
- Get Creative: Don’t feel limited by these exact designs! Experiment with different colors for your dragons, add edible glitter for scales, or even tiny candy pearls for eyes if you prefer. Each dragon can have its own personality!
- Involve the Kids: Older children can help with non-piping tasks like sorting sprinkles, unwrapping cupcakes, or even helping mix the food coloring. It’s a fun way to get them involved in their own party preparations.
Serving Your Mythical Masterpieces
Once your array of dragon cupcakes is complete, the presentation is the final touch that ties the whole theme together. Arrange them on a multi-tiered stand for a dramatic effect, making it look like a mountain filled with dragon lairs. Alternatively, place them on a large platter adorned with green tissue paper or moss-like decorations to mimic a dragon’s natural habitat. Consider adding small toy dragons around the display for an extra playful element. These cupcakes are not just desserts; they are edible centerpieces that enhance the entire party atmosphere!
A Roaring Success and More to Come!
There’s truly nothing more rewarding than seeing the wide-eyed wonder and genuine smiles on children’s faces when they see a birthday treat made just for them, especially one as imaginative as these dragon cupcakes. The effort put into these treats is always overshadowed by the pure joy they bring. These simple yet spectacular creations are perfect for unleashing a bit of magic at your child’s next birthday celebration, proving that even with a busy schedule, you can create something truly special and memorable.
I hope this tutorial empowers you to create your own magnificent dragon cupcakes. They’re a fantastic way to celebrate creativity and bring a beloved fantasy theme to life. Keep an eye out for my next post, where I’ll share the tutorial for my daughter’s equally adorable birthday cupcakes. Until then, happy baking and decorating!