
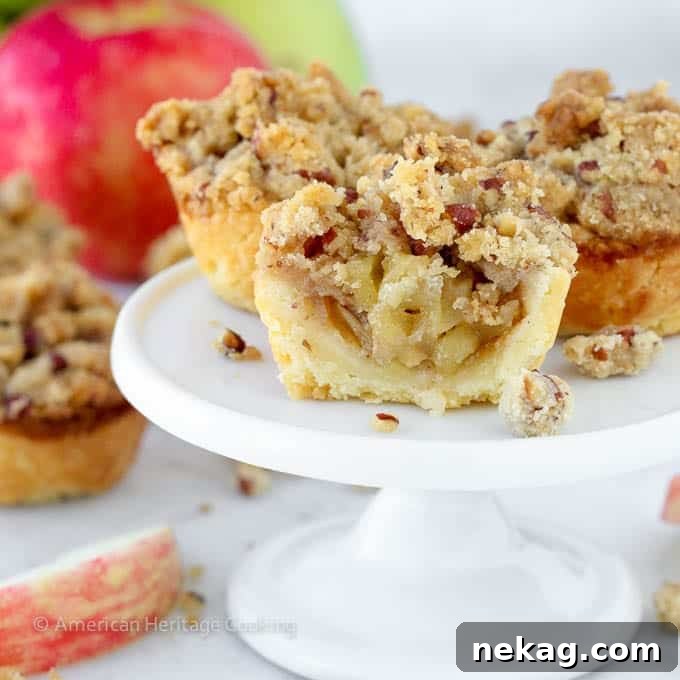
Delectable Mini Apple Pies: The Perfect Bite-Sized Treat with a Cream Cheese Crust
Indulge in these irresistible Mini Apple Pies, a delightful twist on a classic dessert that’s perfect for any occasion. Each bite-sized pastry features a remarkably easy, press-in cream cheese crust, cradling a rich and warmly spiced apple pie filling. Crowned with a crunchy brown sugar pecan crumble topping, these individual pies are baked to golden perfection in muffin tins. Whether you’re looking for an impressive addition to a cookie platter, a charming party dessert, or simply a comforting afternoon snack, these mini apple pies are guaranteed to be a crowd-pleaser.
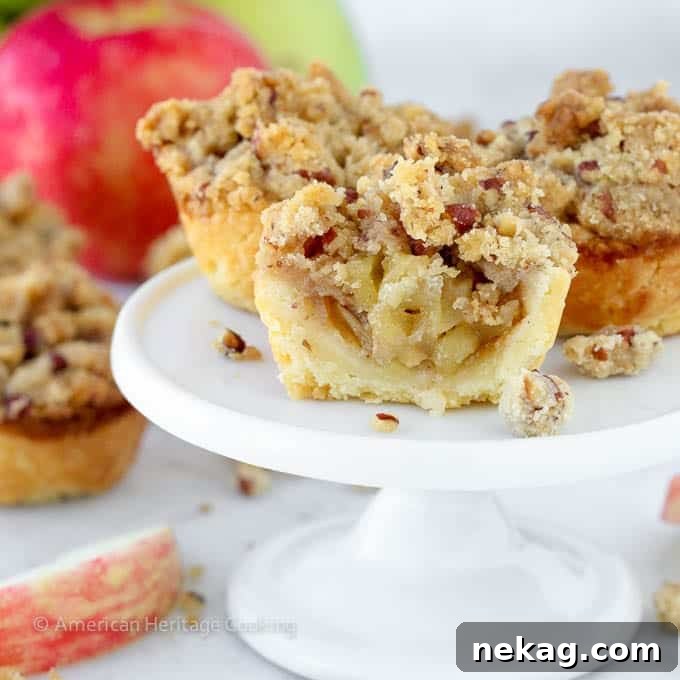
A Quick Overview of This Delightful Recipe
Planning your baking adventure? Here’s a snapshot of what to expect when making these scrumptious mini apple pies:
- Prep Time: 30 minutes – A speedy start thanks to our simple press-in crust.
- Cook Time: 25-30 minutes – Just enough time for the apples to soften and the crust to turn golden.
- Total Time: Approximately 55 minutes – From mixing bowl to oven, you’ll have these pies ready in under an hour!
- Servings: 24 mini pies – Ideal for sharing, gifting, or stocking up your freezer.
- Calories: Approximately 150 kcal per pie (based on nutrition panel) – A perfectly portioned treat.
- Key Technique: Effortlessly press tender cream cheese dough into mini muffin tins, generously fill with a fragrant spiced apple mixture, top with a crunchy pecan crumble, and bake until golden brown.
- Flavor Profile: Experience a harmonious blend of a rich, buttery cream cheese crust, a warm and aromatic apple cinnamon-cardamom filling, and a delightful crisp brown sugar pecan topping that adds texture and nutty depth.
- Difficulty: Confident Beginners – While impressive, this recipe is designed to be approachable with easy-to-follow steps, yielding a sophisticated bite-sized dessert.
Featured Comment
⭐⭐⭐⭐⭐ “My grandson wanted something apple for his October wedding. Wedding cake is my renowned coconut cake and then 5 or 6 mini desserts. Your apple crumbles will be perfect!” -Lora
Why You Will Absolutely Adore This Mini Apple Pie Recipe:
These mini apple pies are more than just a dessert; they’re a delightful experience waiting to happen. Here’s why this recipe will quickly become a favorite in your baking repertoire:
- Effortless Press-In Cream Cheese Crust: Forget rolling and chilling traditional pie dough! This incredible crust recipe, passed down from my great-grandmother, is the same one used for my popular pecan tassies. It’s incredibly tender, flaky, and unbelievably easy to press into mini muffin tins, twisting out cleanly once baked. The cream cheese adds an unparalleled richness and subtle tang that perfectly complements the sweet apple filling.
- Exquisitely Balanced Flavors: Every component of these mini pies works in harmony to create a symphony of taste. The sweet, vanilla-infused brown sugar crumble offers a satisfying crunch. Beneath it, the apple filling, generously spiced with aromatic cardamom and classic cinnamon, provides a warm and comforting core with just the right amount of tartness. Finally, the delicate cream cheese crust grounds these flavors, creating a truly unforgettable dessert. We believe this will be the best mini apple pie you’ve ever tasted!
- Perfect for Making Ahead and Freezing: Planning for a party, a holiday, or just want to have delicious treats on hand? This recipe is incredibly freezer-friendly! Prepare a large batch of these charming tiny pies, bake them, and then freeze for future enjoyment. Simply thaw as many as you need at room temperature whenever a craving strikes, making them the ultimate convenient indulgence.
Table of Contents
- A Quick Look at the Recipe
- Why You Will Love This Recipe:
- Ingredients Needed
- Variations & Substitutions
- Professional Tips for Making Tiny Pies
- How to Make Mini Apple Pies
- Chef Lindsey’s Recipe Tip
- Recipe FAQs
- Recommended Apple Dessert Recipes
- Mini Apple Pies Recipe
- Before You Go
These delightful bite-sized treats encapsulate all the comforting flavors of a classic apple pie, but in a charming individual serving. The heart of these pies lies in their sweet and slightly tart cinnamon-cardamom apple filling, perfectly complemented by a crisp vanilla brown sugar crumble topping. For an even quicker route to deliciousness, you could even prepare a big batch of my easy apple compote to use as the flavorful base for the mini apple pie filling.
The flaky and rich cream cheese pastry provides a wonderful contrast to the vibrant spiced apple filling. While this unique crust is incredibly easy and yields outstanding results, feel free to adapt the recipe to your preference. You could opt for a store-bought pie crust for ultimate convenience or craft this foolproof vodka pie crust for an extra tender result. The easy crumble topping includes pecans for a nutty crunch, but if you’re looking for a nut-free alternative, my versatile streusel topping recipe would also be absolutely delightful!
Essential Ingredients for Your Mini Apple Pies
Gathering the right ingredients is the first step to baking success. Here’s a detailed look at what you’ll need and why each component is vital for the perfect mini apple pie:
- Butter: For both the crust and the crumble, butter is key to achieving that rich, decadent flavor and tender texture. Whether you use unsalted or salted butter, it will enhance the overall taste, as no additional salt is specified in these components. I generally recommend unsalted butter to control the salt content precisely.
- Cream Cheese: This is the secret ingredient for our unique crust! I always reach for original Philadelphia Cream Cheese for all my baked goods due to its consistent quality. Incorporating cream cheese into the dough not only adds richness and a delightful subtle tang but also creates an incredibly soft and tender pastry shell. Unlike butter, cream cheese behaves differently when baked, contributing to a distinct melt-in-your-mouth texture that is simply divine.
- All-Purpose Flour: The foundation of our crust and crumble. All-purpose flour contains just the right amount of gluten to create a tender, flaky shell when handled correctly. For an even more delicate crust, you could also opt for pastry flour.
- Apples: The star of our filling! Just like in my easy apple pie, selecting a blend of apples is crucial for a balanced flavor and texture. Choose a mix of tart varieties like Granny Smith apples (for that essential tang) and sweeter options such as Gala, Honeycrisp, Braeburn, or Fuji. This combination ensures a complex and vibrant homemade apple pie filling.
- Brown Sugar: Used in both the filling and the crumble. Light brown sugar is specified as it imparts a subtle molasses flavor, allowing the apple and spice notes to shine through without being overshadowed. You can use either light or dark brown sugar, but adjust sweetness if using dark.
- Cinnamon: A quintessential apple pie spice. Choose a high-quality cinnamon, as its robust flavor is paramount to the comforting taste of the filling, much like in my beloved easy apple crisp.
- Cardamom: This aromatic spice elevates the apple filling, adding a sophisticated, fragrant note. For the freshest and most intense flavor, I highly recommend grinding cardamom seeds fresh in a spice or coffee grinder. However, pre-ground cardamom is also perfectly acceptable and will still deliver delicious results.
- Lemon Juice: Freshly squeezed lemon juice is indispensable. It brightens the fresh fruit flavors, much like it does in my mixed berry jam, and adds a crucial touch of acidity to balance the sweetness of the apples and sugar. This recipe typically uses the juice from one large, juicy lemon. Don’t let the zest go to waste – save it for a classic pumpkin pie with a twist, or even for making mini pumpkin pies using this very same versatile crust!
- Nutmeg: A grate of fresh nutmeg offers a truly delightful, warm aroma and flavor. While fresh is always best, ground nutmeg will also work wonderfully to complement the other spices in the apple filling.
- Kosher Salt: A pinch of kosher salt is vital for enhancing and balancing all the sweet flavors in the filling, preventing them from being cloyingly sweet.
- Cornstarch: This acts as a thickener for the apple filling, ensuring it sets beautifully and isn’t too runny when baked.
- Vanilla Extract: Essential for adding a warm, sweet aroma and flavor to the crumble topping. Opt for a good quality pure vanilla extract for the best results.
- Pecans: These provide a fantastic nutty crunch and rich flavor to the crumble topping. I prefer to lightly toast the pecans first to deepen their flavor, then chop them. For convenience, you can give them a quick pulse in a food processor, or even make the entire crumble topping in the food processor if you wish!
For precise measurements and quantities, please refer to the comprehensive recipe card located at the end of this article.
Creative Variations & Easy Substitutions
While this mini apple pie recipe is perfect as written, it’s also wonderfully versatile, allowing you to customize it to your taste or dietary needs. Explore these exciting variations and substitutions to make the recipe your own:
- Embrace a Traditional Pie Crust or Lattice Topping: If you adore classic pie crusts, these mini pies would be equally fantastic with my all-butter pie crust or my reliable Crisco pie crust. You can either keep the streusel topping for simplicity or elevate their appearance by following my detailed tutorial on how to lattice pie crust to create charming miniature lattice tops.
- Experiment with Diverse Flavor Profiles: Get creative with your spice blend! Try adding a generous pinch of allspice, use my signature homemade apple pie spice mix, or even infuse the pies with the cozy warmth of pumpkin spice. Instead of lemon juice, consider using orange juice for a brighter citrus note or spiced apple cider for an extra layer of apple flavor. For an ultimate indulgence, drizzle homemade salted caramel sauce directly into the apple filling before baking to create luscious mini caramel apple pies.
- Pre-Cook Your Apple Filling for a Fuller Pie: For those who prefer a truly “mile-high” apple pie experience, consider pre-cooking your apple filling slightly in a small saucepan, similar to the technique used in my mile high apple pie or apple hand pie recipe. This step softens the apples before they go into the crust, allowing you to pack even more delicious apple mixture into each tiny pie shell, resulting in a more substantial and satisfying bite.
Professional Tips for Crafting Perfect Tiny Pies
Baking miniature desserts can be incredibly rewarding, and with these expert tips, you’ll achieve flawless results every time:
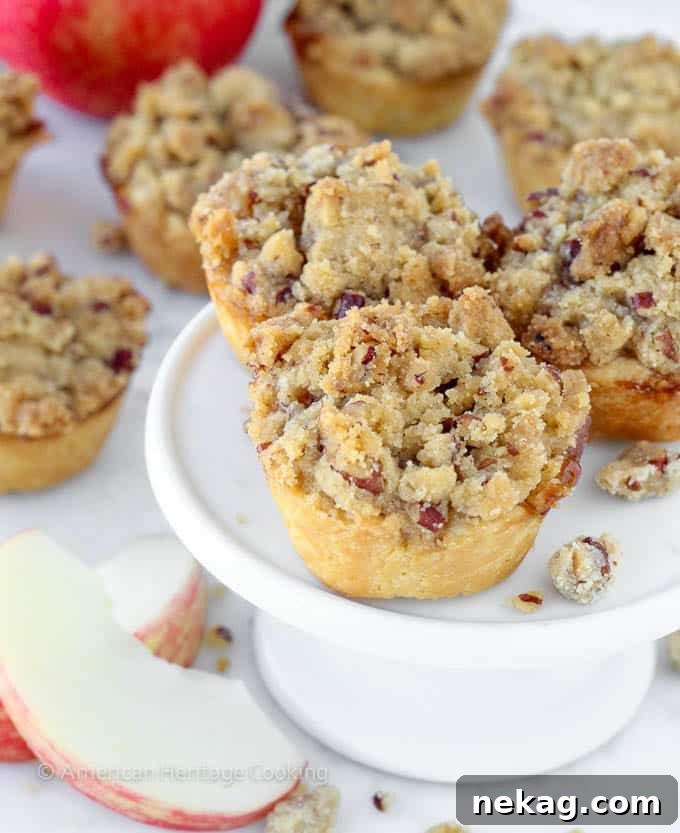
- Embrace the Simplicity of a Streusel Topping: While tiny lattice tops might look adorable in photos, they can be quite time-consuming and fiddly for a batch of mini pies. Our delicious streusel topping not only tastes incredible with its buttery, sweet, and nutty notes, but it also significantly simplifies the preparation process, saving you valuable time and effort. Plus, any leftover streusel can be generously sprinkled over my Berry Crumble Recipe for another fantastic dessert!
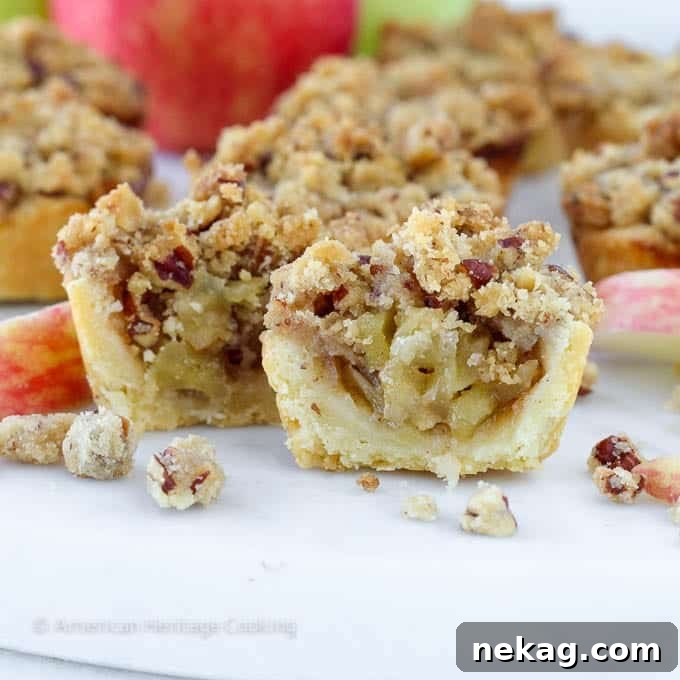
- Dice Apples Finely for Optimal Cooking: Unlike recipes for larger pies or my apple pie cookies where the filling might be pre-cooked, this recipe keeps things super easy by using raw apples. This means it’s absolutely crucial to cut your apples into very small, uniform pieces (about ¼-inch dice). Small pieces ensure that the apple filling will cook through and soften perfectly within the same timeframe it takes for the mini crusts to bake to a beautiful golden brown, preventing any crunchy surprises.
- Don’t Over-Complicate the Process: One of the beauties of this recipe is its forgiving nature. There’s no need for exact measurements when dividing the dough. Simply eyeball 24 small pieces for your mini muffin tins and gently press them in. Fill each cup generously to the top with the apple mixture – don’t worry, it will cook down significantly – then heap on a good amount of streusel. Bake until the crusts are golden brown and the filling is visibly bubbling around the edges. Trust your instincts!
- Allow for Complete Cooling and Use the Right Tools: Patience is a virtue, especially when it comes to removing these delicate mini pies. Once baked, it’s essential to let them cool completely in the muffin tins. As they cool, the butter in the crust solidifies slightly, making them much easier to remove without breaking. If a pie is stubborn and doesn’t twist out easily, gently run a small offset spatula or a thin paring knife around the edges to loosen it. This technique helps ensure each pie maintains its perfect shape.
Step-by-Step Guide: How to Craft Your Own Mini Apple Pies
Follow these detailed instructions to create consistently perfect mini apple pies every time. More specific details, exact measurements, and ingredient quantities can be found in the comprehensive recipe card below.
Part 1: Preparing the Irresistible Cream Cheese Crust
Step 1: Preheat and Prepare. Begin by preheating your oven to a steady 350°F (175°C). For this recipe, I find that a good quality nonstick mini muffin tin doesn’t require any additional greasing or spraying, making cleanup a breeze.
Step 2: Combine the Crust Ingredients. In the bowl of a stand mixer fitted with the paddle attachment, or in a large mixing bowl if working by hand, add the all-purpose flour. Cut your cold butter and cream cheese into small cubes, then add them to the flour. If using a stand mixer, mix on low speed until the dough comes together in a cohesive ball. If mixing by hand, use a pastry blender or two knives to cut the butter and cream cheese into the flour until the mixture resembles coarse crumbs, then work it gently until it forms a dough. The key here is to keep working it past the point you might normally stop for a traditional pie crust, as the cream cheese needs to fully incorporate to create that signature tender texture.
Chef’s Shortcut: The Food Processor Method! For an incredibly quick and easy crust, I highly recommend using a food processor. Simply add all the crust ingredients (flour, butter, and cream cheese) to the food processor bowl and pulse until a smooth dough forms. This method takes less than a minute and is wonderfully efficient!
Step 3: Portion the Dough. Gently gather the dough into a single ball. Now, divide this ball into 24 smaller, roughly equal pieces. You can do this by eye, or for more precision, roll the dough into a log, cut it in half, then divide each half into thirds, and finally divide each third into 4 pieces using a bench scraper or knife. Don’t stress too much about perfect equality; the dough is pliable enough that you can pinch off a bit from a larger piece and add it to a smaller one if needed – it’s a classic baker’s “robbing Peter to pay Paul” scenario!
Step 4: Form the Crusts. Roll each small piece of dough into a neat ball. This step helps create a more finished look for your crusts. Then, firmly press each ball into one cup of your miniature muffin tin using your forefinger, working the dough up the sides to create a small, even crust. Ensure that the sides and bottom are not too thin; this is crucial. A thin crust can lead to the delicious apple filling bubbling out and sticking to the muffin pan, making removal difficult. If you notice a spot that’s too thin, simply borrow a tiny bit of dough from a “chubbier” ball to reinforce it.
Part 2: Preparing the Aromatic Filling & Crunchy Topping
Step 5: Mix the Apple Filling. In a medium-sized bowl, combine your finely diced apples, light brown sugar, fresh lemon juice, cinnamon, ground cardamom, a pinch of ground nutmeg (freshly grated if possible), and kosher salt. Toss all the ingredients thoroughly to ensure the apples are evenly coated with the sweet and spicy mixture. Taste the mixture and adjust the sugar, lemon juice, or spices to your personal preference. Finally, sprinkle the cornstarch over the apple mixture and toss again until the apples are evenly coated; this will help thicken the filling as it bakes.
Step 6: Create the Pecan Crumble Topping. In a separate small bowl, pour in the melted butter and stir in the vanilla extract. Add the all-purpose flour, light brown sugar (packed), and finely chopped toasted pecans. Using a fork, stir all the ingredients together until they are equally moistened. The mixture should clump together when squeezed lightly in your hand, then break apart into delightful crumbles. If the mixture seems too dry, add melted butter one teaspoon at a time, being careful not to overdo it, as too much moisture will result in a greasy rather than crunchy-soft crumble. Also, ensure your pecans are finely chopped; larger pieces can hinder crumble formation.
Part 3: Assembling & Baking Your Mini Apple Pies
Step 7: Fill the Pastry Shells. Carefully spoon about a teaspoon of the prepared apple filling into each unbaked pastry shell. Don’t be shy – the filling should come right up to the top of the crust, as the apples will cook down and soften considerably during baking.
Step 8: Top with Crumble. Generously press a good amount of the pecan crumble mixture onto the top of each mini pie. Make sure to mound it slightly; a robust layer of crumble ensures that your finished pies have a beautiful, golden, and satisfyingly textured topping.
Step 9: Bake to Perfection. Place the muffin tin into your preheated oven and bake for 25-30 minutes. Keep an eye on them until the apple filling is visibly bubbling around the edges of the pies, and both the crumble topping and the cream cheese crusts have turned a gorgeous golden brown. Once baked, remove the tin from the oven and let the mini pies cool completely in their tins on a wire rack. Cooling is crucial for easy removal. To release them, I’ve found that gently spinning each pie in its tin to loosen the edges, then pressing down softly on one side, is an effective way to remove them without damaging the delicate shells. You can also use a small offset spatula or a paring knife to carefully lift them out if needed.
Preventing Bubbling Over: If you’re concerned about your mini pies bubbling over in the oven and creating a sticky mess, a simple preventative measure is to place a baking sheet lined with parchment paper on the rack directly below your muffin tin. This catches any errant drips, keeping your oven clean!
Chef Lindsey’s Expert Recipe Tip
For this specific cream cheese crust recipe, I strongly advise against chilling the pie dough before you begin pressing it into the muffin tins. Chilling this particular dough can cause it to puff up excessively during baking, much like classic puff pastry. This unintended puffing might, in turn, force some of the delicious apple filling out of the mini muffin tins, leading to a less neat and potentially messier result. Work with the dough at room temperature for the best outcome.
Frequently Asked Questions About Mini Apple Pies
Proper storage is key to enjoying your mini apple pies for longer. You can store these delicious pies at room temperature for up to one week, though for optimal freshness and texture, I recommend consuming them within 3-4 days. If you need to extend their shelf life, they can be refrigerated for up to two weeks or frozen for up to 3 months. When ready to serve from frozen, simply thaw them at room temperature for a few hours before indulging. Freezing them after baking is a fantastic way to enjoy homemade goodness whenever you wish!
While some bakers prefer to leave apple peels on for added fiber and color, I personally always peel apples for my pies, particularly for mini apple pies. The peels tend to retain their firmness and do not break down adequately during the cooking process, which I find creates an unappealing texture in the finished pie. However, if you don’t mind the texture or prefer to save time, you certainly don’t have to peel them.
Mini apple pies are incredibly versatile in how they can be served! They are perfectly delicious at room temperature, making them an excellent grab-and-go treat, much like a gourmet cookie. For a warm, comforting experience, gently reheat them in the oven or an air fryer until just warmed through. Elevate your serving with a decadent drizzle of homemade salted caramel sauce, a rich butterscotch sauce, or my signature maple caramel sauce. For a classic pairing, serve alongside a generous scoop of creamy vanilla ice cream or a delicate spoonful of vanilla crème anglaise. They’re also fantastic simply dusted with powdered sugar!
More Irresistible Apple Dessert Recipes You’ll Love
Summer Dessert Recipes
Apple Hand Pies
Cookie Recipes
Apple Pie Cookies
Fall Dessert Recipes
21 Best Apple Dessert Recipes
Summer Dessert Recipes
Easy Apple Pie
If you tried this recipe and loved it, please take a moment to leave a 🌟 star rating and share your thoughts in the comments section below. Your feedback truly brightens my day, and I love hearing about your baking successes!
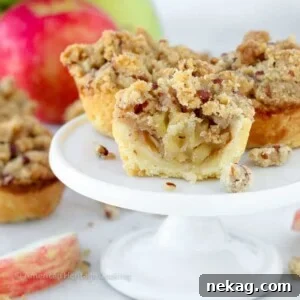
Mini Apple Pies
Comment
Print Recipe
Ingredients
For the Crust:
- 1 cup all-purpose flour
- ½ cup unsalted butter
- 3 oz cream cheese
For the Apple Filling:
- 2 apples peeled and diced into small pieces
- ½ cup light brown sugar not packed
- 2 tablespoons fresh lemon juice
- ¼ teaspoon cinnamon
- ⅛ teaspoon ground cardamom or more to taste
- pinch ground nutmeg fresh is better but you could use a ground as well
- ¼ teaspoon kosher salt
- 1 teaspoon cornstarch
For the Crumble:
- ¼ cup unsalted butter melted
- ¼ teaspoon vanilla
- ½ cup light brown sugar packed
- ½ cup all-purpose flour
- ½ cup toasted pecans finely chopped
Instructions
To make the crust:
-
Preheat the oven to 350℉ (175°C).
-
Sift flour into a medium sized bowl. Cut butter into small cubes and add to flour. Add the cream cheese and cut the butter and cheese into the flour with two knives or a pastry blender. Continue until the dough holds together. Since we aren’t adding any additional liquid, you’ll want to continue to blend way past the stage at which you would normally stop with a pie crust, to ensure the cream cheese is fully incorporated for a tender result. Alternatively, use a food processor for a quick dough.
-
Gather the crust into a ball and divide into 24 little pieces. A helpful method is to form a small log from the dough, divide it into half, then roughly divide each half into thirds using a bench scraper or knife. Finally, divide each third into 4 pieces. The dough is pliable, so you can easily adjust sizes by pinching off from larger pieces and adding to smaller ones.
-
Roll each piece into a small ball for a neat finish, then press each into one cup of a miniature muffin tin with your forefinger to create a uniform crust. Ensure that the sides and bottom of each crust are not too thin to prevent filling from escaping during baking.
To make the Apple Pie Filling:
-
Combine finely diced apples, light brown sugar, fresh lemon juice, cinnamon, cardamom, nutmeg, and kosher salt in a medium bowl. Toss thoroughly to coat the apples evenly. Taste and adjust the sweetness, tartness, or spice levels as desired. Lastly, add the cornstarch and toss until the apples are uniformly coated to ensure a properly thickened filling.
Make the Crumble Topping:
-
Stir the vanilla extract into the melted butter. Add all the remaining crumble ingredients (flour, brown sugar, and chopped pecans) to the bowl. Mix with a fork until all ingredients are evenly moistened and the mixture resembles coarse crumbs. When squeezed, the crumbles should hold together before breaking apart. If the mixture is too dry, add more melted butter 1 teaspoon at a time, being cautious not to make it greasy.
-
For the best crumble texture, ensure your pecans are finely chopped. Larger pieces can prevent the crumbles from forming properly.
Assemble the Pies:
-
Spoon approximately one teaspoon of the apple filling into each unbaked pastry shell. Fill the shells generously to the top, as the apple mixture will cook down significantly.
-
Press a good amount of the prepared crumble topping onto the surface of each mini pie. Make sure to mound it slightly to ensure a generous and satisfying crumble layer on the finished pies.
-
Bake in the preheated oven for 25-30 minutes, or until the apple filling is bubbling around the edges and both the crumble topping and pie crusts are beautifully golden brown. Once baked, remove from the oven and allow the pies to cool completely in their tins on a wire rack before attempting to remove them. To release, gently spin each pie in the tin to loosen the edges, then press down on one side to lift it out without breaking.
Notes
Flavor Variations: Feel free to customize the spice profile of your apple filling. Incorporate a large pinch of my signature apple pie spice mix for a traditional taste, or get creative by substituting orange juice or spiced apple cider for the lemon juice to introduce different citrus or autumnal notes. For an irresistible treat, add a swirl of salted caramel sauce into the filling before baking.
Storage Tips: These mini apple pies can be stored at room temperature for up to a week, refrigerated for up to two weeks, or frozen for up to 3 months. For optimal flavor and texture, I recommend storing them at room temperature for no more than 3 days, or freezing them for longer-term storage. Simply thaw at room temperature before serving.
Important Note on Muffin Tin Sizes: It’s worth noting that there are often two different sizes of mini muffin tins available on the market. This particular recipe is perfectly calibrated for the smaller-sized mini muffin tins. If you use a larger mini muffin tin, you may yield fewer pies, and baking times might need slight adjustment.
Nutrition
Before You Go… Explore More Chef-Tested Recipes!
I sincerely hope you enjoyed creating and savoring this professional chef-tested recipe for Mini Apple Pies. These delightful treats are a testament to how simple ingredients can come together to create something truly special. If you’re passionate about pies and looking for more delicious inspiration, I encourage you to explore our extensive collection of other chef-developed pie recipes on the site. From classic fruit pies to decadent cream pies, there’s a perfect pie waiting for every occasion and palate. You might also find endless apple-inspired ideas within our curated list of the 21 Best Apple Dessert Recipes. Happy baking, and happy eating!