


Revolutionize Your Fridge: The Ultimate Guide to Keeping Strawberries Fresh for Weeks
There’s nothing quite like the vibrant color and juicy sweetness of fresh strawberries. They’re a staple of summer desserts, healthy snacks, and delightful jams. However, anyone who has ever brought home a beautiful punnet of strawberries knows the bitter truth: their shelf life often seems to be measured in hours, not days. The joy of a fresh batch can quickly turn into the disappointment of mold and mush, leading to unnecessary food waste and wasted money.
Today, we’re diving into a game-changing hack that promises to extend the life of your precious berries significantly. This isn’t just a kitchen trick; it’s a science-backed method that I personally tested and found to be incredibly effective. Whether you’ve just picked a flat of strawberries from a local farm or snagged a great deal at the grocery store, this guide will equip you with the knowledge to keep them crisp, clean, and delicious for much longer than you thought possible.
I recently put this method to the test after purchasing an impressive eight-pound flat of strawberries for an unbelievably low price. After sorting through them to remove any already compromised berries, I applied this simple technique, and the results were truly pleasing. If you caught my Low-Sugar Strawberry Freezer Jam recipe, you know I had an abundance of these ruby red gems, making it the perfect opportunity to verify this brilliant preservation hack. Let’s eliminate spoilage and embrace lasting freshness!
Why Do Strawberries Spoil So Quickly? Understanding the Enemy of Freshness
Before we dive into the solution, it’s helpful to understand the primary culprits behind rapid strawberry spoilage. Strawberries are delicate fruits, highly susceptible to several factors:
- Mold Spores: These microscopic organisms are present everywhere, including on the surface of your berries. They thrive in moist environments and are the main cause of the fuzzy white or gray growth you often see.
- Moisture: Excess moisture, whether from washing and not drying properly or condensation within packaging, creates an ideal breeding ground for mold and bacteria.
- Ethylene Gas: Like many fruits, strawberries release ethylene gas as they ripen. While necessary for ripening, too much accumulated ethylene can accelerate spoilage, especially if the berries are stored in sealed containers.
- Physical Damage: Bruises or cuts can break the delicate skin, allowing bacteria and mold to enter more easily, speeding up decay.
Our goal with this preservation method is to tackle these issues head-on, particularly by sanitizing the berries and ensuring they are stored in an optimal, dry environment.
The Game-Changing Method: A Simple Vinegar Wash for Extended Freshness
This method, widely popularized as a “Pinterest trick,” leverages the natural antimicrobial properties of white vinegar to combat mold and bacteria, significantly extending the shelf life of your strawberries. Don’t worry, your berries won’t taste like vinegar!
Step 1: The Cleansing Soak – Vinegar and Cold Water Bath
The first crucial step is to prepare a cleansing bath for your strawberries. This solution will sanitize the berries and wake them up, helping them stay crisp.
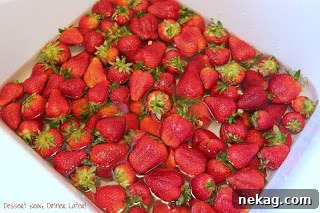
Begin by filling a clean sink or a large bowl with a mixture of white vinegar and cold water. The ideal ratio is 1 part white vinegar to 10 parts cold water. For instance, if you have a large batch of strawberries like my 8-pound flat, you might use 2 cups of white vinegar mixed with 20 cups of cold water. The exact quantity isn’t critical, as long as the ratio is maintained and there’s enough liquid to submerge all your berries.
Gently place the whole strawberries, stems and all, into this solution. It’s important to keep the stems intact during this step, as removing them can create entry points for water and contaminants, accelerating spoilage. The white vinegar acts as a natural sanitizing agent, effectively killing mold spores and bacteria present on the surface of the fruit. This is the key to preventing premature decay. Rest assured, the vinegar dissipates and will not affect the taste of your fresh strawberries.
The cold water component serves a dual purpose. Firstly, it helps to thoroughly clean away any dirt, pesticides, or other residues from the fruit’s surface. As I discovered, my sink was visibly dirty after this step, proving just how effective it is at cleaning! Secondly, the cold water provides a mild “shock” to the strawberries, helping to tighten their cell structure and keep them firm and crisp rather than soft and mushy.
Allow the strawberries to soak for precisely 5 minutes. This duration is sufficient for the vinegar to work its magic without over-exposing the delicate fruit.
Step 2: Gentle Drying – The Importance of Removing All Moisture
After their refreshing bath, the strawberries must be dried thoroughly. This step is just as critical as the soak itself, as any residual moisture can negate the benefits of the vinegar wash and encourage mold growth.
Carefully transfer the soaked strawberries from the sink to a salad spinner. Work in batches if necessary to avoid overcrowding and ensure proper drying. Close the lid and GENTLY spin the strawberries until they are mostly dry. The salad spinner is an excellent tool for this, as it effectively removes surface water without bruising the delicate fruit. The emphasis here is on “gently”; aggressive spinning can damage the berries.
If you don’t own a salad spinner, don’t despair! You can carefully spread the strawberries in a single layer on clean paper towels or a clean kitchen towel. Allow them to air dry for an extended period, perhaps 30-60 minutes, gently rolling them occasionally, until they are completely dry to the touch. Patience is key here – a truly dry strawberry is a long-lasting strawberry.

Step 3: Optimal Storage – The Paper Towel & Uncovered Method
Once your strawberries are clean and thoroughly dry, it’s time to prepare them for storage. This final step is crucial for maintaining their extended freshness.
Line a clean, large bowl or container with several layers of paper towels. The paper towels will act as an absorbent layer, wicking away any residual moisture or condensation that might accumulate during refrigeration. This creates a drier micro-environment around the berries, which is inhospitable to mold.
Carefully arrange the clean and dry strawberries in a single layer, or as few layers as possible, on top of the paper towels. Avoid packing them too tightly, as good air circulation is beneficial. Crucially, leave the bowl uncovered. While it might seem counterintuitive to leave them open, covering them traps moisture and ethylene gas, both of which accelerate spoilage. By leaving them uncovered, you allow for air circulation, which keeps the environment dry and fresh.
Place the uncovered bowl in your refrigerator. The crisper drawer is often a good spot, but ensure it’s not overly humid. And just like that, you’re done! Your strawberries are now primed for extended enjoyment.

Proof in the Pudding: Real-World Results
My personal experiment with this method yielded impressive results. I bought my flat of strawberries on a Wednesday and applied this trick on Thursday. The majority of these berries, which were already quite ripe when purchased, lasted for an additional 4 days after the wash before showing any signs of softening or wrinkling. A significant portion (about 4 pounds) lasted for nearly a full week! We enjoyed some of the softer ones immediately, transformed others into delicious freezer jam, and served the rest with my popular Coconut Cream Fruit Dip at a gathering. This extended freshness means less waste and more delicious moments.
Beyond Strawberries: The Versatility of the Vinegar Wash
The beauty of this method lies in its versatility. While tested primarily on strawberries, this clever hack is effective for nearly all types of delicate berries. Feel free to use this same vinegar wash and storage technique for:
- Blueberries: Known for their slightly longer shelf life, but this method can extend it even further.
- Raspberries: Among the most fragile berries, they particularly benefit from this gentle cleaning and drying.
- Blackberries: Similar to raspberries, blackberries will enjoy a prolonged freshness.
Always remember to be gentle with these delicate fruits throughout the process.
Essential Tips for Maximizing Strawberry Freshness
- Sort Before You Soak: Always inspect your strawberries and remove any moldy, bruised, or overly soft berries *before* washing. One bad berry can literally spoil the whole bunch.
- Keep Stems On (Until Ready to Eat): For the longest shelf life, leave the green tops (calyx) on your strawberries until just before you’re ready to consume them.
- Avoid Over-Washing: Only wash the quantity of strawberries you plan to eat within a few days or treat with the vinegar method. Unwashed berries stored dry in the fridge sometimes last a little longer than those simply rinsed with water and left to air dry.
- Don’t Store in Airtight Containers: While convenient, airtight containers trap moisture and ethylene gas, which are detrimental to berry freshness. The uncovered method is superior.
- Monitor Your Fridge: Ensure your refrigerator is set to the optimal temperature (around 35-40°F or 1-4°C).
- Consider Freezing Excess: If you still find yourself with an abundance of berries that you can’t eat in time, hull them (remove the green tops), slice them if desired, and freeze them in a single layer on a baking sheet before transferring to freezer bags. They’ll be perfect for smoothies, sauces, or baking later.
Frequently Asked Questions About Berry Preservation
Q: Will my strawberries taste like vinegar?
A: Absolutely not! The vinegar is highly diluted and evaporates quickly. Once dried, there will be no lingering vinegar taste on your berries. The primary role of the vinegar is to kill mold spores, not to flavor the fruit.
Q: Can I use apple cider vinegar or other types of vinegar?
A: While other vinegars have acidic properties, plain white vinegar is recommended because it is clear, has a neutral flavor profile, and is very effective as an antimicrobial agent without imparting any unwanted color or taste to your berries.
Q: How long can I expect my strawberries to last with this method?
A: While results can vary based on the initial ripeness and quality of your berries, most users report an extended shelf life of 4 to 7 days beyond what they would typically get, sometimes even longer. My own experience showed many lasting nearly a full week.
Q: Is this method safe?
A: Yes, it is perfectly safe. White vinegar is a food-grade product commonly used for cleaning and food preparation. The dilution ratio is gentle enough not to harm the fruit or pose any health risks.
Q: What if I don’t have a salad spinner?
A: No problem! After rinsing, gently spread the strawberries in a single layer on clean paper towels or a lint-free kitchen towel. Allow them to air dry completely for at least 30-60 minutes, gently turning them periodically, until there is no visible moisture.
Conclusion: Embrace Fresher Berries and Less Waste
Say goodbye to the frustration of rapidly spoiling strawberries. This simple, yet incredibly effective, vinegar wash method is a game-changer for anyone who loves fresh berries. By investing just a few minutes in proper cleaning and storage, you can significantly extend the life of your fruit, reduce food waste, and enjoy the delicious taste of summer for longer.
Give this trick a try the next time you bring home a batch of berries. You’ll be amazed at the difference it makes! Enjoy your perfectly preserved, crisp, and clean strawberries in all your culinary creations, from refreshing salads to delightful desserts.