
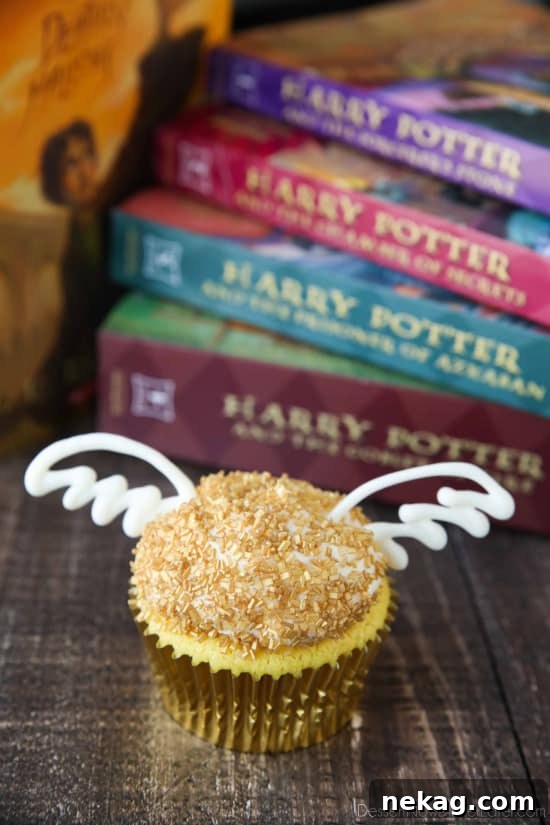
Prepare to cast a spell of enchantment over your next celebration! You don’t need a wand or advanced potion-making skills to conjure up these truly magical Golden Snitch Cupcakes for an unforgettable Harry Potter Birthday Party. This comprehensive guide will not only walk you through creating these iconic wizarding world treats but also immerse you in a world of DIY Harry Potter party ideas, ensuring your event is as dazzling as a trip to Diagon Alley.
Recently, we embarked on a magical journey to celebrate my eldest child’s birthday with a spectacular Harry Potter-themed party. The stars truly aligned for this occasion as it was his “golden birthday” – turning nine on the ninth of June! This coincidence inspired the perfect centerpiece for our dessert table: radiant Golden Snitch Cupcakes, glistening with edible gold. These weren’t just any cupcakes; they were a symbol of the magical pursuit that defines the beloved Quidditch game, perfectly capturing the spirit of the wizarding world for our young witches and wizards.
Crafting Enchanting Golden Snitch Cupcakes: A Simple Approach
While many enchanting ideas for Golden Snitch Cupcakes often involve elaborate designs using Ferrero Rocher chocolates or other delicate truffles as the “snitch” body, my goal was to create something equally charming but wonderfully straightforward. The vision was a dessert that would impress without requiring the skills of a professional patissier. Simplicity, elegance, and a touch of magic were the guiding principles for these treats.
To achieve this, I focused on key elements that would deliver maximum visual impact with minimal effort. The foundation began with shimmering gold cupcake liners, instantly elevating the festive mood. These were paired with a generous dusting of sparkling gold sprinkles, providing that unmistakable “golden” allure. For the iconic wings, I opted for white candy melts – an incredibly versatile and easy-to-use medium that allows for perfectly shaped, delicate wings that solidify beautifully. This combination proved to be a stroke of genius, offering a simple yet stunning result.
My son, ever the culinary critic, requested lemon cupcakes with a creamy cream cheese frosting. The vibrant yellow hue of the lemon cake complemented the gold accents perfectly, enhancing the “golden” theme. However, for those who prefer different flavors, a classic yellow or vanilla cake mix would also serve as an excellent base, providing a neutral canvas for the golden decorations. The key is the presentation, and with these simple tools, anyone can achieve a show-stopping dessert.
Planning a Magical Harry Potter Birthday Party
This particular birthday marked a special milestone as it was our child’s first “friends” party, inspiring me to pull out all the stops and immerse our guests in the enchanting world of Harry Potter. Every detail, from the invitations to the decorations and activities, was carefully chosen to transport everyone straight to Hogwarts.
Enchanting Invitations
The journey into the wizarding world began with the invitations. I discovered an absolutely adorable FREE printable Harry Potter Party Invitation from Bagvania, which instantly set the tone. Customizing them was a breeze; all I needed were some readily available FREE Harry Potter fonts to type in all our party details, making each invite feel like an official summons from the Ministry of Magic itself. These personal touches made receiving the invitation an exciting precursor to the party.
Spellbinding Decorations
Transforming our humble abode into a miniature Hogwarts was an exhilarating challenge. For the main decor, I printed stunning FREE Harry Potter House Banners from Paper Trail Design. These banners, representing Gryffindor, Hufflepuff, Ravenclaw, and Slytherin, added an authentic touch and allowed guests to pick their house affiliation. To further enhance the festive atmosphere, I purchased streamers in coordinating house colors and followed Party Majors’ fantastic tutorial to craft vibrant DIY Tassels. These handmade garlands swayed playfully, adding depth and texture to the party space. A large number balloon, signifying my son’s age, was a simple yet effective addition, sourced from a local Walmart. It came equipped with a straw for easy inflation and hanging holes, allowing me to string everything together with white twine for a cohesive look. Even the food labels received a magical makeover, thanks to FREE printable food labels from Just Sweet and Simple, personalized with the whimsical FREE Harry P font. These small details combined to create a truly immersive environment.
Feasting Like Wizards: Party Menu
No wizarding feast is complete without delicious treats. In addition to our homemade Golden Snitch Cupcakes (recipe below!), we served delectable Butterbeer, a recipe borrowed from Cooking Classy, which was an absolute hit with both children and adults. Preparing all these magical elements, especially the printables for decorations and gift bags, involved a considerable amount of printing and cutting. I highly recommend stocking up on printer ink, paper, sturdy card stock, and investing in a reliable paper trimmer. Don’t forget your glue and tape, as they’ll be your best friends in bringing your wizarding vision to life!
Magical Harry Potter Gift Bags: Treasures for Young Wizards
Sending our young guests home with a piece of the magic was paramount, and these Harry Potter gift bags were meticulously curated with delightful wizarding essentials. For the exterior of the bags, I designed a custom printable, combining the enchanting FREE Harry P font with captivating FREE Harry Potter templates, featuring iconic elements like a broomstick and the infamous Hogwarts letter. Each bag was a treasure trove, packed with items designed to extend the wizarding adventure beyond the party walls:
- – A Spell Book: We transformed inexpensive plastic photo albums into impressive spell books. Black card stock served as sturdy covers, and FREE printable spell pages from Lemon Squeezy Home were inserted, allowing each child to learn essential charms and incantations.
- – Origami Sorting Hat: Guests could discover their true house with a fun, interactive Origami Sorting Hat, a FREE printable from Get Away Today. This delightful craft provided a memorable take-home activity.
- – Chocolate Frog: No wizarding feast is complete without a Chocolate Frog! I used a Chocolate Frog candy mold from Amazon. Two bags of Guittard semi-sweet chocolate chips yielded 16 frogs, which was more than enough. Remember to tap the mold gently after pouring the chocolate to release any air bubbles, ensuring perfectly smooth frogs!
- – Harry Potter Glasses: Every aspiring wizard needs their signature spectacles! These Harry Potter Glasses, also available on Amazon, were an absolute favorite, instantly transforming the children into their favorite characters.
- – Lightning Bolt Tattoos: To complete the look, Lightning Bolt Tattoos from Amazon were a must-have. With 72 tattoos in a pack, I divided them into groups of six for each of the 12 children, stapling them together for easy distribution. The variety of designs ensured everyone found a favorite.
- – Polyjuice Potion: Quench a wizard’s thirst with “Polyjuice Potion”! I repurposed Kool-Aid Bursts (squeeze it) drinks, adding custom tags printed with the FREE Harry P font onto string tags purchased from Dollar Tree. These vibrant drinks were a fun and thematic addition.
Engaging Harry Potter Party Activities for Young Wizards
To ensure our party guests were thoroughly entertained and immersed in the wizarding world, we planned a series of interactive and creative activities. These experiences were designed to be both fun and age-appropriate for our 8-9 year old attendees, fostering creativity and a healthy dose of competition.
Crafting Custom Wands
Every witch and wizard needs a wand, and what better way to acquire one than to craft it themselves? We followed an ingenious tutorial for DIY Wands from Boxy Colonial. This activity proved simple enough for our age group, requiring just a few basic supplies: chopsticks as the base, hot glue for adding unique textures and designs, paint for personalized colors, and a sealant to protect their magical creations. The children absolutely adored this hands-on project, proudly showcasing their newly made wands, each one a unique masterpiece.
Harry Potter Trivia Challenge
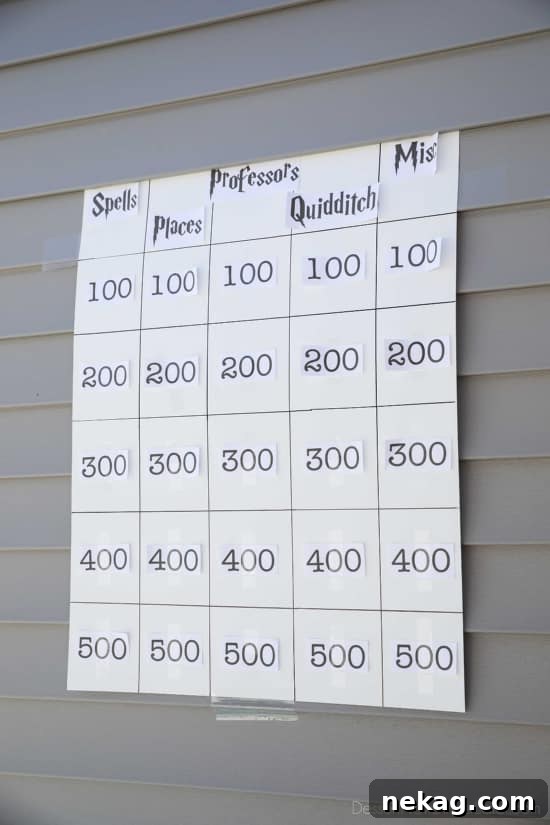
Following our wand-making session, we put their wizarding knowledge to the test with a thrilling FREE Harry Potter Trivia/Jeopardy game from Scholastic. I printed out the categories and point values, then carefully taped them onto a large poster board, mimicking the classic game show format. The competitive spirit was palpable as the kids eagerly answered questions about spells, creatures, and characters. The ultimate winner was rewarded with a bag of Rolos, playfully designated as “Gringott’s Gold,” a sweet reminder of their triumph in the magical quiz (not pictured, but certainly enjoyed!).
After the creative wand crafting and the mentally stimulating trivia game, it was time to refuel. We enjoyed a delicious pizza feast, accompanied by refreshing butterbeer and, of course, our star attraction: the golden snitch cupcakes. The atmosphere was vibrant and full of joy! Once the feasting concluded, the children eagerly retrieved their gift bags, immediately beginning to cast imaginary spells on each other with their new wands. It was a truly memorable and fantastic party, filled with laughter, magic, and cherished moments.
Mastering the Art of Golden Snitch Cupcakes: Step-by-Step
Creating these dazzling Golden Snitch Cupcakes is surprisingly simple, even for novice bakers. The key lies in a straightforward frosting technique and easy-to-make candy melt wings. Here’s how you can replicate this magic in your own kitchen:
Perfecting the Frosting Dome
The frosting technique for these cupcakes is designed for ease and visual appeal. I simply frosted them using an open coupler on a piping bag, employing a “dome” technique. This is similar to this “kiss” piping method, but without pulling up as sharply at the end. To achieve this, hold your piping bag directly in the center of the cupcake, close to the surface. Gently squeeze the bag, allowing the frosting to build up into a nice, rounded dome. Continue squeezing in the same spot until the frosting almost reaches the edges of the cupcake. If you notice any uneven spots or need more frosting in a particular direction, you can gently rotate or lift your wrist to guide the frosting. For any sharp tips that may form, a damp finger can be used to gently flatten them, creating a perfectly smooth, golden canvas.
Applying the Golden Sparkle
Once your frosting dome is complete, immediately grab your gold sprinkles. Generously sprinkle them over the entire frosted surface and gently press them onto the sides of the cupcake until it’s thoroughly covered in golden shimmer. Don’t be shy with the sprinkles – the more the merrier for that true Golden Snitch effect! After coverage, gently shake off any excess sprinkles to prevent them from scattering everywhere. This quick application ensures the sprinkles adhere perfectly to the fresh frosting.
Crafting Delicate Candy Melt Wings
The wings are the crowning glory of the Golden Snitch. To make them, melt white candy melts according to the package instructions. Once smooth, carefully pour the melted candy into a zip-top plastic bag and seal it shut. Snip off a tiny corner of the bag to create a makeshift piping tool. On a cookie sheet lined with wax paper, begin piping your wings. Start by piping a small, round “button” – this will serve as the base that anchors the wing securely into the cupcake frosting. From this button, pipe approximately four small points to form the bottom feathers of the wing, and then a graceful half-circle shape for the top part of the wing. You can see an example of the piped wings in the image above, showing them detached from the cupcake.
A little tip for efficiency: I found it easier to pipe all the right-sided wings first. Then, I simply flipped my cookie sheet around to pipe the left-sided wings upside-down, as piping to my left felt a bit awkward. Experiment to find the most comfortable method for you. These wings are incredibly easy to create and add that unmistakable magical touch!
The specific lemon cake and cream cheese frosting recipes I used are detailed below. However, feel absolutely free to substitute with your favorite yellow or vanilla cake recipe and buttercream frosting if you have a tried-and-true combination you love. The magic truly lies in the golden presentation and the delicate wings.
Golden Snitch Cupcakes
A truly magical dessert that’s surprisingly easy to make, perfect for any Harry Potter themed celebration!
Recipe Details
Prep Time: 30 mins | Cook Time: 15 mins | Total Time: 45 mins
Yields: 30 cupcakes
Created by: Amber Brady
Ingredients
Lemon Cupcakes:
- 3 cups (360 g) all-purpose flour (stir flour, then spoon into cup and level it)
- 2 tsp baking powder
- 1 tsp salt
- 1 cup (226 g) unsalted butter, room temperature
- 2 cups (200 g) granulated sugar
- 4 large eggs
- Zest of 4 lemons
- ⅔ cup (159 ml) fresh lemon juice
- Yellow food coloring, optional
- 1 cup (237 ml) buttermilk, room temperature
Cream Cheese Frosting:
- 16 ounces (452 g) cream cheese, cold
- 1 cup (226 g) unsalted butter, room temperature
- 2 cups (240 g) powdered sugar
- 2 tsp vanilla extract
Other Ingredients:
- 30 Gold Cupcake Liners
- 5.25 oz (155 g) Gold Sprinkles
- 6 oz (170 g) bag White Candy Melts
Instructions
To Make the Lemon Cupcakes:
- Preheat oven to 400 degrees Fahrenheit.
- In a large bowl, whisk together the flour, baking powder, and salt. Set aside.
- In the bowl of a stand mixer, cream the butter and sugar together with the paddle attachment until light and fluffy. Add the eggs one at a time, mixing thoroughly after each addition. Add the lemon zest, fresh lemon juice, and a few drops of yellow food coloring, if desired. Combine well.
- Alternate adding the flour mixture and buttermilk to the wet ingredients, beginning and ending with the flour mixture. Mix until just combined, being careful not to overmix!
- Line muffin tins with 30 gold cupcake liners. Fill cups ⅔ full with batter.
- Bake at 400 degrees Fahrenheit for 13-15 minutes, or until a toothpick inserted into the center comes out clean. Let cupcakes rest in the pan for 10 minutes before transferring them to a wire rack to cool completely.
To Make the Cream Cheese Frosting:
- Place the cold cream cheese in a mixing bowl. Using a hand mixer, beat until smooth and creamy.
- Gradually add the room temperature butter, 2 tablespoons at a time, and continue beating until the mixture is smooth and well blended.
- Add all of the powdered sugar and vanilla extract at once. Blend on low speed until combined, then increase speed to medium and beat until smooth. Do not beat for too long, or the frosting may become too soft to pipe. If this happens, simply place the frosting in the refrigerator or freezer for a short period until it firms back up to a pipeable consistency.
To Make the Wings:
- Melt the white candy melts according to the package directions (usually microwave or double boiler method). Pour the melted candy into a zip-top plastic bag and seal it securely.
- Snip a small corner off the bag to create a piping opening. Pipe wings onto a cookie sheet lined with wax paper.
- For each wing, pipe a small, round button (this will help support the wing in the frosting), then pipe about 4 small points to form the bottom feathers, and finally, a half-circle shape for the top of the wing. (For efficiency, you may find it easier to pipe all the right-sided wings, then flip your cookie sheet and pipe the left-sided wings upside-down. Do what feels most comfortable for your piping hand.)
- Place the cookie sheet with the piped wings into the refrigerator until the candy melts are completely set and firm. Each wing should be approximately 2.5 inches long. Make sure to create at least 60 wings (two per cupcake), plus a few extras in case any break during handling. Refer to the last image of this post for a visual guide on the wing shape.
To Assemble the Cupcakes:
- Pour the gold sprinkles into a large, shallow bowl. Prepare your piping bag by filling it with the cream cheese frosting, fitted with an open coupler (no specific tip needed).
- Pipe a beautiful dome on top of each cooled cupcake. To do this, hold your piping bag directly in the center of the cupcake, squeezing gently. Allow the frosting to build up, expanding outwards into a smooth, rounded dome until it almost reaches the edges of the cupcake. If desired, you can gently rotate or lift your wrist to ensure complete coverage. For any small peaks, lightly wet your finger with water and gently pat them down.
- Immediately after frosting each cupcake, carefully invert it into the bowl of gold sprinkles, or liberally sprinkle the gold sprinkles over the frosting and onto the sides until fully covered and shimmering. Gently tap the cupcake to shake off any excess sprinkles. Repeat this process for all cupcakes.
- Once all cupcakes are frosted and sprinkled, gently insert one left and one right candy melt wing into the frosting of each cupcake, positioning them on opposite sides to mimic the Golden Snitch.
- Serve your enchanting Golden Snitch Cupcakes to your guests and enjoy the magic!
Notes
To Store: Gently cover the finished cupcakes with plastic wrap and refrigerate. For best flavor and texture, allow the cupcakes to come to room temperature for about 30 minutes before serving.
Disclaimer: Nutritional values provided are estimations calculated using a third-party tool and should be considered as guidance only.
Sharing this recipe with a link is both encouraged and appreciated. Copying/pasting and/or screenshots of full recipes to any social media is strictly prohibited. Content and photographs are copyright protected.
Did you make this?
Don’t forget to leave a rating below and make sure to follow on Pinterest and Instagram for more magical recipes and party inspiration!