
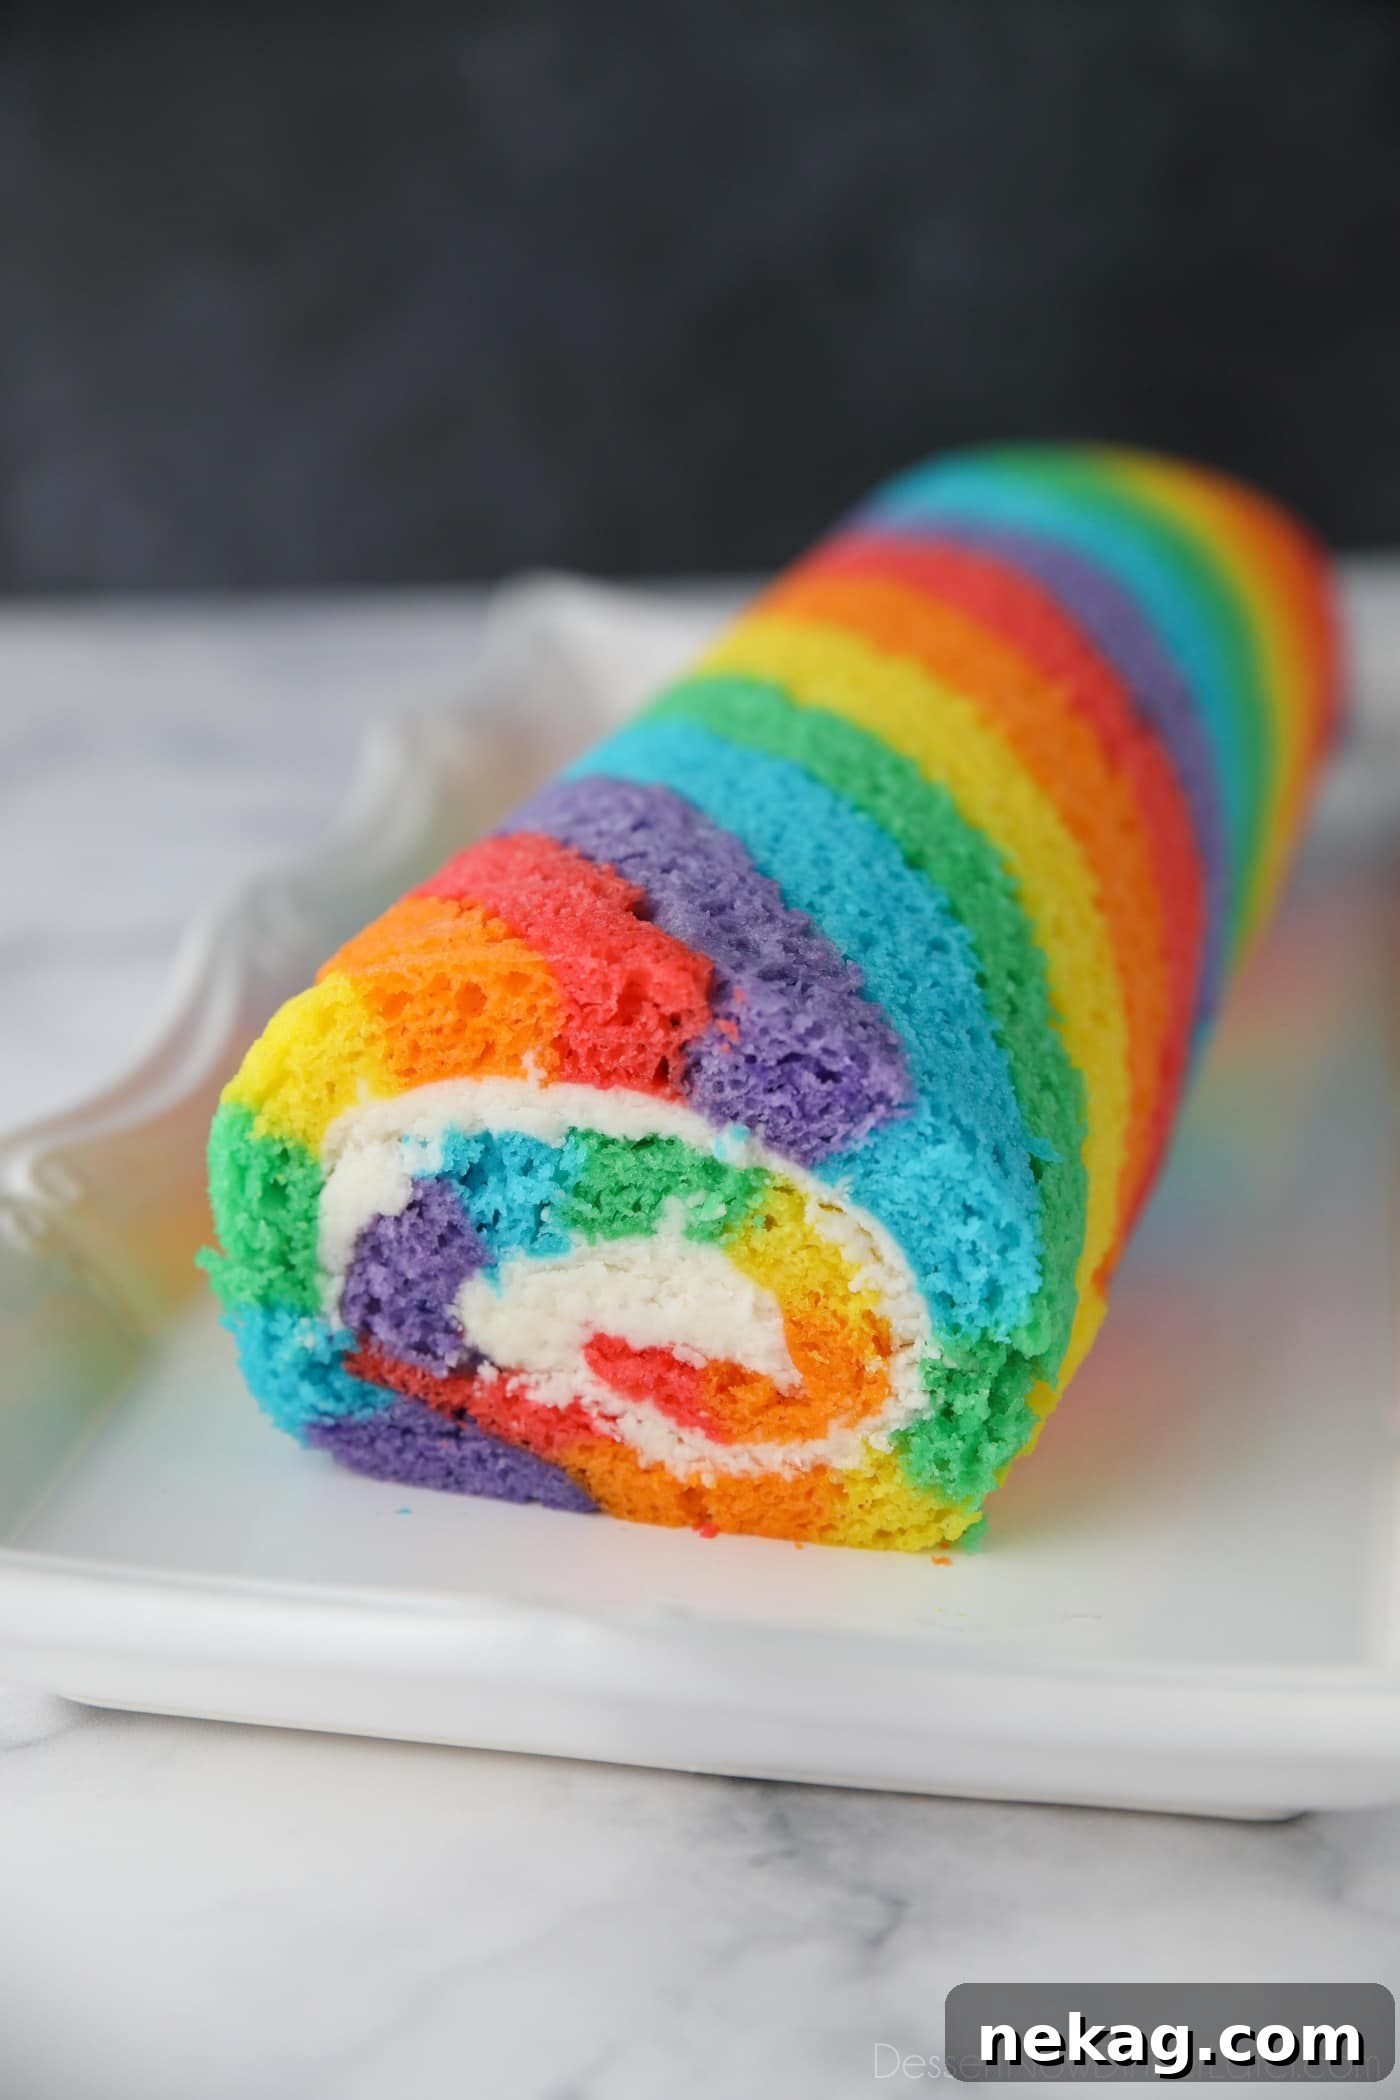
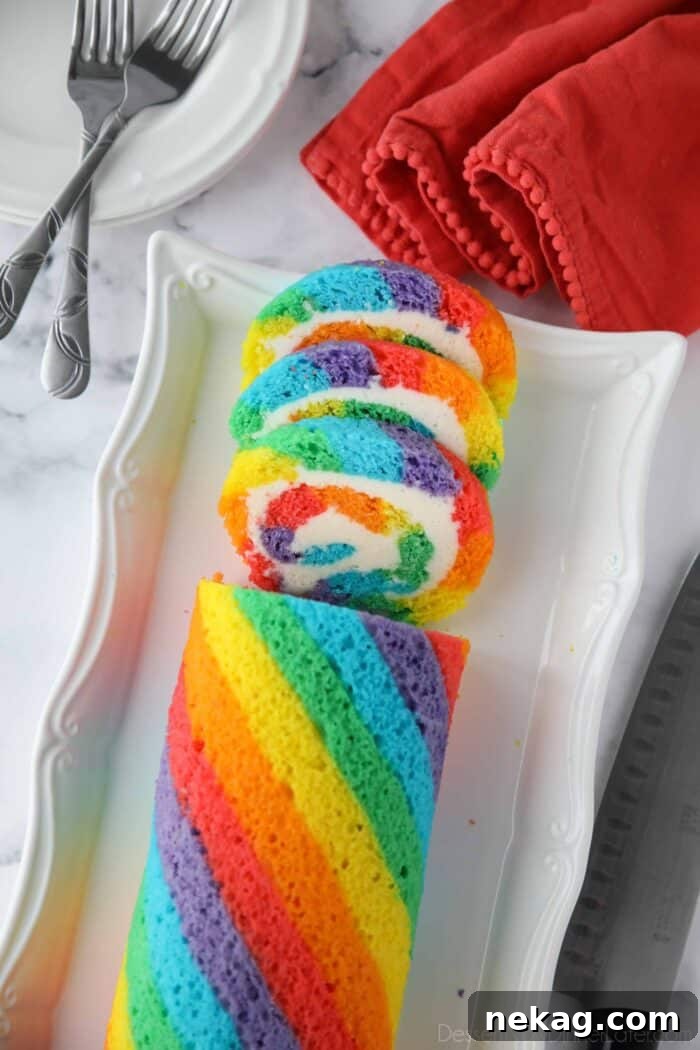
Unlock a world of vibrant flavors and stunning visuals with this incredible Rainbow Cake Roll, generously filled with luscious vanilla buttercream. This impressive dessert, often known as a striped Swiss roll, begins its journey with a simple cake mix, making it surprisingly accessible for home bakers eager to create something truly magical. Whether you’re planning a dazzling birthday celebration, a festive holiday gathering like St. Patrick’s Day, or simply want to brighten someone’s day, this colorful confection is guaranteed to be a showstopper. Follow our step-by-step guide and detailed photos to master the art of this beautiful, spiraled cake.
The Enchantment of Rainbow Desserts
There’s an undeniable joy that comes with seeing a spectrum of colors in a dessert. Rainbow desserts are inherently happy, and their vibrant hues have a way of evoking a childlike sense of wonder and excitement. For many, these colorful treats are more than just food; they’re an experience, a celebration of color that lights up any occasion. Each year, as St. Patrick’s Day approaches, I find myself drawn to the challenge and delight of crafting a new rainbow-themed confection.
My culinary adventures with color have led me to explore various forms. I’ve created delightful rainbow cupcakes in two distinct styles: one showcasing colored cake mix for a classic swirled effect, and another featuring homemade funfetti cupcakes adorned with brightrainbow icing. Both options offered unique visual appeal and a burst of flavor, proving the versatility of rainbow themes.
Beyond traditional desserts, I even ventured into making rainbow bread. While not strictly a dessert, it transforms into an incredibly fun and colorful base for dishes like French toast, adding a playful twist to breakfast or brunch. This year, my ambition led me to try something new and more intricate: to bake a stunning rainbow cake roll, a project that promised both beauty and a rewarding challenge.
Mastering the Striped Swiss Roll Technique
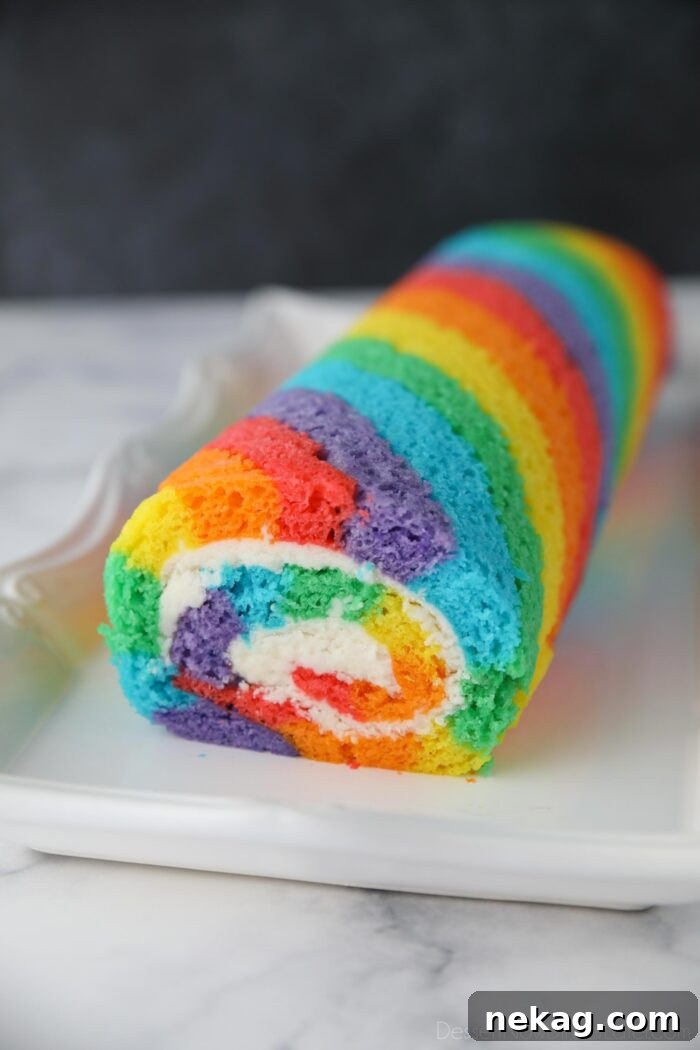
The Swiss roll, also affectionately known as a cake roll, is a classic dessert known for its elegant spiral of cake and filling. I’ve had the pleasure of baking several variations over the years, including a comforting pumpkin cake roll, a spiced carrot cake roll, and a rich red velvet cake roll. Each offered its own unique charm, but a striped cake roll remained an exciting frontier—until now.
The inspiration for this vibrant creation came from my friend, Mandy of Baking with Blondie, who is a true artist when it comes to multi-colored cake rolls. Her ingenious doctored cake mix recipe provided the perfect foundation. The idea of using a cake mix for a shortcut was particularly appealing, given the intricate process of mixing and piping six distinct colors. It promised to simplify the batter preparation, allowing more focus on the artistic elements.
However, through my experience developing and testing this rainbow cake roll recipe, I’ve come to realize that while the cake mix provides a head start, the overall process still demands a certain level of time, patience, and skill. The precise division of batter, the meticulous coloring, and the careful piping of each stripe elevate this recipe beyond a beginner’s casual bake. It’s a truly fun and rewarding recipe for those who enjoy a slightly more challenging project and are eager to impress with a visually spectacular dessert. Don’t let the challenge deter you; the payoff is absolutely worth the effort.
The Ultimate Guide: How to Make a Rainbow Cake Roll From Scratch
Crafting a breathtaking rainbow cake roll might seem daunting, but by breaking it down into manageable steps, you’ll find the process incredibly rewarding. Below is a condensed overview of the journey, followed by detailed instructions and helpful tips to ensure your success. While a cake roll made from a doctored cake mix can be slightly more delicate and fluffy than those made from scratch with denser batters, our expert tips will guide you every step of the way to a perfect finish.
- Prepare the Cake Batter: Begin by mixing your enhanced cake mix ingredients to create a smooth, consistent batter.
- Divide, Color, and Bag: Separate the batter into six portions, dye each a vibrant rainbow color, and carefully transfer them into piping bags.
- Pipe Perfect Stripes: Skillfully pipe the colored batters in diagonal rainbow stripes onto your prepared baking sheet.
- Bake and Roll Warm: Bake the cake until just set, then immediately and gently roll it up while still warm within its parchment paper.
- Cool and Unroll: Allow the rolled cake to cool completely, then carefully unroll it, preparing it for the filling.
- Fill with Vanilla Buttercream: Spread a generous layer of creamy vanilla buttercream over the unrolled cake.
- Re-roll with Filling: Tightly roll the cake back up, encasing the delicious frosting within its colorful layers.
- Chill to Perfection: Wrap and chill the cake roll thoroughly to set the shape and make slicing easier.
- Slice and Serve: Cut your chilled rainbow cake roll into beautiful slices and present this magnificent dessert.
NOTE: This cake roll, utilizing a doctored cake mix, tends to be exceptionally light and airy. We’ll share crucial tips to minimize cracking and ensure a picture-perfect presentation.
Step 1: Crafting the Perfect Doctored Cake Batter
The foundation of our spectacular rainbow cake roll lies in a perfectly prepared, “doctored” cake mix. This simple enhancement transforms an ordinary boxed mix into a rich, moist, and flavorful batter, ideal for the delicate nature of a Swiss roll. Start by preheating your oven to 325 degrees Fahrenheit. This lower temperature is key to ensuring the cake bakes evenly without becoming too crisp, which could lead to cracking when rolled. Next, prepare your baking vessel: a half sheet pan (approximately 13×18 inches). Line it meticulously with parchment paper, leaving a generous couple of inches of overhang on the shorter sides. This overhang will serve as convenient handles, allowing you to easily lift the delicate cake out of the pan once baked. For an extra layer of nonstick insurance, consider lightly spraying the parchment paper with Baker’s Joy or another flour-based baking spray. Set the prepared pan aside.
Now, let’s bring our batter to life. In a large mixing bowl, combine the liquid and enriching ingredients: room temperature sour cream, room temperature buttermilk, pure vanilla extract, four room temperature egg whites, and your chosen oil (canola or vegetable work well). The room temperature ingredients are vital as they emulsify better, creating a smoother batter and a more consistent cake texture. Whisk these wet ingredients together thoroughly until they are well combined and homogenous.
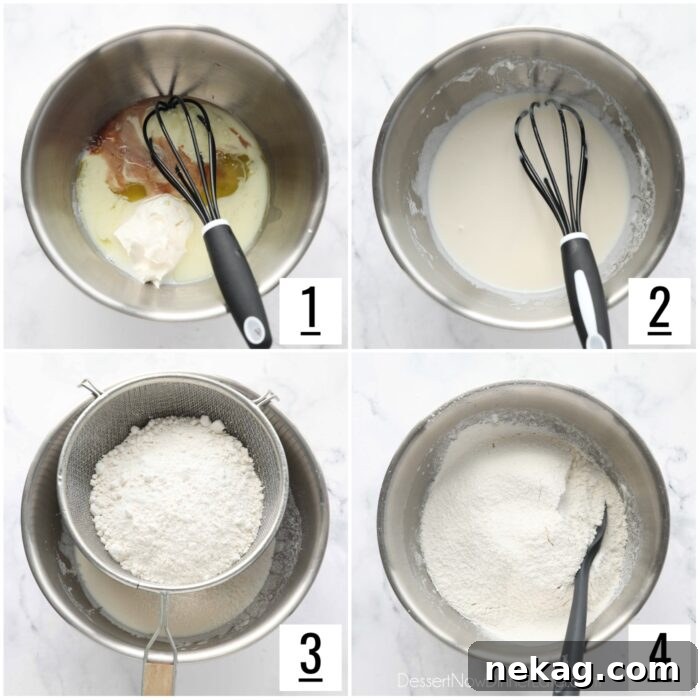
Finally, it’s time to incorporate the dry component. Sift your white cake mix (Duncan Hines is a recommended brand for its consistent quality) directly into the bowl with the wet ingredients. Sifting is an important step that aerates the mix and prevents lumps, contributing to a lighter, more uniform cake. Gently stir the mixture together until the ingredients are just combined. The golden rule here is to avoid over-mixing. Over-mixing can develop the gluten in the flour too much, resulting in a tough or rubbery cake – something we definitely want to avoid for a tender cake roll.
Step 2: Dividing, Coloring, and Preparing Your Piping Bags
With your perfect cake batter ready, the real fun begins: transforming it into a kaleidoscope of colors. This step requires precision and a good eye for vibrant shades, as each hue will contribute to the stunning striped effect of your finished cake roll.
First, carefully divide your cake batter into six small, separate bowls. Aim for approximately 2/3 cup of batter in each bowl to ensure even distribution of colors. The key to truly brilliant colors is using high-quality gel food coloring. I highly recommend AmeriColor gels, as they provide intense, concentrated color without significantly altering the batter’s consistency. Add a small amount of gel food coloring to each bowl—red, orange, yellow, green, blue, and purple—and mix each color separately until it is uniformly vibrant. Start with a tiny amount and gradually add more if needed, as gel colors are very potent. Ensure each color is distinct and bright, as these will form the beautiful stripes of your rainbow.
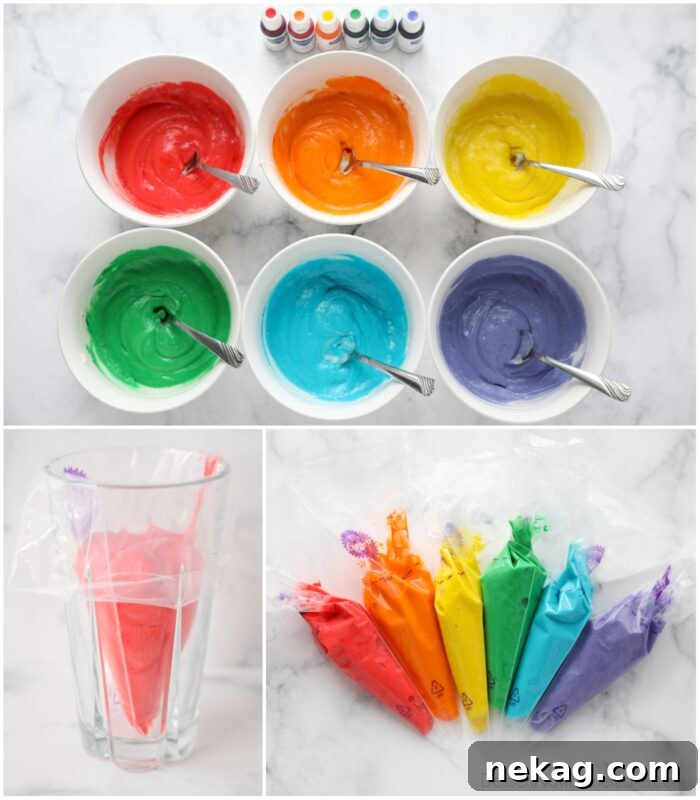
Once your batters are beautifully colored, it’s time to prepare them for piping. Fill individual piping bags with each of the six colors. A helpful trick to make this process much easier and cleaner is to use a tall glass cup. Drape the piping bag over the rim of the cup, allowing the top edges of the bag to cuff around the outside of the glass. This creates a stable opening, preventing spills and making it simple to spoon the cake batter into the bag. Once filled, remove the bag from the glass and twist the top securely to seal it, preventing batter from escaping while you pipe. NOTE: It’s crucial not to cut the tips off the piping bags until you are fully ready to begin piping. This prevents any premature leaks or drying of the batter, ensuring your stripes are crisp and clean.
Step 3: Precision Piping: Stripes in Rainbow Order
This is where the artistic flair of the rainbow cake roll truly comes to life. Creating perfect, vibrant stripes requires a steady hand and a methodical approach. Before you begin piping, ensure your parchment-lined baking sheet is ready. As an optional but recommended step, spray the parchment paper with Baker’s Joy or a similar nonstick baking spray that contains flour. While parchment paper significantly aids in releasing the cake, this extra layer of protection can make the unrolling process even smoother for delicate cake mix batters.
Now, take your piping bags, one color at a time. Using a pair of kitchen scissors, snip a small amount off the tip of each bag. The size of the opening will determine the thickness of your stripes, so start small and adjust if necessary. Begin with red, then orange, yellow, green, blue, and finally purple. These are the traditional colors of the rainbow, and piping them in this specific order will create the classic gradient effect.
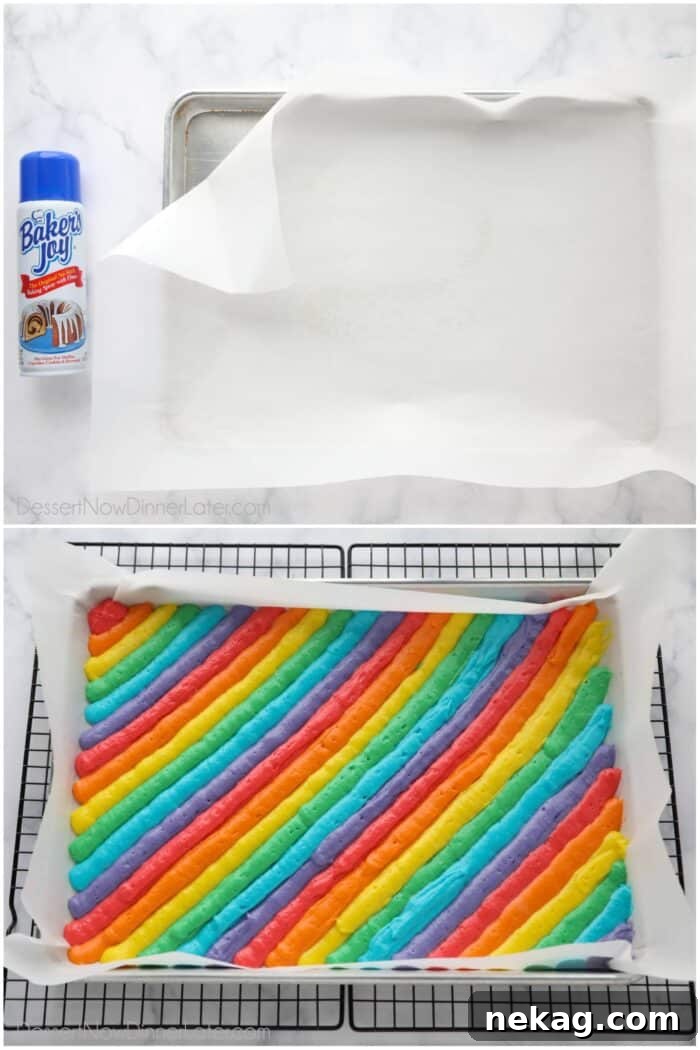
Pipe the colors diagonally across the pan. This diagonal orientation is key to achieving a beautiful spiral effect when the cake is rolled. Start by piping thin layers of each color. This approach helps conserve batter, ensuring you have enough for all six stripes. Once you have a base layer of all colors, you can go back and reinforce any areas that appear too thin or need a bit more batter to achieve optimal coverage and vibrancy. Aim for consistent thickness across all stripes for a uniform appearance.
After all the colors have been piped onto the baking sheet, gently tap the sheet pan several times on your counter. This seemingly simple action serves a crucial purpose: it helps to release any trapped air bubbles from the batter, which can cause imperfections in the baked cake. More importantly, tapping the pan encourages the different colored stripes to settle and merge slightly at their edges, creating a smoother transition between colors and a more cohesive cake layer, ready for baking.
Step 4: The Perfect Bake and the Crucial Warm Roll
Baking a cake roll requires precise timing, as an overbaked cake will crack when rolled, and an underbaked cake will be too delicate. Once your vibrant striped batter is ready, carefully place the baking sheet into your preheated 325˚F oven. Bake the rainbow cake for approximately 17 minutes, or until it is just baked through. You can test for doneness by gently pressing on the center of the cake; it should spring back slightly, and the edges should be lightly golden. Avoid overbaking, as even a minute or two can make a significant difference in its flexibility.
The moment the cake comes out of the oven, urgency is key. Immediately lift the entire cake, still on its parchment paper, out of the pan. Transfer it to a wire cooling rack. If you only have one rack, make sure the cake is fully supported without any edges dangling, which could cause premature cracking. Ideally, use two racks side-by-side for full support.
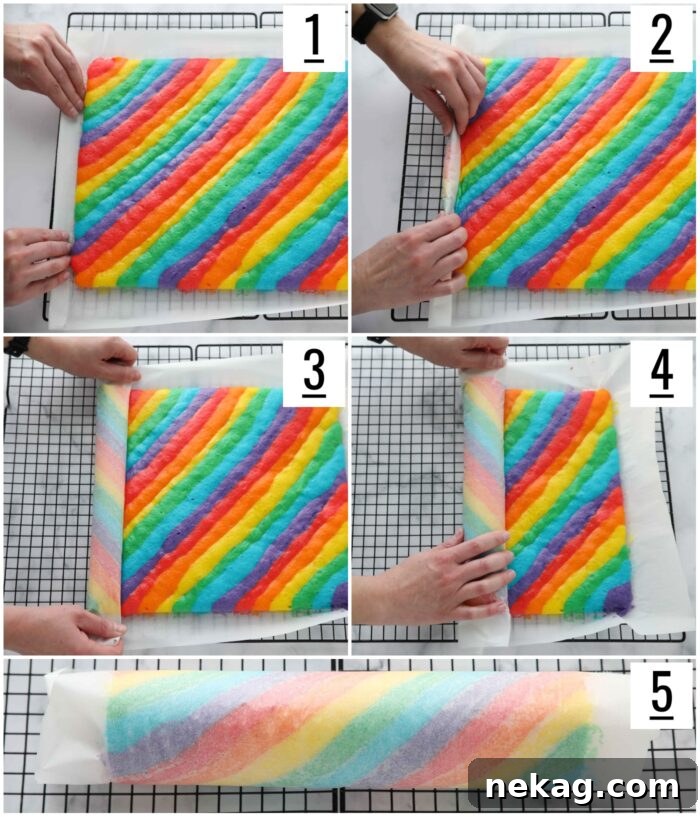
Allow the cake to release steam for precisely 4 minutes. This brief period is critical. Set a timer! The cake needs to be warm and pliable enough to roll without cracking, but if you wait too long, it will become stiff. After 4 minutes, it’s time for the crucial warm roll. Starting from one of the shorter (13-inch) sides, carefully begin rolling the cake up, still encased in its parchment paper. A helpful tip for a tight, even roll: fold any excess parchment paper at the starting edge to create a thicker, more rigid initial fold, about 1-inch thick. Then, fold this over the edge of the cake and use the remaining edges of the parchment paper to continue rolling the cake tightly without squishing it. This technique helps guide the cake into a snug spiral and prevents it from sticking to itself.
Once rolled, leave the cake rolled up in the parchment paper and let it cool completely at room temperature. This typically takes about 40 minutes, depending on your kitchen’s temperature. While your cake is cooling and setting its rolled shape, it’s the perfect time to prepare your rich and creamy vanilla buttercream frosting, ensuring it’s ready to fill your beautiful rainbow creation.
Step 5: Unrolling and Filling the Striped Cake Roll with Creamy Frosting
Once your rainbow cake roll has completely cooled in its rolled form, it’s time for the delicate process of unrolling and filling. This step requires a gentle touch to prevent any cracking, especially with the slightly more delicate texture of a cake mix-based roll. Slowly and carefully unroll the cake, peeling back the parchment paper. You might find that some areas of the cake slightly adhere to the paper due to condensation or its tender texture. If this happens, use a thin spatula or knife to gently scrape off any stuck pieces, trying your best to keep the cake intact.
With the cake unrolled and laid flat, it’s ready for its creamy filling. Generously dollop the prepared vanilla buttercream frosting evenly over the surface of the cake. Now, using an offset spatula, gently smooth the icing across the entire surface. It’s important to leave a bare strip of about 1/2-inch at the far end of the cake – the end you will roll towards. This ensures the frosting doesn’t squeeze out excessively when you re-roll, creating a clean finish. You might notice the icing appears somewhat thin as you spread it, which is normal for a smooth, spreadable consistency.
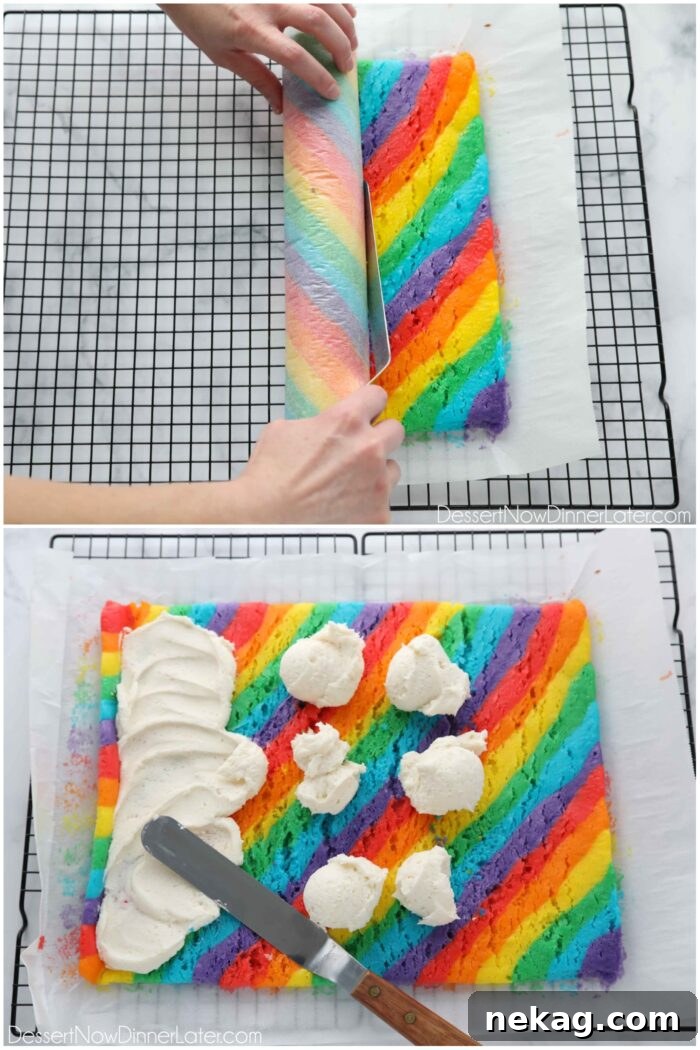
A crucial tip for frosting a cake roll, especially one with vibrant colors, is to keep the tip of your offset spatula immersed in the frosting as much as possible while spreading. This technique helps prevent lifting any stray cake crumbs into the pristine white frosting, ensuring a clean, unmarred finish for your interior spiral. Take your time, working the frosting smoothly and evenly across the colorful canvas of your cake.
Step 6: Re-rolling the Rainbow Cake Roll with Its Sweet Filling
With the creamy vanilla buttercream expertly spread across your vibrant cake, it’s time to complete the spiral by re-rolling it. This step is a mirror of the initial warm roll, but now with the added challenge of keeping the frosting neatly contained and evenly distributed. The goal is to achieve a tight, uniform spiral that showcases both the colorful cake and the generous filling.
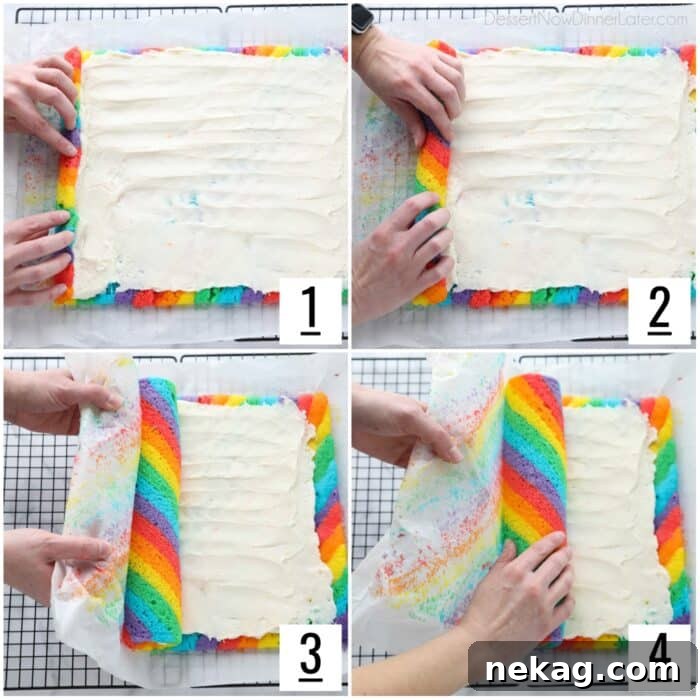
Begin re-rolling the cake as tightly as you can, starting from the end closest to you (the one with frosting all the way to the edge). Use your fingers to gently guide the initial fold. As you continue to roll, carefully lift the parchment paper underneath to help guide the cake and pull it away from the paper as needed. This allows for a tighter roll and prevents the cake from sticking to the parchment. Work slowly and evenly across the length of the roll, applying gentle, consistent pressure. The parchment paper acts as a helpful tool, enabling you to manipulate the cake without directly handling its delicate surface, thus minimizing the risk of cracks or smudges in the frosting.
If you encounter any slight cracking on the surface of the cake during this process, don’t despair! This is common, especially with more delicate cake mixes. The subsequent chilling and wrapping steps, along with any external frosting you might choose to add (though this recipe focuses on an internal filling), will help conceal any minor imperfections. Focus on creating a tight, beautiful spiral that will reveal its magic when sliced.
Step 7: The Critical Chill: Wrap and Set
Once your rainbow cake roll is beautifully re-rolled with its creamy filling, the next crucial step is to wrap and chill it. This period of chilling is essential for several reasons: it allows the cake to firmly set its spiral shape, solidifies the buttercream frosting, and makes the entire roll much easier to slice cleanly without smudging the colors or squishing the cake. This step transforms your delicate roll into a sturdy, sliceable dessert.
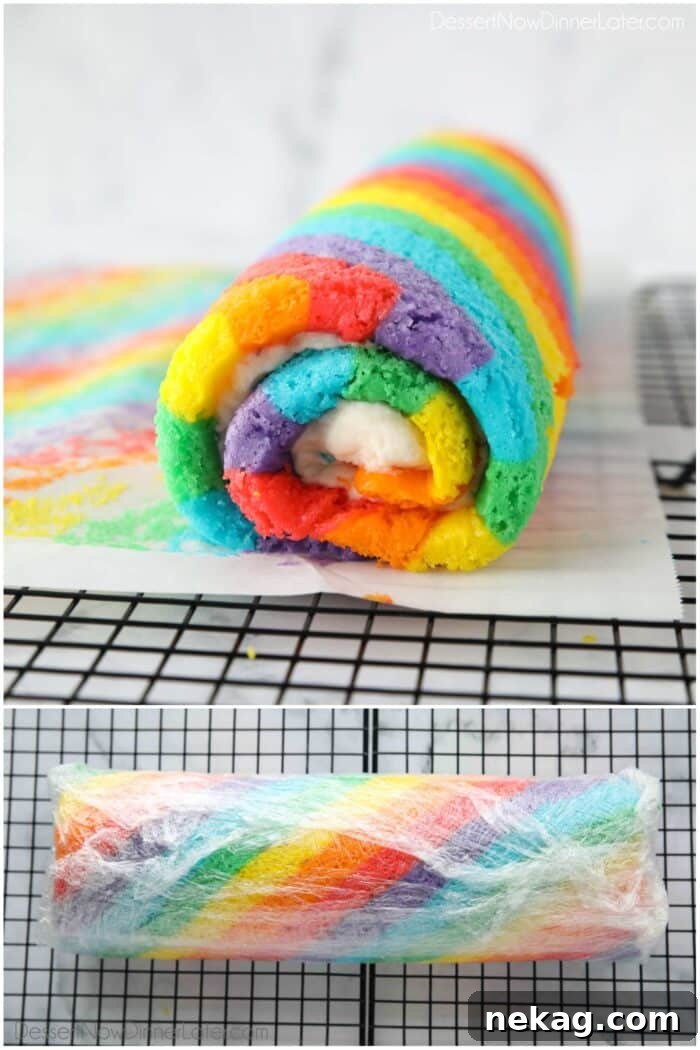
To prepare for chilling, keep the cake roll on the same parchment paper it was baked and rolled in. Trim any excess parchment paper, leaving just enough to encase the roll. A helpful tip to prevent any additional cracking from handling the delicate cake: use the edges of the remaining parchment paper to gently lift the rolled cake directly onto a piece of plastic wrap. This minimizes direct contact with the cake’s surface. Once positioned, wrap the entire cake roll tightly with plastic wrap, ensuring it’s completely sealed. The snug wrap helps maintain its shape and prevents it from drying out.
Now, transfer the wrapped cake roll to the freezer. For optimal firmness and ease of slicing, freeze it for at least 1 hour, or until it is completely firm. If you’re preparing this dessert in advance for a future event, you can alternately freeze the cake overnight or even for longer durations. If freezing for more than 24 hours, it’s a good idea to double-wrap the cake in an additional layer of plastic wrap or foil to prevent freezer burn and preserve its freshness. This chilling period is a non-negotiable step for achieving those picture-perfect, distinct rainbow slices.
Step 8: The Grand Reveal: Slicing and Serving Your Rainbow Swiss Roll
After patiently chilling, your masterpiece is ready for its grand reveal! This final step transforms your beautifully spiraled cake roll into individual portions, each a miniature work of art. The key to showcasing the vibrant rainbow stripes and creamy filling is precise and clean slicing.
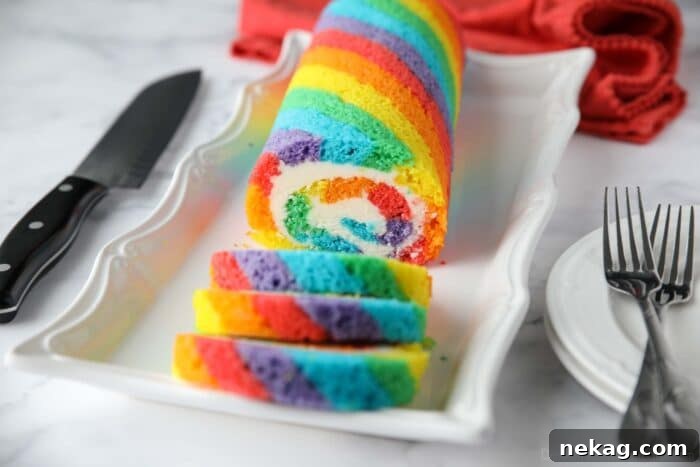
First, carefully unwrap the chilled cake roll. You’ll notice it’s now firm and much easier to handle. To achieve those picture-perfect slices, use a very hot, sharp knife. The heat from the knife helps glide through the cake and frosting without tearing or squishing, resulting in clean, defined layers. To heat your knife, simply run it under hot water for a few seconds, then wipe it completely dry with a clean towel. This is an important step to prevent excess moisture from affecting your cake.
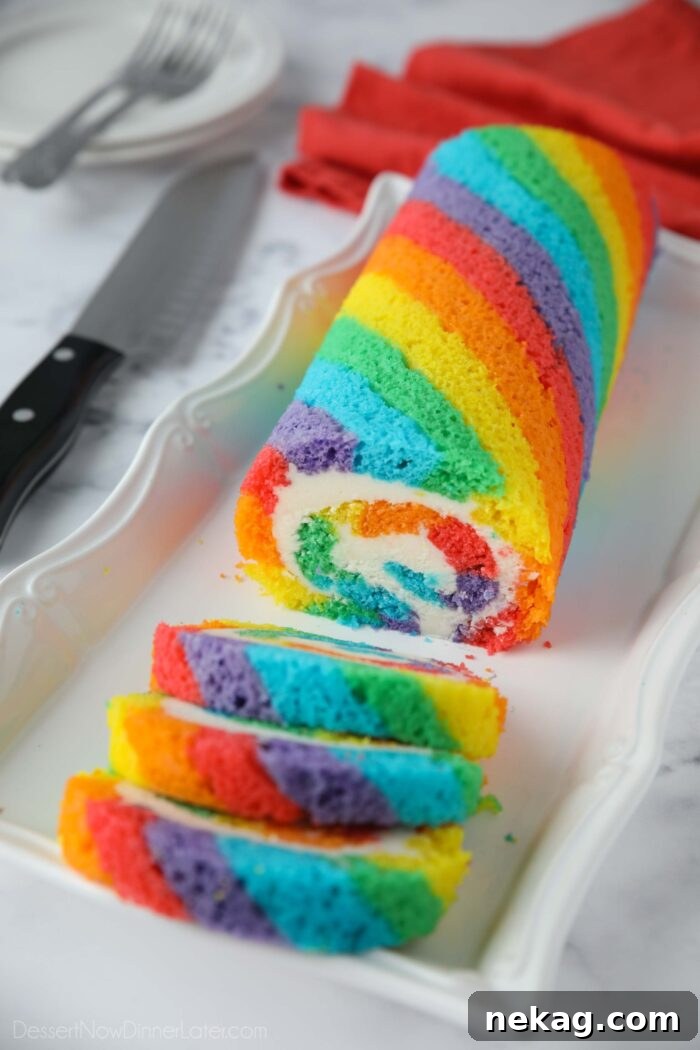
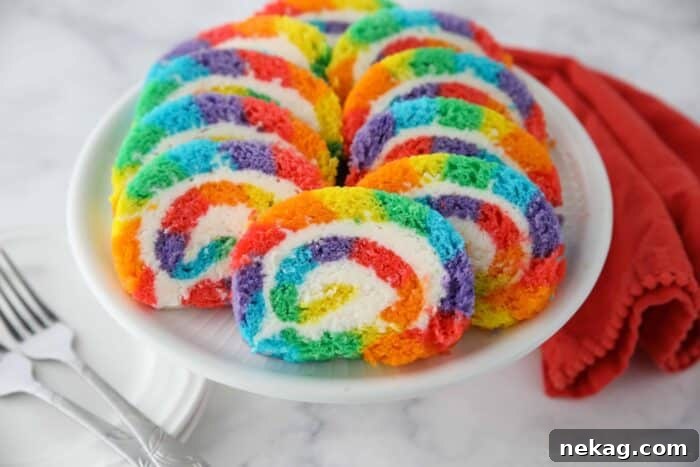
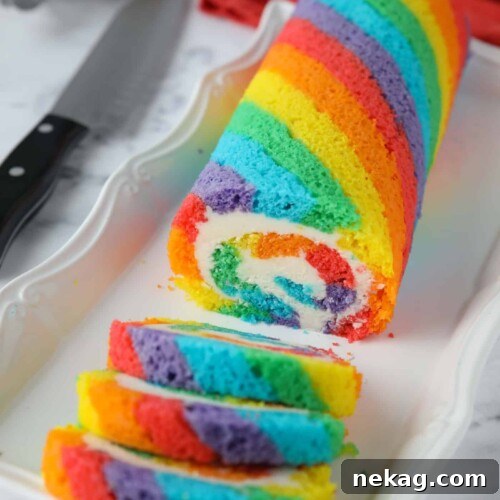
With your hot knife, begin cutting the rainbow cake roll into approximately 3/4-inch thick slices. You should yield about 16 exquisite pieces from one roll. For truly immaculate slices, make sure to rinse and re-dry your knife between each cut. This removes any clinging crumbs or frosting, ensuring every subsequent slice is as clean and beautiful as the first. This attention to detail will make your rainbow cake roll truly stand out.
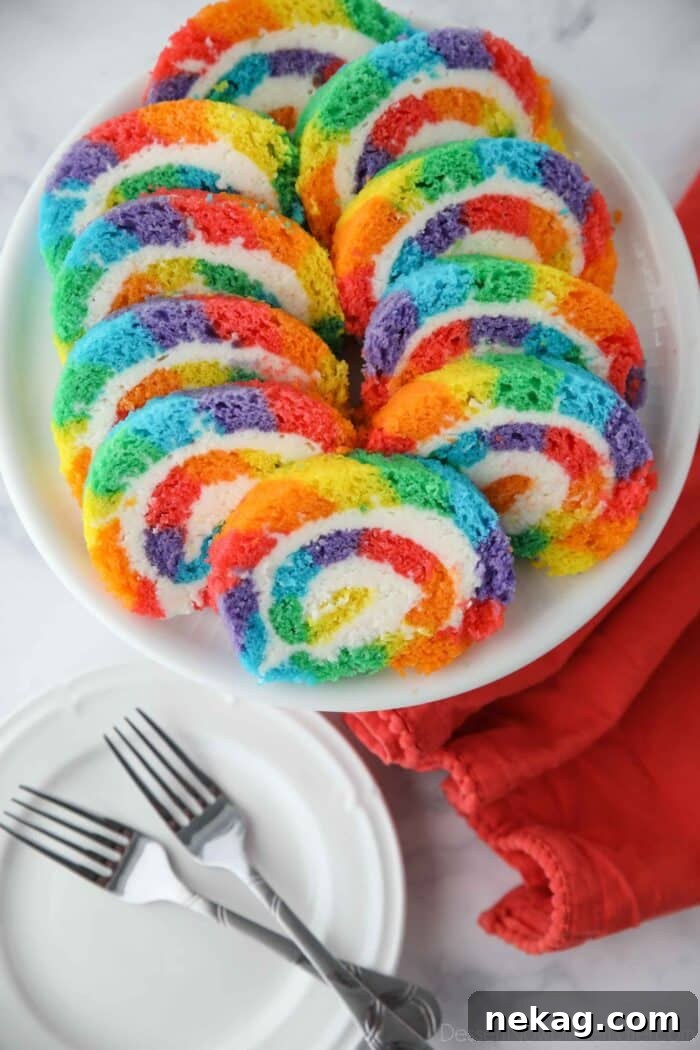
Once sliced, arrange the colorful pieces on a platter. If the cake has been frozen or deeply chilled, allow the slices to thaw for about 15 minutes at room temperature before serving. This brings them to the ideal texture for enjoyment. Each slice will reveal a mesmerizing spiral of vivid colors and creamy vanilla buttercream, ready to delight your guests. Enjoy the smiles and oohs and aahs this stunning dessert is sure to bring!
Expert Tips and Troubleshooting for Your Rainbow Cake Roll
Achieving a flawless rainbow cake roll, especially when working with a delicate cake mix batter, can present a few challenges. Here are some essential tips and troubleshooting advice to ensure your success and help you create a beautiful, crack-free masterpiece.
- Timing the Warm Roll is Paramount: The most critical step for minimizing cracks is rolling the cake while it’s still warm. You want to allow the majority of the steam to escape—about 4 minutes after removing it from the oven—before you start rolling. If you wait too long, the cake will cool and firm up, making it much more prone to cracking significantly. Set a timer for those 4 minutes; precision is key here!
- Parchment Paper vs. Tea Towel: Choose Your Rolling Method Wisely:
- Parchment Paper: This method offers incredibly easy cleanup and works wonderfully for many cake roll recipes. However, for a cake made from a doctored cake mix, which tends to be slightly more delicate, you might find it a bit challenging to unroll the cake from the parchment paper without some sticking. The condensation between the cake and the non-porous parchment can cause adhesion.
- Powdered Sugar Dusted Tea Towel: If this is your first time making a cake roll, or if you’re concerned about cracking, consider flipping the freshly baked cake onto a clean, lint-free tea towel generously dusted with powdered sugar. Immediately peel off the baking parchment paper. The fibers of the towel allow steam to escape more easily and provide a gentle surface that often makes unrolling easier. Roll the cake up in the towel while still warm, then proceed with cooling. This method can offer more forgiveness for beginner bakers.
- Ensure Room Temperature Ingredients: For the cake batter, sour cream, buttermilk, egg whites, and even butter for the frosting should be at room temperature. This ensures they emulsify smoothly, creating a homogeneous batter and a creamier frosting, which are both crucial for the final texture and appearance of your cake roll.
- Don’t Over-Mix the Batter: Once you add the dry cake mix to the wet ingredients, mix only until just combined. Over-mixing develops gluten, leading to a tough, less pliable cake that will crack easily when rolled.
- Vibrant Gel Food Coloring: For truly bold and distinct stripes, use high-quality gel food colorings. They are concentrated and won’t thin out your batter like liquid food colorings can.
- Chill Thoroughly: Do not rush the chilling process. A well-chilled cake roll is not only easier to slice but also holds its shape much better. Freeze for at least an hour, or until firm.
- Clean Slices: The hot knife technique is essential for clean slices that showcase your rainbow layers. Don’t forget to rinse and wipe the knife between each cut!
- Storage: Store any leftover cake slices wrapped well in an airtight container in the refrigerator to keep them fresh. If freezing the entire roll for an extended period, double-wrap it in plastic wrap and then foil to prevent freezer burn.
We hope these tips empower you to create a magnificent and delicious Rainbow Cake Roll that brings joy to everyone who sees and tastes it! Happy baking!
Rainbow Cake Roll
Ingredients
Cake Batter:
- ⅔ cup (160 g) sour cream, room temperature
- ¾ cup (177 ml) buttermilk, room temperature
- 1 Tbsp pure vanilla extract
- 4 egg whites, room temperature
- ⅓ cup (80 ml) oil, canola/vegetable
- 1 (15.25)oz (432 g) box white cake mix, I use Duncan Hines
- food coloring gel, red, orange, yellow, green, blue, and purple
Vanilla Buttercream Frosting:
- 1 cup (226 g) unsalted butter, (2 sticks) room temperature
- ¼ tsp salt
- 4 cups (480 g) powdered sugar
- 2 tsp pure vanilla extract
- 4 Tbsp heavy cream, or milk
Equipment
-
AmeriColor Food Coloring Gel Paste
-
Wilton Disposable Piping Bags
-
Aluminum Half Sheet Tray (2 Pack)
-
Parchment Paper
-
Electric Hand Mixer
-
Wilton 3-Piece Icing Spatula Set
Instructions
-
Preheat the oven to 325℉. Line a half sheet pan (13×18-inches) with parchment paper, leaving a couple inches of overhang to easily lift the cake out of the pan. Optional: Spray the parchment-lined baking sheet with Baker’s Joy — a nonstick baking spray with flour in it. Set pan aside.
-
Make the Cake Batter: Place the sour cream, buttermilk, vanilla, egg whites, and oil in a large bowl. Whisk together until combined well. Sift the white cake mix into the bowl of wet ingredients. Stir together until just combined. (Do not over-mix.)
-
Divide and Color Batter: Divide the cake batter into six small bowls; about 2/3 cup of batter in each. Add food coloring (I use AmeriColor gels) and mix colors separately. (Red, orange, yellow, green, blue, and purple.) Fill piping bags with individual colors. It’s easiest to do this by using a glass cup to cuff the top of the bag over the rim. Then fill it with cake batter, remove the bag, and twist the top. NOTE: Do not cut the ends until ready to pipe.
-
Pipe Stripes: Cut the tips off the bags and pipe the colors diagonally across the prepared pan in the order of a rainbow: red, orange, yellow, green, blue, and purple. TIP: Pipe thin layers to begin with so you don’t run out of cake batter. Then go back over any areas that may need extra.
-
Bake: Tap the baking sheet on the counter to remove any air bubbles and to help the different colored stripes settle into one-another. Bake the rainbow cake roll at 325℉ for 17 minutes or until baked through.
-
Rolling & Cooling: Immediately lift the cake out of the pan with the parchment paper and set it on a wire rack (or two, to make sure the cake doesn’t dangle off the edges and crack). Allow the cake to let off steam for 4 minutes. (Set a timer! Timing is important.) Then roll the cake up while it’s still warm starting from one of the shorter (13-inch) sides. TIP: I like to fold any excess paper to make it about 1-inch thick, then fold it on top of the cake, and then use the edges of the paper to continue rolling it up tightly without squishing the cake. Let the cake cool completely at room temperature; about 40 minutes.
-
Make the Vanilla Buttercream Frosting: Using an electric mixer and the paddle attachment beat the butter with the salt until creamy. Add the powdered sugar, 1 cup at a time, mixing completely before adding more. Repeat until all powdered sugar is added. Mix in the vanilla. Add the heavy cream or milk 1 Tablespoon at a time while mixing, until the desired consistency is reached.
-
Slowly and carefully unroll the cake. You may need to use a spatula to gently scrape off any cake that sticks to the paper due to the condensation.
-
Filling: Dollop the frosting over the cake. Use an offset spatula to smooth the icing over the cake leaving 1/2-inch bare on the end you will roll towards. TIP: Keep the tip of the spatula in the frosting the whole time as to not lift crumbs into the frosting.
-
Re-roll the cake as tightly as you can. Pulling the cake away from the parchment paper as needed. TIP: Start rolling the cake with your fingers, then lift the parchment paper to help roll the cake.
-
Chilling: Wrap the cake roll with plastic wrap and freeze it for 1 hour or until firm. Alternately freeze the cake overnight. TIP: Leave the cake on the parchment paper and cut off the excess. Then use the edges of the remaining paper to lift the rolled cake onto the plastic wrap to be wrapped completely. This will help prevent any extra cracking from the delicate cake.
-
Unwrap the chilled cake. Use a hot knife to cut the rainbow cake roll into 3/4-inch slices; about 16 pieces. TIP: Rinse and dry the knife between cuts for clean slices. NOTE: Cake slices will thaw in about 15 minutes at room temperature.
Notes
- Double wrap the cake if freezing for longer than 24 hours.
- Frosting makes about 3 cups.
- Store any leftover cake slices wrapped well in the refrigerator.
Nutrition
Disclaimer: Nutritional values were calculated using a third-party tool and are provided as an estimation only.
Sharing this recipe with a link is both encouraged and appreciated. Copying/pasting and/or screenshots of full recipes to any social media is strictly prohibited. Content and photographs are copyright protected.
Did you make this?
Don’t forget to leave a rating below and make sure to follow on Pinterest and Instagram for more!