

Welcome to a delightful twist on classic sweet rolls: Strawberry Swirl Bread. This mouth-watering recipe brings together the comforting warmth of homemade yeast bread with the vibrant, fruity essence of fresh strawberries and sweet strawberry preserves. Each golden-baked slice reveals beautiful layers of fruit and jam, creating a visually stunning and incredibly delicious treat that’s perfect for any occasion. Topped with a creamy, simple icing, this easy sweet bread serves beautifully for breakfast, brunch, or as a decadent dessert.
*This post is proudly brought to you by Rhodes Bake-N-Serv. We appreciate their support in making delicious recipes like this possible.

If you’re a fan of sweet rolls but looking for something a bit more substantial and easier to share, this strawberry swirl bread is your answer. While it shares many similarities with traditional sweet rolls, its unique cutting and shaping technique transforms it into an impressive loaf baked in a cast iron skillet. This presentation allows you to slice and serve it like a pie or cake, making it an ideal centerpiece for family gatherings, holiday breakfasts, or any time you crave a fruity, sweet indulgence. It’s truly a versatile treat that seamlessly transitions from a morning delight to an evening dessert.

The Secret to Effortless & Delicious Bread
At first glance, this recipe might seem intricate due to its beautiful swirls, but it’s surprisingly simple to make. Don’t let the thought of working with dough intimidate you! While the shaping process can get a little messy with all the sweet fruit filling, the end result is absolutely worth every sticky moment. The incredible softness and fluffiness of this bread will have everyone believing you spent hours kneading dough from scratch. But here’s the best part: it’s almost entirely store-bought, making it a fantastic “semi-homemade” solution for busy bakers.

The magic ingredient that simplifies this recipe considerably is Rhodes frozen dough. Using quality frozen dough eliminates the most time-consuming steps of traditional bread making, such as mixing ingredients from scratch, lengthy kneading, and initial proofing. This allows you to achieve that irresistible homemade texture and flavor without the usual effort. Rhodes dough is consistently reliable, producing wonderfully soft and airy bread, which is why it’s my go-to for most of my yeast bread creations. For this particular strawberry swirl bread recipe, I used a loaf of Rhodes White Bread, but if you prefer, 12 Rhodes White Dinner Rolls can also be used as a convenient alternative. The convenience of having half the work done for you truly can’t be beaten, especially when you’re aiming for a show-stopping dish with minimal fuss.
Essential Ingredients for Your Strawberry Swirl Bread
Beyond the frozen dough, you only need a few other key ingredients to bring this sensational bread to life. Fresh, ripe strawberries are crucial for their vibrant flavor and delightful texture. Look for bright red, firm berries for the best results. Coupled with natural strawberry preserves, these ingredients create a double layer of strawberry goodness that permeates every swirl. The preserves add an intense sweetness and moisture, while the fresh chunks offer bursts of natural fruit flavor and a slight chewiness. For the glaze, a simple combination of powdered sugar and heavy cream comes together to form a sweet, drizzly finish that complements the bread beautifully.
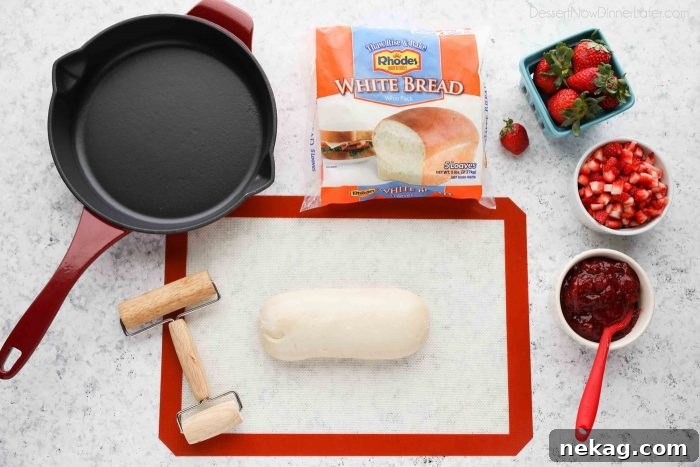
How to Make Strawberry Swirl Bread: A Step-by-Step Guide
Creating this stunning strawberry swirl bread is an enjoyable process, and I’ve broken it down into clear, manageable steps to ensure your success. Follow these instructions carefully, and you’ll be rewarded with a beautiful, delicious loaf that looks like it came from a professional bakery.
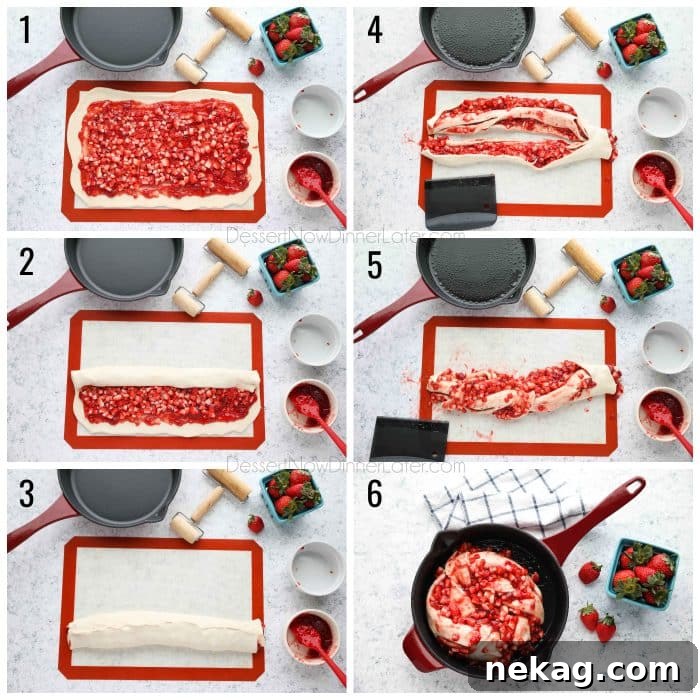
- Prepare the Dough: Begin by thawing one loaf of Rhodes frozen dough. For best results, place the frozen dough on a lightly greased baking sheet, cover it loosely with sprayed plastic wrap, and let it thaw and rise in the refrigerator for about 4-5 hours or overnight. Alternatively, you can let it thaw and rise at room temperature until it’s soft and pliable. Once thawed, transfer the dough to a lightly floured surface. Using a rolling pin, roll the dough into a large rectangle, approximately 16×20 inches. Aim for an even thickness across the entire rectangle to ensure consistent baking.
- Add the Filling: Carefully spread a generous layer of natural strawberry preserves over the rolled-out dough, making sure to leave about a 1/2-inch border around the edges. This border will help contain the filling when you roll the dough. Next, sprinkle your chopped fresh strawberries evenly over the preserves. The combination of jam and fresh fruit creates an irresistible flavor and texture contrast.
- Initial Roll and Fold: Starting from one of the long sides of the rectangle, gently roll the dough upwards, a little over halfway towards the center. Aim for a relatively tight roll to ensure the filling is well-distributed.
- Complete the Roll and Seal: Now, take the other long side of the dough rectangle and lift it up, carefully folding it over the section you’ve already rolled. This encloses the fruit filling completely. Once folded, firmly pinch the seams together along the length of the dough to seal it. This step is crucial for keeping all that delicious strawberry filling securely inside during the subsequent shaping and baking. Place the dough seam-side down on your work surface.
- Cut and Twist: With the seam side down, use a sharp knife or a dough scraper to cut the rolled dough in half lengthwise. It’s important to leave about 2 to 3 inches intact at one end, creating a “hinge.” This will allow you to twist the two halves without them completely separating. This part can be a bit messy as the fruit layers are now exposed, but don’t worry – just do your best to handle it gently. Carefully twist the two dough pieces around each other, ensuring the beautiful cut sides, revealing the strawberry layers, face upwards. This twisting motion creates the signature “swirl” effect.
- Form the Swirl and Place in Pan: Bring the two twisted ends together to form a circular shape, pinching them firmly to seal the circle. Lightly grease a 10-inch cast iron skillet with cooking spray. Carefully transfer the circular dough into the prepared skillet. If any strawberries have fallen out during the shaping process, simply scoop them up and gently place them back onto the dough in the pan. This ensures every bite is packed with fruit.

The Final Rise and Perfect Bake
Once your strawberry swirl bread is beautifully shaped in the cast iron skillet, it’s time for its final rise. Cover the dough loosely with sprayed plastic wrap and let it rise in a warm spot until it has doubled in size, which typically takes about 1 hour. A warm, draft-free environment is ideal for optimal rising. Preheat your oven to 350 degrees Fahrenheit (175°C) during the last part of the rising period.
Remove the plastic wrap and bake the bread for 35-45 minutes. Around the 25-30 minute mark, you’ll notice the top of the bread starting to brown significantly. To prevent it from browning too quickly before the center is fully cooked, loosely cover the skillet with aluminum foil. Continue baking until a wooden toothpick inserted into the center comes out clean, and the dough springs back when lightly touched. This indicates that your bread is thoroughly baked and ready to be enjoyed.

Glaze, Slice, and Serve!
Once baked, allow the strawberry swirl bread to cool in the skillet for 10-15 minutes. This cooling period helps the bread set and makes it easier to handle. While it cools, prepare the luscious icing: simply whisk together powdered sugar and heavy cream until smooth. The consistency should be pourable yet thick enough to cling to the bread. Drizzle or squeeze this creamy icing generously over the warm bread. The heat from the bread will slightly melt the glaze, allowing it to seep into the crevices and add another layer of delightful sweetness. Then, slice it into wedges and serve immediately.
This bread is best enjoyed fresh and warm. My family devoured an entire loaf in one sitting, wishing there was more – a true testament to its irresistible appeal! I am confident that you and your loved ones will adore this easy, flavorful strawberry swirl bread as much as we do.
Serving Suggestions and Variations
Strawberry Swirl Bread is incredibly versatile. Serve it for a special weekend breakfast alongside scrambled eggs and bacon, or as part of an elaborate brunch spread with fresh fruit and coffee. For dessert, it’s wonderful on its own or with a scoop of vanilla ice cream. To change things up, consider these delightful variations:
- **Mixed Berry Swirl:** Substitute a mix of raspberries, blueberries, and blackberries for the strawberries, and use mixed berry preserves.
- **Lemon-Kissed Strawberry:** Add a teaspoon of lemon zest to the strawberry preserves for a brighter, more aromatic flavor.
- **Cream Cheese Swirl:** Before adding the fruit, spread a thin layer of sweetened cream cheese filling (softened cream cheese, powdered sugar, vanilla) over the dough for an extra rich swirl.
- **Nutty Crunch:** Sprinkle finely chopped pecans or walnuts over the strawberries for a pleasant textural contrast.
Storage Tips
Should you be lucky enough to have leftovers, store this delightful bread covered or in an airtight container at room temperature for up to 2-3 days. While it’s best enjoyed fresh, a quick warm-up in the microwave or oven can revive its tender texture and delicious aroma.
If you enjoy this sweet bread recipe, you may also want to try these other fantastic creations:
- Lemon Strawberry Sweet Rolls
- Vanilla Strawberry Monkey Bread
- Raspberry Breakfast Braid
- Raspberry Lemon Rolls
- Valentine’s Day Raspberry Rolls

5 from 3 ratings
Strawberry Swirl Bread
Pin
Rate
Save
Ingredients
Bread:
- 1 loaf Rhodes White Bread, thawed*
- ¾ cup (228 g) natural strawberry preserves
- 1 ½ cups (261 g) fresh strawberries, chopped
Icing:
- 1 cup (120 g) powdered sugar
- 3 Tbsp heavy cream
Equipment
-
Stainless Steel Scraper/Chopper
-
Mini Rolling Pin
Instructions
-
*Place frozen dough on a greased baking sheet. Cover with sprayed plastic wrap. THAW and rise about 4-5 hours or overnight in the refrigerator.
-
Spray a 10-inch cast iron pan with cooking spray.
-
Roll the thawed dough into a large rectangle about 16×20-inches. Spread with strawberry preserves, leaving a 1⁄2 inch border. Then sprinkle with chopped strawberries.
-
Starting at one long side, roll up dough a little over halfway. Pick up the other long side and lift it up and over the rolled section, keeping the fruit tucked inside. Pinch the seams together. Place seam side down, and cut in half lengthwise, leaving 2 to 3-inches intact on one end.
-
Carefully twist the two dough pieces around each other, with the cut side up. (This part is messy, just do your best.) Bring ends together forming a circle, and place in the prepared cast iron pan. Pinch ends together. Replace any strawberries that have fallen out during the shaping process, by scooping them up and adding them to the pan.
-
Cover dough with sprayed plastic wrap and let rise until double in size, about 1 hour.
-
Preheat oven to 350 degrees Fahrenheit. Remove plastic wrap and bake for 35-45 minutes. *Cover loosely with foil around the 25-30 minute mark so the top doesn’t brown too quickly. The top will brown before baked fully in the center. Bake until a toothpick inserted in the center comes out clean, and the dough springs back when touched.
-
Cool for 10-15 minutes. Whisk together the powdered sugar and heavy cream. Drizzle or squeeze the icing over the top. Then slice and serve.
Notes
*May substitute 12 Rhodes Dinner Rolls in place of the loaf.
Nutrition
Disclaimer: Nutritional values were calculated using a third-party tool and are provided as an estimation only.
Sharing this recipe with a link is both encouraged and appreciated. Copying/pasting and/or screenshots of full recipes to any social media is strictly prohibited. Content and photographs are copyright protected.
Did you make this?
Don’t forget to leave a rating below and make sure to follow on Pinterest and Instagram for more!