
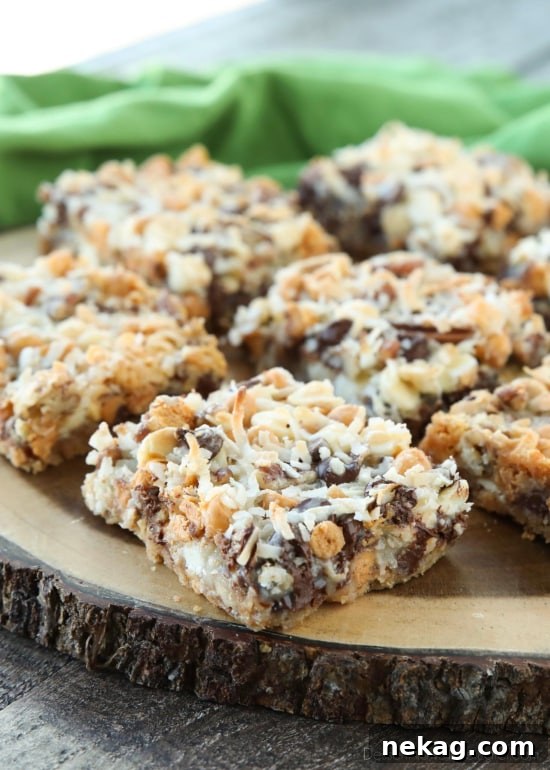
Seven Layer Bars, also known as Magic Cookie Bars, Hello Dolly Bars, or Kitchen Sink Bars, are a beloved classic dessert renowned for their irresistible combination of textures and flavors. This incredibly easy-to-make treat features a rich graham cracker crust topped with layers of chocolate chips, white chocolate chips, butterscotch chips, crunchy nuts, and shredded coconut, all bound together by a luscious drizzle of sweetened condensed milk. The result is a chewy, decadent bar that melts in your mouth and satisfies every sweet craving.
Unveiling the Magic of Seven Layer Bars: A Beloved Classic Dessert
Seven Layer Bars are more than just a dessert; they’re a symphony of flavors and textures, a culinary legend that has graced potlucks, holiday tables, and family gatherings for decades. Their popularity stems from their sheer simplicity and the delightful complexity of each bite. With a minimal ingredient list and straightforward preparation, these “magic” bars live up to their name by transforming simple pantry staples into an extraordinary treat.
The “seven layers” typically refer to:
- A buttery **graham cracker crust** (crushed graham crackers mixed with melted butter) that forms the perfect foundation.
- Generous **chocolate chips**, offering a classic sweet cocoa note.
- Creamy **white chocolate chips**, adding a distinct, sweet contrast.
- Rich **butterscotch chips**, contributing a unique caramelized flavor.
- Crunchy **nuts** (commonly pecans or walnuts), providing texture and earthy undertones.
- Sweet, chewy **shredded coconut**, adding an exotic tropical touch.
- And the essential ingredient that ties it all together: **sweetened condensed milk**, which bakes into a gooey, caramel-like binder.
Each layer contributes to the overall harmony, creating a dessert that is both familiar and exciting. Whether you’re a seasoned baker or a kitchen novice, these bars are a guaranteed crowd-pleaser.
Why Seven Layer Bars Are a Must-Try Dessert
Beyond their delightful taste, Seven Layer Bars offer numerous reasons to become a staple in your recipe collection:
- Effortlessly Easy: With minimal prep and baking time, this recipe is perfect for busy schedules or when you need a fantastic dessert without fuss. There’s no complex mixing, kneading, or frosting involved—just simple layering.
- Perfect for Every Occasion: These bars shine in any setting. They’re an excellent choice for holiday gift-giving, a wonderful alternative to traditional pies at Thanksgiving or Christmas, and an absolute hit at potlucks, picnics, and casual gatherings. Their portability makes them ideal for sharing.
- Rich and Satisfying: The combination of sweet, salty, and crunchy elements creates a deeply satisfying treat. Due to their richness, even small portions are incredibly fulfilling, making them last longer and perfect for indulging without overdoing it.
- Versatile and Customizable: While the classic combination is superb, these bars are incredibly forgiving and open to endless variations. You can easily swap out ingredients to suit different tastes or dietary preferences, turning them into your unique creation.
- Freezer-Friendly: Prepare a large batch and store them in the freezer for future cravings. They hold up beautifully, allowing you to enjoy a taste of magic whenever the mood strikes.
A Nod to Nostalgia: The Origin and Many Names
Seven Layer Bars gained widespread popularity in the 1960s, largely due to marketing efforts by Eagle Brand Sweetened Condensed Milk. Often found on the back of condensed milk cans, this recipe quickly became a household favorite, celebrated for its “magic” ability to create a delicious dessert with such ease. While “Seven Layer Bars” is the most common moniker, you might also hear them called:
- Magic Cookie Bars: Emphasizing the magical transformation of simple ingredients.
- Hello Dolly Bars: A name popularized around the same time as the famous Broadway musical, evoking a sense of joy and classic charm.
- Kitchen Sink Bars: Suggesting that you can throw in just about anything you have on hand, much like a “kitchen sink” cookie.
- Dream Bars: For their dreamy, irresistible flavor.
Regardless of what you call them, these bars evoke a sense of nostalgic comfort and homemade goodness.
Essential Ingredients for Your Seven Layer Masterpiece
The beauty of Seven Layer Bars lies in their straightforward ingredients, readily available in most grocery stores. Here’s a closer look at what you’ll need and some tips for each:
- Graham Crackers: About 12 whole crackers (186g), which is roughly 1 ½ sleeves from a standard box. These are crushed to form the crust. For a finer crumb, a food processor works best.
- Butter: ½ cup (113g) of melted butter, either salted or unsalted. The butter binds the graham cracker crumbs and adds richness to the crust. If using unsalted butter, you might add a tiny pinch of salt to the crumbs for flavor balance.
- Chocolate Chips: 1 cup (170g) of your preferred type—milk chocolate for classic sweetness or semi-sweet for a slightly deeper flavor. You can even use a mix!
- White Chocolate Chips: 1 cup (170g) adds a creamy, sweet contrast to the other layers.
- Butterscotch Chips: 1 cup (170g) is crucial for that distinct, caramel-like butterscotch flavor that makes these bars so unique. Don’t skip these if you want the traditional taste!
- Nuts: 1 cup (112g) of pecan pieces or chopped walnuts are traditional choices. They add a wonderful crunch and earthy flavor that balances the sweetness.
- Shredded Coconut Flakes: 1 cup (120g) of sweetened shredded coconut. This provides a delightful chewiness and tropical aroma. Make sure it’s sweetened for the classic flavor profile.
- Sweetened Condensed Milk: One 14 oz (396g) can is the magic ingredient. This thick, sweet milk is drizzled over all the layers, sinking down to create a gooey, caramelized binder as it bakes. It’s what gives the bars their signature chewy texture and rich flavor. Ensure you grab sweetened condensed milk, not evaporated milk, as they are not interchangeable in this recipe.
Step-by-Step Guide to Baking Perfect Seven Layer Bars
Creating these delightful bars is incredibly simple. Follow these steps for a perfect batch every time:
Preparation (10 mins)
-
Preheat Oven & Prepare Pan: Preheat your oven to 350°F (175°C). Lightly grease a 9×13-inch baking dish. For easiest removal and clean cuts, line the dish with parchment paper, leaving an overhang on the sides. This will allow you to easily lift the entire slab of bars out of the pan after baking and cooling.
-
Make the Graham Cracker Crust: Blend the whole graham crackers in a food processor or blender until they form fine crumbs. Alternatively, place them in a zip-top bag and crush them with a rolling pin. In a medium bowl, combine the graham cracker crumbs with the melted butter and mix well until thoroughly combined. Press this mixture evenly onto the bottom of your prepared 9×13-inch baking dish, forming a firm crust.
Assembly & Baking (25-30 mins)
-
Drizzle Sweetened Condensed Milk (First Layer): Drizzle about one-third of the can of sweetened condensed milk evenly over the graham cracker crust. This initial drizzle helps to meld the crust with the subsequent layers.
-
Layer the Toppings: Evenly sprinkle the chocolate chips, white chocolate chips, butterscotch chips, chopped nuts, and shredded coconut flakes over the crust. Try to distribute each topping as uniformly as possible to ensure every bar gets a good mix of flavors.
-
Final Drizzle: Drizzle the remaining sweetened condensed milk evenly over all the sprinkled toppings. This top layer of milk will seep down, binding all the ingredients together as they bake and creating that signature gooey texture.
-
Bake: Place the baking dish in the preheated oven and bake for 25-30 minutes. The bars are done when the center is bubbling, the edges are lightly browned, and the coconut is toasted golden. Be careful not to overbake, as this can make the bars too hard.
Cooling & Serving
-
Cool Completely: This step is crucial! Allow the bars to cool completely in the pan on a wire rack before attempting to cut them. This can take several hours, or you can speed it up by chilling them in the refrigerator. Cooling ensures the layers set properly, making them much easier to cut into neat bars without falling apart.
-
Cut and Serve: Once completely cool and set, use the parchment paper overhang to lift the entire block of bars out of the pan. Place it on a cutting board. For perfect portions, you can trim the crusty edges (chef’s treat!) and then cut into 24 even bars (4×6 arrangement). Serve and enjoy!
Tips for Achieving Seven Layer Bar Perfection
- Don’t Skimp on Cooling: Patience is key! Cutting the bars before they are fully cooled will result in a messy, crumbly outcome. For the neatest slices, chill the baked bars in the refrigerator for at least 2-3 hours.
- Parchment Paper is Your Best Friend: Lining your baking dish with parchment paper (with an overhang) makes removal and cleanup incredibly easy. You can lift the entire slab of bars out and transfer it to a cutting board.
- Even Layers Matter: Try to spread each layer as evenly as possible. This ensures every bite has a balanced distribution of all the wonderful ingredients.
- Quality Ingredients: While simple, using good quality chocolate chips, fresh nuts, and aromatic coconut flakes can elevate the flavor profile significantly.
- Customize to Your Liking: Feel free to experiment with different types of chips or nuts. See the “Customization” section below for ideas.
Customizing Your Seven Layer Bars: Endless Variations
The beauty of Seven Layer Bars lies in their adaptability. Once you master the basic recipe, the possibilities for customization are truly endless. Here are some ideas to inspire your creativity:
-
Chocolate Variations:
- Dark Chocolate: Swap milk or semi-sweet chocolate chips for dark chocolate for a richer, less sweet bar.
- Peanut Butter Chips: Add or substitute some chocolate chips with peanut butter chips for a nutty, salty twist.
- Mint Chocolate Chips: Perfect for holidays or a refreshing flavor profile.
- Toffee Bits: Sprinkle in some Heath or Skor toffee bits for an extra layer of crunch and caramel flavor.
-
Nutty Alternatives:
- Almonds or Cashews: Use chopped almonds or cashews instead of pecans or walnuts for a different nutty flavor.
- No Nuts: If allergies are a concern, simply omit the nuts or replace them with more chocolate chips or toasted oats for texture.
-
Crust Creativity:
- Oreo Crust: Use crushed Oreo cookies (and a little less butter) for a rich, chocolatey base.
- Shortbread Crust: A simple crushed shortbread cookie crust can add a buttery, delicate flavor.
-
Fun Add-ins:
- Pretzels: Crush pretzels and sprinkle them in for a delightful sweet and salty crunch (as seen in Caramel Pretzel Magic Bars).
- Dried Fruits: Chopped dried cranberries, cherries, or apricots can add a tangy chewiness.
- M&Ms or Sprinkles: For a more colorful and playful bar, especially for children’s parties.
- Caramel Drizzle: After baking and cooling, add an extra drizzle of caramel sauce for an ultra-indulgent treat.
-
Dietary Adjustments:
- Gluten-Free: Use gluten-free graham crackers or a gluten-free cookie for the crust.
- Dairy-Free/Vegan: Opt for dairy-free butter, vegan chocolate chips, and a plant-based sweetened condensed milk substitute.
Serving and Storage Recommendations
Seven Layer Bars are incredibly versatile when it comes to serving and storage, making them an ideal make-ahead dessert.
Serving Suggestions:
- Classic Dessert: Serve them as is, perhaps with a glass of milk or a cup of coffee or tea.
- With Ice Cream: Warm a bar slightly and serve it alongside a scoop of vanilla bean ice cream for an extra indulgent treat.
- Crumble Topping: Crumble cooled bars over ice cream, yogurt, or even oatmeal for added texture and flavor.
Storage:
- Room Temperature: Store cooled Seven Layer Bars in an airtight container at room temperature for up to 3-4 days. This keeps them chewy and fresh.
- Refrigeration: For longer storage, or if you prefer a firmer bar, refrigerate them in an airtight container for up to a week.
-
Freezing: Seven Layer Bars freeze beautifully!
- Once baked and completely cooled, cut the bars.
- Arrange them in a single layer on a baking sheet, leaving a small space between each bar to prevent sticking.
- Freeze for about 1-2 hours until solid.
- Transfer the frozen bars to a freezer-safe plastic bag or airtight container. If stacking, place wax paper or parchment paper between layers to prevent sticking.
- They can be stored in the freezer for up to 2-3 months.
You can eat them straight from the freezer for a delightful chewy-cold treat, or thaw them in the refrigerator overnight before serving.
Frequently Asked Questions About Seven Layer Bars
Here are answers to some common questions about this classic recipe:
Q: What makes these bars “magic”?
A: The “magic” primarily comes from the sweetened condensed milk. As it bakes, it caramelizes and seeps down through all the layers, creating a wonderfully chewy, gooey texture that binds all the disparate ingredients into one cohesive and delicious bar.
Q: Can I use unsweetened coconut?
A: While you can, it’s generally recommended to use sweetened shredded coconut for Seven Layer Bars. The sweetened variety contributes to the overall sweetness and moistness of the bars, which is a hallmark of this dessert. Unsweetened coconut might make the bars taste less rich and a bit dry.
Q: Do I have to use nuts?
A: No, not at all! If you have a nut allergy or simply prefer your bars without nuts, you can easily omit them. You can replace the volume with more chocolate chips, additional coconut, or even a different crunchy element like crushed pretzels or toasted oats.
Q: How do I prevent the bars from sticking to the pan?
A: The best method is to line your baking dish with parchment paper before adding any ingredients. Leave an overhang on the longer sides so you can easily lift the entire cooled slab of bars out of the pan onto a cutting board. This also makes cleanup a breeze!
Q: Can I make Seven Layer Bars ahead of time?
A: Absolutely! These bars are an excellent make-ahead dessert. You can bake them a day or two in advance and store them at room temperature in an airtight container. They also freeze exceptionally well, making them perfect for preparing weeks or even months ahead for special occasions.
Seven Layer Bars Recipe
Average Rating: 4.31 stars from 26 ratings
Seven Layer Bars
Pin Recipe
Rate Recipe
Save Recipe
Ingredients
- 12 (186 g) whole graham crackers, (about 1 & ½ sleeves)
- ½ cup (113 g) butter, melted (salted or unsalted)
- 1 cup (170 g) chocolate chips, (milk or semi-sweet)
- 1 cup (170 g) white chocolate chips
- 1 cup (170 g) butterscotch chips
- 1 cup (112 g) pecan pieces or other chopped nuts
- 1 cup (120 g) shredded coconut flakes
- 14 oz (396 g) can sweetened condensed milk
Instructions
-
Preheat oven to 350°F (175°C). Lightly grease a 9×13-inch baking dish, or line with parchment paper leaving an overhang for easy removal. Blend graham crackers into fine crumbs. Combine crumbs with melted butter and press firmly into the bottom of the prepared dish.
-
Drizzle about 1/3 of the sweetened condensed milk over the crust. Evenly sprinkle with chocolate chips, white chocolate chips, butterscotch chips, nuts, and coconut flakes. Drizzle the remaining sweetened condensed milk evenly over the top of the layers.
-
Bake for 25-30 minutes, or until the center is bubbling and the edges are golden brown.
-
Allow to cool completely on a wire rack before cutting into bars. For freezing, place bars on a sheet tray with space between them until frozen, then transfer to a freezer-safe bag with parchment paper if stacking. Thaw in the refrigerator or enjoy directly from the freezer.
Video

Watch the video for a visual guide on how to make these delicious Seven Layer Bars!
Notes
Nutrition Information (Estimation)
Disclaimer: Nutritional values were calculated using a third-party tool and are provided as an estimation only. Individual results may vary based on specific ingredients and preparation methods.
Sharing this recipe with a link is both encouraged and appreciated. Copying/pasting and/or screenshots of full recipes to any social media is strictly prohibited. Content and photographs are copyright protected.
Did you make this?
Don’t forget to leave a rating below and make sure to follow on Pinterest and Instagram for more delicious recipes!