
Ultimate Classic Lemon Bars: A Tangy, Sweet, and Effortless Homemade Dessert
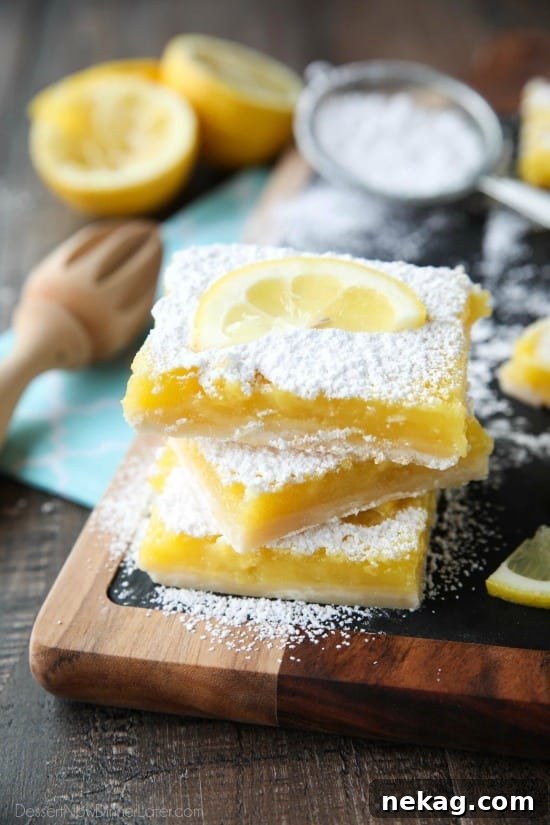
Indulge in the bright, zesty flavor of these classic lemon bars. Perfectly balanced between tangy and sweet, and incredibly easy to prepare, this recipe is a dream come true for any lemon dessert enthusiast. Featuring a buttery shortbread crust topped with a vibrant, smooth lemon curd, these bars are destined to become a staple in your baking repertoire.
There’s something inherently delightful about a lemon dessert. It’s refreshing, invigorating, and offers a palate-cleansing zing that richer sweets often lack. Among the pantheon of citrus-infused treats, lemon bars stand out as an enduring classic. Today, we’re diving deep into the art of making the perfect batch of homemade lemon bars – a recipe that promises an exquisite balance of intense lemon flavor, just the right amount of sweetness, and a delightful texture that simply melts in your mouth.
This isn’t just another lemon bar recipe; it’s a celebration of citrus. My version elevates the classic, ensuring a pronounced tang that makes your tastebuds tingle, complemented by a subtly sweet, crisp crust. If you’re like me and believe a lemon dessert should make you pucker with pleasure, then you’ve found your new favorite recipe. The secret lies in a generous amount of fresh lemon juice and a hint of zest, creating a filling that’s undeniably, gloriously LEMON.
The Irresistible Allure of Classic Lemon Bars
Lemon bars are a timeless treat, cherished for their simplicity and vibrant flavor. They strike a harmonious chord between a crumbly, buttery shortbread base and a silky-smooth, intensely lemony custard topping. This dessert is perfect for any occasion – a sunny spring picnic, a cozy winter gathering, or simply a delightful afternoon pick-me-up. Their bright yellow hue is as cheerful as their taste, making them an instant crowd-pleaser.
Many lemon bar recipes rely solely on lemon juice for their flavor profile. While effective, my recipe takes it a step further by incorporating both ample lemon juice and fresh lemon zest. The zest is packed with aromatic oils, intensifying the citrusy notes and adding a complex depth that pure juice alone cannot achieve. The result? Lemon bars that leave no doubt about their star ingredient – they are unequivocally, sensationally LEMON.
For me, any lemon dessert is a delightful experience, but these lemon bars elevate that experience to pure heaven. The creamy lemon curd dances on my tastebuds, delivering a burst of refreshingly tart and subtly sweet sensations. It’s hard to believe I haven’t shared this incredible recipe sooner! The texture is key here: a firm, yet tender shortbread crust provides the perfect foundation, contrasting beautifully with the jiggly, luscious lemon filling. Once you try these, you’ll understand why they’re the ultimate lemon lover’s dream.
Crafting Your Perfect Lemon Bars: A Detailed Guide
Creating these sensational lemon bars involves two main components: the buttery shortbread crust and the vibrant lemon filling. Each layer plays a crucial role in achieving the desired texture and flavor balance. Let’s break down the process step by step, ensuring your homemade lemon bars turn out perfect every single time.
Ingredients You’ll Need
Precision in ingredients is the first step towards perfection. Here’s what you’ll gather for your lemon bars:

Lemon Bars
Pin
Ingredients
For the Crust:
- 1 cup (120 g) all-purpose flour, (stir, spoon, & level for accuracy)
- ¼ cup (30 g) powdered sugar
- ¼ tsp salt
- ½ cup (113 g) unsalted butter, (cut into 8 pieces and chilled)
For the Lemon Filling:
- 1 ¼ cup (250 g) granulated sugar
- ¼ cup (30 g) all-purpose flour, (stir, spoon, & level)
- 4 large eggs
- zest of 2 lemons, (about 2 tsp; optional, but highly recommended for enhanced flavor)
- ⅔ cup (159 g) fresh lemon juice, (from about 4-5 lemons, ensure it’s freshly squeezed for best taste)
Equipment
-
Juicer (for fresh lemon juice)
-
Zester (for extracting fragrant lemon zest)
-
Food Processor (for easily preparing the crust)
-
11×7-inch Pan (the ideal size for these bars)
-
Parchment Paper (for easy removal and cleanup)
Instructions
-
Prepare for Baking: Preheat your oven to 350 degrees Fahrenheit (175°C). Lightly grease your 11×7-inch baking dish, or line it with parchment paper, leaving an overhang on the sides for easy lifting later.
-
Make the Shortbread Crust: In a food processor, combine the all-purpose flour, powdered sugar, salt, and chilled unsalted butter (cut into small pieces). Pulse the mixture repeatedly until it resembles fine, sandy crumbs. This ensures a tender, melt-in-your-mouth crust. Press the crumb mixture evenly into the bottom of your prepared baking dish. Bake this crust for 18 to 20 minutes, or until it turns a delicate golden brown around the edges. Keep a close eye on it to prevent over-browning.
-
Whip Up the Lemon Filling: While the crust is baking, prepare the luscious lemon filling. In a medium-sized bowl, whisk together the granulated sugar and all-purpose flour until well combined. This step helps prevent lumps and ensures a smooth custard. Crack the large eggs into the bowl, adding them one at a time, and whisk thoroughly after each addition until fully incorporated. Finally, stir in the fresh lemon zest (if using) and the freshly squeezed lemon juice. Continue mixing until the entire filling is smooth and uniform.
-
Combine and Bake: Carefully pour the prepared lemon filling over the hot, pre-baked crust in the baking dish. Return the pan to the oven and bake for an additional 18 to 20 minutes. The bars are ready when the filling is set and no longer jiggles significantly when gently shaken. The center might still appear slightly soft, but it will firm up as it cools.
-
Cool and Serve: Allow the lemon bars to cool completely in the pan on a wire rack. This is a crucial step – patience is key! For the absolute best results, refrigerate the cooled bars for at least one to two hours, or even overnight, until thoroughly chilled. Once cold and firm, use the parchment paper overhang to lift the entire slab out of the pan. Slice into individual bars and generously dust with powdered sugar just before serving. Store any leftover lemon bars in an airtight container in the refrigerator for up to 3-4 days.
Notes
For an extra burst of lemon flavor, consider rubbing the lemon zest into the granulated sugar for the filling before adding other ingredients. This releases the oils from the zest, infusing the sugar with even more aroma and taste. Always use fresh lemons for juicing and zesting; bottled lemon juice simply won’t yield the same vibrant, natural flavor.
Nutrition
Disclaimer: Nutritional values were calculated using a third-party tool and are provided as an estimation only.
Sharing this recipe with a link is both encouraged and appreciated. Copying/pasting and/or screenshots of full recipes to any social media is strictly prohibited. Content and photographs are copyright protected.
Tips for Lemon Bar Success
- Fresh is Best: Always use freshly squeezed lemon juice and fresh zest. Bottled juice lacks the vibrant, complex flavor that makes these bars truly shine.
- Don’t Overbake the Crust: Bake it just until golden brown. An overbaked crust can become tough or dry.
- Don’t Overbake the Filling: The filling should still have a slight jiggle in the center when removed from the oven. It will continue to set as it cools. Overbaking can lead to a rubbery texture.
- Cool Completely: Resist the urge to slice warm bars. The filling needs ample time to set, especially during the crucial chilling phase. Warm bars will be messy and won’t hold their shape.
- Dust with Powdered Sugar Last: If you dust with powdered sugar too early, it will absorb into the moist lemon filling. Dust right before serving for that beautiful, classic finish.
Variations and Serving Suggestions
While classic lemon bars are perfect as they are, there are many ways to customize them to your liking. Consider adding a few blueberries or raspberries to the lemon filling before baking for a fruity twist. For a different flavor profile, you could swap out a portion of the lemon juice for lime juice to create a key lime pie-like bar. A sprinkle of chopped pistachios or shredded coconut on top before chilling can also add an interesting texture and flavor.
These bars are delightful on their own, perhaps with a cup of tea or coffee. They also make a fantastic dessert course, especially after a rich meal, thanks to their refreshing acidity. For a truly decadent experience, serve them alongside a scoop of vanilla bean ice cream or a dollop of fresh whipped cream and a few extra berries.
Storage and Freezing Instructions
Proper storage is essential to keep your lemon bars tasting fresh and delicious. Once cooled and sliced, store them in an airtight container in the refrigerator for up to 3-4 days. Placing parchment paper between layers can prevent sticking.
Lemon bars also freeze remarkably well! To freeze, arrange the cooled, sliced bars in a single layer on a baking sheet and flash freeze them for about an hour until firm. Then, transfer the frozen bars to an airtight freezer-safe container or a freezer bag, separating layers with parchment paper. They can be stored in the freezer for up to 2-3 months. Thaw them in the refrigerator overnight or at room temperature for about an hour before serving. A fresh dusting of powdered sugar will bring them back to life after thawing.
More Tangy Lemon Desserts to Explore
If these lemon bars have ignited your passion for all things citrus, you’re in luck! There’s a whole world of tangy lemon desserts waiting to be discovered. Expand your lemon repertoire with these other fantastic recipes:
- Soft Baked Lemon Cookies: Chewy, tender cookies bursting with lemon flavor.
- Lemon Cheesecake Bars: A creamy, rich cheesecake base infused with zesty lemon.
- Lemon Sugar Cookies: A delightful twist on a classic, perfect for any occasion.
So much lemon goodness to go around! I hope you enjoy baking and savoring these delightful lemon bars as much as I do. Happy baking, my friends!
Did you make this recipe?
We’d love to hear from you! Don’t forget to leave a rating below and share your creations. Make sure to follow us on Pinterest and Instagram for more delicious recipes and baking inspiration!