
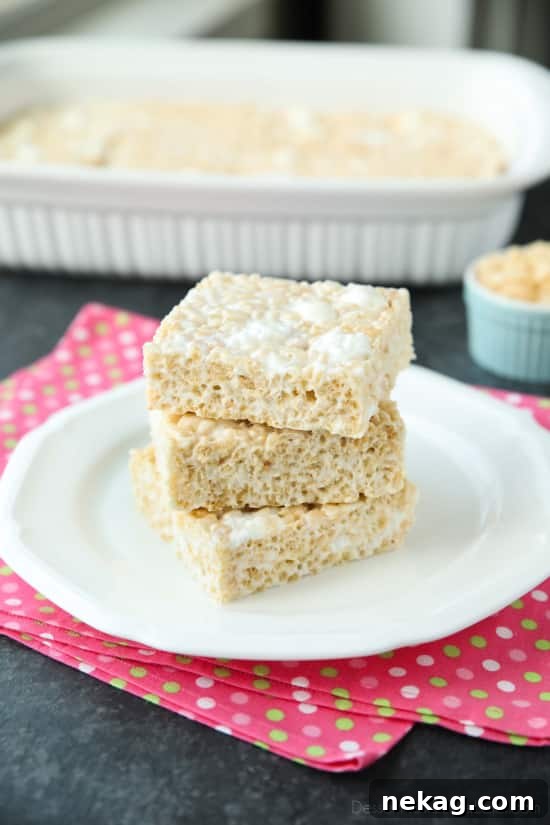
Welcome to the definitive guide for crafting the BEST Rice Krispie Treats Recipe you’ll ever taste. Prepare for a dessert experience that is gloriously soft, incredibly gooey, satisfyingly crispy, and wonderfully chewy – a perfect harmony of textures and flavors. Forget everything you thought you knew about this classic treat; our rendition is superior to the original, promising a delightful indulgence so good, you won’t be able to stop at just one. Gather your family and friends and get ready to enjoy this iconic dessert, truly done right.
For generations, the humble Rice Krispie Treat has held a special place in our hearts and kitchens. It’s a timeless confection, conjuring images of childhood memories, school bake sales, and effortless party desserts. Both kids and adults find themselves captivated by the simple, yet profound, joy of these iconic marshmallow treats. They are, without a doubt, true memory makers, tying us to moments of shared happiness and simple pleasures.
While the classic version holds undeniable charm, there’s also immense fun in exploring unique and creative variations. Imagine elevating your crispy treats with delightful mix-ins like crushed Oreos for a cookies and cream twist, or incorporating a rich Biscoff Spread for a sophisticated caramel note. You can even venture into rich Chocolate Rice Krispie Treats, offering a decadent upgrade, or swap out the traditional cereal for vibrant rainbow crispy treats that are as visually appealing as they are delicious. The possibilities are truly endless when it comes to customizing these versatile squares. However, before you embark on your creative journey, we urge you to master the foundation – the ultimate classic, made with our best Rice Krispie Treats recipe, detailed below.
It’s a truth I’ve come to accept, albeit with a hint of sorrow: the original Rice Krispie Treats recipe, while a good starting point, simply doesn’t deliver the transcendent experience we crave. It often falls short, lacking the profound softness and irresistible chewiness found in the individually wrapped packages at the grocery store. But even those store-bought versions, convenient as they may be, pale in comparison to the homemade perfection you’re about to discover with this recipe. We’re talking about a level of deliciousness that will redefine your expectations.
Unveiling The Best Rice Krispie Treats Recipe
So, what exactly elevates this to “The Best Rice Krispie Treats Recipe”? The secret lies in a generous abundance of key ingredients: way more butter and an incredibly indulgent amount of marshmallows. This deliberate increase isn’t just for show; it’s the fundamental reason these treats achieve their signature characteristics of being exceptionally soft, exquisitely chewy, and delightfully gooey. The rich butter ensures a tender texture, while the extra marshmallows melt into a luscious, stretchy binder that perfectly coats every crispy rice kernel.
Every single time I whip up a batch of these glorious Rice Krispie Treats for friends, family, or neighbors, the reaction is consistently the same: utter rapture. They rave about the unparalleled texture and flavor, invariably asking for the recipe. For a while, I’d simply giggle and tell them my little secret – “just double the butter and marshmallows!” But after countless requests and witnessing the pure joy these treats bring, I realized it was time to share the exact methodology. Now, everyone can experience the unparalleled delight of my favorite Rice Krispie Treats recipe, creating moments of pure, sweet bliss in their own homes.
Take a moment to truly appreciate the exquisite ratio of marshmallow to crispy rice cereal in these treats. When you gently pull a piece apart, you’re not just breaking a solid block; you’re greeted with that tantalizing “cheese-pull” effect, but with glistening, stretchy marshmallow instead. This visual testament to their gooeyness is just a preview of the extraordinary taste and texture awaiting you. It’s this perfect balance that ensures every bite is an explosion of crispy, chewy, and utterly delicious goodness.
Best Rice Krispie Treats Recipe
Pin
Rate
Ingredients
- 6 cups (160 g) crispy rice cereal
- 8 Tbsp (113 g) butter, (1 stick)
- 20 oz (566 g) mini marshmallows, (two 10-oz bags) divided
- ¼ tsp salt, optional
Instructions
-
Coat a 13×9-inch pan with cooking spray. Set aside.
-
Place crispy rice cereal in a large bowl. Add half of a 10-oz bag of mini marshmallows to the dry cereal. (Approximately 4 cups.)
-
In a large pot, melt the butter over medium-low heat. Add the remaining marshmallows and salt (if desired). Stir constantly until just barely melted completely, ensuring no lumps remain but avoiding overcooking. Remove from heat. Let the mixture rest for 1-2 minutes to cool slightly. This crucial step prevents the marshmallows mixed with the cereal from melting entirely, preserving their delightful texture.
-
Pour the slightly cooled melted marshmallow mixture over the cereal and dry marshmallows. Stir gently but thoroughly until the cereal is evenly coated. Do not overmix. Pour the mixture into the prepared pan and flatten with a greased spatula or rolling pin. Press down lightly to avoid compacting the treats too much, which can make them hard. Cool completely at room temperature.
-
Once cooled, cut into squares of your desired size and serve. For optimal freshness, cover and store any leftovers with plastic wrap or in an airtight container at room temperature for up to 5 days.
Notes
Disclaimer: Nutritional values provided are estimations and should not be considered a substitute for professional nutritional advice.
Sharing this recipe with a link is both encouraged and appreciated. Copying/pasting and/or screenshots of full recipes to any social media is strictly prohibited. Content and photographs are copyright protected.
Did you make this?
Don’t forget to leave a rating below and make sure to follow on Pinterest and Instagram for more!
Tips for Achieving Perfect, Gooey Rice Krispie Treats Every Time
Creating truly outstanding Rice Krispie Treats goes beyond just following the recipe; it involves a few key techniques and considerations that guarantee that signature soft, gooey texture. Here are our top tips for success:
- Use Fresh Marshmallows: This is non-negotiable! Old, stale marshmallows will not melt correctly and will result in hard, dry treats. Always opt for fresh, soft mini marshmallows for the best results.
- Melt Low and Slow: Patience is a virtue when melting butter and marshmallows. Use medium-low heat and stir constantly. Overheating marshmallows can cause them to become stiff and grainy when cooled, leading to hard treats. As soon as they are mostly melted with just a few small lumps remaining, remove them from the heat and stir until smooth.
- Don’t Overmix: Once you combine the marshmallow mixture with the cereal, mix just enough to evenly coat the cereal. Excessive stirring can crush the cereal and incorporate too much air, leading to a denser, less gooey treat.
- Lightly Press into the Pan: When transferring the mixture to your prepared pan, resist the urge to pack it down firmly. Use a greased spatula or a piece of greased parchment paper to gently press the treats into an even layer. Over-compressing them will result in hard, dense squares rather than soft, airy ones.
- Cool Completely: Allow the treats to cool entirely at room temperature before cutting. Rushing this step can lead to a sticky mess and less defined squares.
Get Creative: Delicious Variations and Flavor Boosts
While our classic recipe is perfection, there’s always room to play and personalize your Rice Krispie Treats. Here are some fantastic ideas to inspire your next batch:
- Chocolate Lover’s Dream: Drizzle cooled treats with melted chocolate (milk, dark, or white) or fold in chocolate chips (mini or regular) during the mixing stage. You can also use cocoa crispy rice cereal for a full chocolate experience.
- Sprinkle Fun: Add a festive touch by folding in colorful sprinkles with the cereal or scattering them on top before the treats set. Perfect for birthdays and holidays!
- Nutty Crunch: For added texture and flavor, gently fold in chopped nuts like pecans, walnuts, or peanuts.
- Extract Experiments: Enhance the flavor profile with a dash of extract. Vanilla is classic, but try almond extract for a delicate sweetness, peppermint for a holiday twist, or even a hint of orange or lemon zest for brightness.
- Different Cereals: Don’t limit yourself to just crispy rice! Explore other cereals like Chex (for more texture), Fruity Pebbles or Froot Loops (for vibrant colors and fruity flavor), or even Cinnamon Toast Crunch for a spiced treat. Adjust marshmallow quantities slightly if the cereal is very dense.
- Caramel Swirl: Swirl in some melted caramel sauce with the marshmallow mixture, or drizzle it over the top of the cooled treats. A sprinkle of sea salt can balance the sweetness beautifully.
Storage and Shelf Life: Keeping Your Treats Fresh and Soft
To ensure your glorious Rice Krispie Treats remain as soft, gooey, and irresistible as the day you made them, proper storage is key. Here’s how to keep them fresh:
- Airtight is Best: Always store your Rice Krispie Treats in an airtight container. Exposure to air is the quickest way for them to dry out and become hard.
- Room Temperature: Keep them at room temperature, away from direct sunlight or heat sources. Refrigeration can make them hard and chewy due to the marshmallow solidifying.
- Layer with Parchment: If stacking multiple layers in a container, place a sheet of parchment paper between them to prevent sticking.
- Shelf Life: Properly stored, your homemade Rice Krispie Treats will remain fresh and delicious for up to 3-5 days. While they are still safe to eat after this, they may start to lose their optimal texture.
- Freezing (Optional): For longer storage, you can freeze Rice Krispie Treats. Wrap individual squares tightly in plastic wrap, then place them in an airtight freezer-safe bag or container. They can be frozen for up to 6 weeks. Thaw at room temperature for a few hours before serving.
Frequently Asked Questions About Rice Krispie Treats
Even though they seem simple, a few common questions pop up when making Rice Krispie Treats. Here are some answers to help you troubleshoot and perfect your batch:
- Q: Why are my Rice Krispie Treats hard?
A: This is usually due to one of two reasons: either the marshmallows were overheated (cooked too long or at too high a temperature, causing them to crystalize), or the mixture was packed too firmly into the pan. Remember to melt marshmallows low and slow, and press gently. - Q: How do I keep Rice Krispie Treats soft and gooey?
A: Use fresh marshmallows, melt them gently, do not overmix, and press them lightly into the pan. Our recipe’s generous butter and marshmallow ratio is also key to achieving maximum gooeyness. Store them in an airtight container at room temperature. - Q: Can I use old marshmallows?
A: It’s strongly advised not to. Old or stale marshmallows will not melt into a smooth, gooey consistency and will lead to stiff, less enjoyable treats. Fresh marshmallows are essential for the best texture. - Q: Can I double the recipe?
A: Yes, absolutely! If you’re feeding a crowd, you can easily double the recipe. Just ensure you use a larger pot for melting the marshmallows and a larger pan (e.g., a full sheet pan) for setting the treats. - Q: What’s the best way to cut sticky Rice Krispie Treats?
A: For clean cuts, lightly grease your knife with cooking spray or butter, or run it under hot water and wipe it dry between cuts. A pizza cutter can also work wonders! - Q: Can I make them ahead of time for a party?
A: Yes, they are an excellent make-ahead dessert! Prepare them up to 1-2 days in advance and store them in an airtight container at room temperature. They will still be perfectly soft and delicious.
There you have it – the ultimate guide to creating the best Rice Krispie Treats recipe that will undoubtedly become a treasured favorite. With their unbeatable soft, gooey, crispy, and chewy texture, these treats are more than just a dessert; they’re a celebration of simple pleasures and shared moments. Go ahead, gather your ingredients, follow these steps, and prepare to delight everyone with a batch of homemade perfection. Enjoy the magic!