
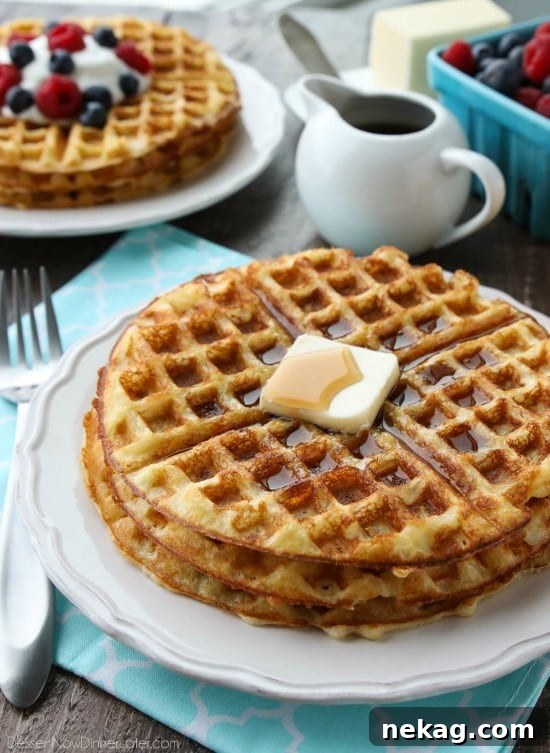
Welcome to the definitive guide for crafting the most exquisite buttermilk waffles you’ll ever taste! This isn’t just a recipe; it’s a revelation. Prepare to discover how to create unbelievably fluffy waffles that boast an irresistible lightness and a perfectly crispy exterior, all with surprising ease. Say goodbye to dense, uninspired breakfast fare and embrace the joy of waking up to these golden wonders, whether for a leisurely breakfast or a delightful brunch.
Beyond Bland: My Waffle Transformation
For years, I was indifferent to waffles. My experiences were consistently underwhelming; they were often bland, heavy, and utterly forgettable. I simply couldn’t understand the fervent devotion many people held for them. That all changed the moment I tasted *this* buttermilk waffles recipe. It was an awakening, a complete paradigm shift in my understanding of what a waffle could be. These aren’t just waffles; they are a culinary experience. They are remarkably light, so fluffy they practically melt in your mouth, yet they possess an incredible crispness that holds up beautifully. The distinct tang of buttermilk shines through, creating a flavor profile that is utterly addictive, especially when paired with my famous blonde butter syrup. It’s a combination that transforms breakfast into an eagerly anticipated event.
The Genesis of a Perfect Waffle: A Christmas Discovery
The story of how this incredible recipe entered my life is a cherished one. It was during a festive Christmas celebration at my in-laws’ home. They had just acquired a shiny new waffle maker – a sleek Breville model, a piece of kitchen equipment I instantly coveted and secretly wished for myself! They were eager to put it to the test, and little did I know, this simple desire would lead to my waffle enlightenment.
My in-laws had recently returned from a trip to Boston, where they visited my brother-in-law and his wife. During their stay, they experienced the culinary delight of a charming bed and breakfast called Amerscot House Inn (which, sadly, has since been sold). They raved about the inn’s waffles, declaring them “the most amazing waffles!” Naturally, they did what any true food lover would do: they asked the cook for the recipe. And so, this treasured formula for perfect waffles found its way into our family. When they prepared these incredible waffles for us that Christmas morning, I was utterly captivated. It was love at first bite, and I knew I had to recreate that magic in my own kitchen.
Bringing the Magic Home: Waffles for Every Waffle Maker
Upon returning from our Christmas break, I was determined to try this legendary buttermilk waffles recipe at home. My in-laws’ Breville waffle maker produced deliciously deep and robust waffles, but I only had my trusty Cuisinart waffle maker, which yields thinner, classic-style waffles. While the thickness varied, the essence of the recipe remained. The waffles, though not as plump as those from the Breville, were still ridiculously delicious – light, crispy, and bursting with flavor. This experience solidified my belief that the magic of this recipe lies in its ingredients and method, not solely in the specific waffle iron. Whether you have a classic round waffle maker, a Belgian iron with deep pockets, or even a fancy rotating model, this buttermilk waffle batter is incredibly forgiving and consistently delivers exceptional results.
The Buttermilk Secret: Why it’s Non-Negotiable for Fluffy Waffles
Through numerous batches, we’ve repeatedly confirmed one absolute truth about this recipe: you must use real buttermilk. This isn’t a suggestion; it’s a critical component for achieving the perfect texture and flavor. We once attempted to substitute with whole milk, and the results were noticeably inferior. The batter became thinner, and the resulting waffles were somehow denser and lacked that signature airy lightness and crisp edge that makes this recipe stand out.
The science behind buttermilk’s superiority lies in its acidity. Buttermilk, being acidic, reacts synergistically with the leavening agents in the recipe – baking powder and baking soda. This acid-base reaction creates carbon dioxide bubbles, which are trapped in the batter, causing it to puff up beautifully and thicken to the ideal consistency. These bubbles are essential for creating the incredibly light and airy internal structure that defines a truly great waffle. Without this crucial chemical reaction, which regular milk simply cannot provide, your waffles will fall flat, both in volume and in flavor. The unique tang of buttermilk also imparts a depth of flavor that is simply irreplaceable, adding a subtle complexity that elevates these waffles far above their bland counterparts. Do not be tempted to use a homemade buttermilk substitute (milk plus vinegar or lemon juice) for this specific recipe, as the precise balance achieved with commercial buttermilk is paramount for the optimal chemical reaction.
Mastering the Art of Waffle Making: Tips for Success
Achieving waffle perfection goes beyond just great ingredients; it also involves a few key techniques. First and foremost, resist the urge to overmix your batter. A lumpy batter is a happy batter when it comes to waffles. Overmixing develops the gluten in the flour, which leads to tough, chewy waffles instead of the desired light and fluffy texture. Mix just until the wet and dry ingredients are combined, with a few small lumps remaining. Secondly, ensure your waffle iron is properly preheated and lightly greased. A well-heated iron will give you that coveted crispy exterior and prevent sticking. While most modern waffle makers have non-stick coatings, a light brush of oil or a quick spray can further ensure easy release and enhance crispness. Pay attention to your waffle maker’s indicator light, or simply wait for it to be piping hot before adding your batter.
For consistent results, measure your batter for each waffle. This ensures uniform size and cooking time. Once the batter hits the hot iron, be patient. Cooking times vary by machine, but generally, 3-5 minutes is standard. Don’t lift the lid too early! Wait for the steam to subside significantly, indicating the waffle is mostly cooked, and for the waffle to turn a beautiful golden brown. The longer you cook it (within reason), the crispier it will become. For truly golden and crispy edges, let it cook until you hear a slight change in the sound or see less steam escaping. Finally, consider the temperature of your ingredients. Room temperature eggs and buttermilk integrate more smoothly into the batter, preventing lumps and ensuring a more uniform texture in the final product. A little planning can go a long way in achieving those ideal fluffy buttermilk waffles.
Serving Suggestions and Creative Toppings
While these buttermilk waffles are phenomenal on their own, or simply with a drizzle of maple syrup, don’t limit your imagination when it comes to toppings! Elevate your waffle experience with a variety of sweet and savory accompaniments. For sweet enthusiasts, fresh berries (strawberries, blueberries, raspberries) and sliced bananas are always a hit. A dollop of freshly whipped cream, a sprinkle of powdered sugar, or a generous drizzle of chocolate sauce can turn a simple breakfast into a decadent dessert. Chopped nuts like pecans or walnuts add a delightful crunch. For a truly indulgent treat, consider adding a scoop of vanilla ice cream and a caramel drizzle.
Waffles aren’t just for sweet cravings! They make a fantastic base for savory meals too. Pair them with crispy fried chicken for the ultimate chicken and waffles experience. A side of thick-cut bacon, scrambled eggs, or even a fried egg on top can transform your buttermilk waffles into a hearty brunch sensation. For something a little different, try topping them with a light cream cheese spread and smoked salmon, or even a spicy sausage gravy. The versatility of these waffles means you can customize them to suit any palate or mealtime.
Storing and Reheating: Enjoying Waffles Anytime
One of the great advantages of these delicious buttermilk waffles is how well they store and reheat. While they tend to disappear quickly, if you happen to have any leftovers, they crisp up wonderfully in a toaster, bringing them back to their former glory. To store cooked waffles, allow them to cool completely on a wire rack first. This prevents them from becoming soggy due to trapped steam. Once cooled, place them in an airtight container or a freezer-safe bag. They will keep in the refrigerator for up to 2-3 days.
For longer storage, these waffles freeze beautifully. Stack them with parchment paper in between to prevent sticking, then place them in a freezer bag. They can be frozen for up to 1-2 months. When you’re ready to enjoy them, there’s no need to thaw! Simply pop them directly into a toaster, toaster oven, or even an air fryer until they are heated through and perfectly crispy. The toaster is my preferred method for achieving that ideal crunch. Avoid the microwave, as it will make them soft and rubbery. With proper storage and reheating, you can enjoy these delightful buttermilk waffles anytime you crave them.
Frequently Asked Questions About Buttermilk Waffles
Why are my waffles soggy?
Soggy waffles are often the result of not cooking them long enough, overcrowding the waffle iron, or letting them sit in a pile after cooking. Ensure your waffle iron is fully preheated, cook until steam subsides, and place cooked waffles on a wire rack rather than stacking them, which traps steam.
Why are my waffles sticking to the iron?
Waffles usually stick if the iron isn’t hot enough, isn’t properly seasoned, or wasn’t greased. Make sure to preheat thoroughly. Even non-stick irons benefit from a light brush or spray of oil before the first waffle. Avoid lifting the lid too early, as this can tear an unbaked waffle.
Can I make the batter ahead of time?
While it’s best to cook buttermilk waffle batter immediately for optimal fluffiness (due to the leavening agents’ reaction), you can prepare the dry ingredients ahead of time. Mix dry ingredients and store them. When ready to cook, add the wet ingredients. If you must make the full batter ahead, store it in the refrigerator for a few hours, but expect a slightly less airy texture as the leavening power diminishes over time.
What’s the difference between Belgian and American waffles?
Belgian waffles typically have deeper pockets, are often made with a lighter, yeasted batter (though baking powder/soda versions exist), and tend to be crispier on the outside and fluffier inside. American waffles, or classic waffles, are usually thinner with shallower grids and a denser, cake-like texture. This recipe leans towards the fluffy and crispy texture often associated with good Belgian waffles, even in a classic waffle iron.
Buttermilk Waffles Recipe
Created by: Amber Brady
Prep time: 5 mins
Cook time: 4 mins
Total time: 9 mins
Yields: 5 large/thick waffles or 8 thin waffles (depends on your waffle maker)
Ingredients
- 1 ½ cups (180 g) all-purpose flour
- 1 tsp baking powder
- 1 tsp baking soda
- ½ tsp salt
- 1 Tbsp sugar
- 2 large eggs
- 2 cups (473 ml) buttermilk*
- ½ cup (118 ml) canola/vegetable oil
Equipment
- Waffle Maker
- Large mixing bowl
- Whisk
Instructions
- In a large bowl, combine all dry ingredients (flour, baking powder, baking soda, salt, sugar) and whisk thoroughly to ensure they are well distributed.
- Add the wet ingredients to the bowl with the dry ingredients: eggs, buttermilk, and oil.
- Mix together briefly with a whisk or spatula. Do not overmix; the batter should still appear lumpy. Overmixing will develop the gluten, resulting in tougher, less airy waffles.
- Preheat your waffle maker according to manufacturer instructions. Once hot, lightly grease the plates if necessary.
- Pour about ½ cup of batter (or the amount recommended by your waffle maker for each waffle) onto the hot iron. Close the lid and cook for approximately 4 minutes, or until the waffle is golden brown and crispy, and steam largely subsides.
- Remove the cooked waffle and place it on a wire rack to prevent it from getting soggy while you cook the remaining batter.
- Serve immediately with your favorite toppings.
Notes
*MUST use real buttermilk. (Milk + vinegar or lemon juice will not yield the same results.) The acid from the buttermilk is crucial for reacting with the baking powder and baking soda, causing the batter to puff up and thicken to create wonderfully light and crispy waffles. Regular milk will result in a thinner batter and denser waffles.
Video
A video demonstration for this recipe is coming soon!
Disclaimer: Nutritional values were calculated using a third-party tool and are provided as an estimation only.
Sharing this recipe with a link is both encouraged and appreciated. Copying/pasting and/or screenshots of full recipes to any social media is strictly prohibited. Content and photographs are copyright protected.
I cannot recommend this buttermilk waffles recipe enough. It truly transformed my opinion of waffles, turning me into a devout fan. These golden delights will disappear in a flash from your breakfast table, but should you find yourself with a few leftovers, they reheat beautifully in a toaster, regaining their perfect crispness. Get ready to impress your family and friends, or simply treat yourself to the ultimate breakfast indulgence. Enjoy, my friends!
Did you make this?
Don’t forget to leave a rating below and make sure to follow on Pinterest and Instagram for more delicious recipes!