

White Chocolate Raspberry Scones offer a delightful balance of sweet and tart, making them an irresistible treat for any time of day. Crafted with creamy white chocolate chips and vibrant fresh (or frozen) raspberries, these tender pastries are surprisingly easy to master. Whether you’re planning an elegant brunch, a cozy breakfast, or a sophisticated afternoon tea, these scones promise a perfect, crumbly texture and burst of flavor that will impress your guests and satisfy your cravings.
Elevate your morning table or sweeten your afternoon break with these homemade delights. If you’re looking to expand your brunch repertoire, consider exploring other classic recipes like the best cinnamon rolls, my renowned flaky biscuit recipe, or a comforting slice of sour cream coffee cake. Each offers a unique experience, but these white chocolate raspberry scones stand out for their exquisite flavor profile and inviting aroma.

Unveiling the Difference: Biscuits vs. Scones
Many home bakers often confuse scones with biscuits, and it’s understandable why. At first glance, they share a striking resemblance, and their core ingredients are indeed quite similar. However, delving deeper reveals distinct characteristics that set these two beloved baked goods apart, particularly in their texture and typical serving styles.
The primary distinction lies in their composition. Scones are traditionally made with heavy cream and eggs, which contribute to their richer, more tender, and crumbly texture. This combination yields a pastry that is dense yet delicate, often with a slightly sweet profile. In contrast, classic American biscuits are typically crafted with buttermilk and do not include eggs. The buttermilk reacts with baking soda to create a light, airy, and distinctively flaky interior, a hallmark of a perfectly made biscuit.
Texture-wise, biscuits boast a wonderful, layered, flaky interior that pulls apart easily, often served with savory dishes like gravy or used for breakfast sandwiches. Scones, on the other hand, offer a more crumbly, cake-like consistency, making them ideal companions for sweet toppings. Their rich dough is often enhanced with additions like fruits, nuts, or chocolate, elevating them to a more dessert-like status.
Furthermore, scones are frequently finished with coarse sugar, a light glaze, or a decadent drizzle, making them inherently sweeter than their biscuit counterparts. This is why you often find scones brimming with delightful inclusions such as fresh berries, dried fruits, or, in the case of this recipe, luxurious white chocolate chips and sweet-tart raspberries. These additions not only enhance their flavor but also contribute to their distinct identity as a versatile pastry perfect for any sweet occasion.

Embrace the Delight: Raspberry White Chocolate Chip Scones
Scones hold a special place in the realm of breakfast and brunch treats. While undeniably decadent and often resembling a dessert, their tender crumb and versatility allow them to gracefully pass as a sophisticated breakfast or brunch pastry. The beauty of scones lies in their ability to carry a wide array of flavors, adapting to any palate or seasonal whim.
I’ve always been inspired by the creativity of fellow bakers, and my friend Michelle, a true scone connoisseur, constantly whips up an impressive variety of flavors. Her repertoire includes delightful creations like orange cream scones, refreshing lemon poppyseed scones, and luscious strawberry cream cheese scones, to name just a few of her masterpieces. Her passion for these delectable pastries reignited my desire to revisit and perfect my own scone recipes.
It was her enthusiasm that prompted me to give this beloved Raspberry White Chocolate Chip Scones recipe a much-needed update. Although it’s one of the few scone recipes currently featured on my blog, alongside my comforting apple brown sugar scones, it truly is a standout. This recipe combines the classic tenderness of a scone with the irresistible sweetness of white chocolate and the bright burst of fresh raspberries, creating a flavor combination that is simply divine. Let me guide you through the process of creating these exquisite pastries right in your own kitchen.

Crafting Culinary Magic: How to Make White Chocolate Raspberry Scones
Making truly exceptional scones requires a few key techniques, but don’t be intimidated – the process is quite straightforward. The secret to light, tender, and perfectly crumbly scones lies in careful preparation and the right ingredients. Follow these steps for an unforgettable baking experience.
PRO TIP: The golden rule for achieving the best-shaped and most tender scones is to use exceptionally cold ingredients. Cold butter, cold heavy cream, and even a chilled mixing bowl will significantly aid in preventing the butter from melting too quickly. This ensures that the butter remains in small pieces, creating pockets of steam during baking, which results in that desirable flaky-tender texture.
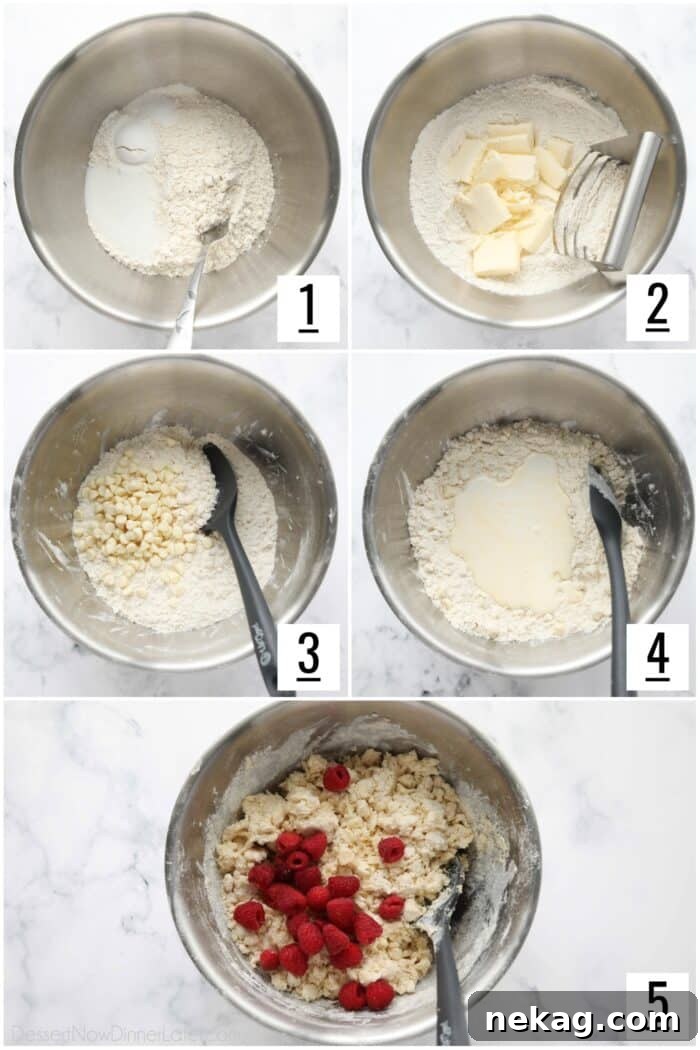
- In a spacious mixing bowl, combine the dry ingredients: flour, granulated sugar, baking powder, and a pinch of salt. Whisk them together thoroughly to ensure even distribution, which is crucial for a consistent rise and flavor.
- Introduce the cold, cubed butter to the dry mixture. Using a pastry blender (or your fingertips for a more hands-on approach), efficiently cut the butter into the dry ingredients. Continue until the mixture resembles coarse crumbs, with some pieces of butter still visible, roughly the size of small peas. This step is vital for creating pockets of steam and a tender crumb. (NOTE: Cutting the cold butter into small, tablespoon-sized pieces beforehand will significantly speed up this process.)
- Once the butter is incorporated, gently fold in the white chocolate chips. Ensure they are evenly distributed throughout the crumbly mixture without overworking the dough.
- In a separate small bowl or liquid measuring cup, whisk together the heavy cream, large egg, and vanilla extract (or almond extract, for a slightly different aromatic note). Ensure these wet ingredients are thoroughly combined.
- Pour the wet mixture into the dry ingredients. With a rubber spatula or wooden spoon, stir everything together gently until the mixture just begins to clump and come together. At this point, carefully add the fresh or frozen raspberries and fold them in very gently. The goal is to distribute the raspberries without crushing them excessively, maintaining their shape and minimizing the release of too much moisture into the dough.
Achieving Perfection: Shaping Your Scones
The shaping process is a simple yet crucial step in creating beautifully uniform and appealing scones. Handling the dough minimally is key to maintaining its tender texture.
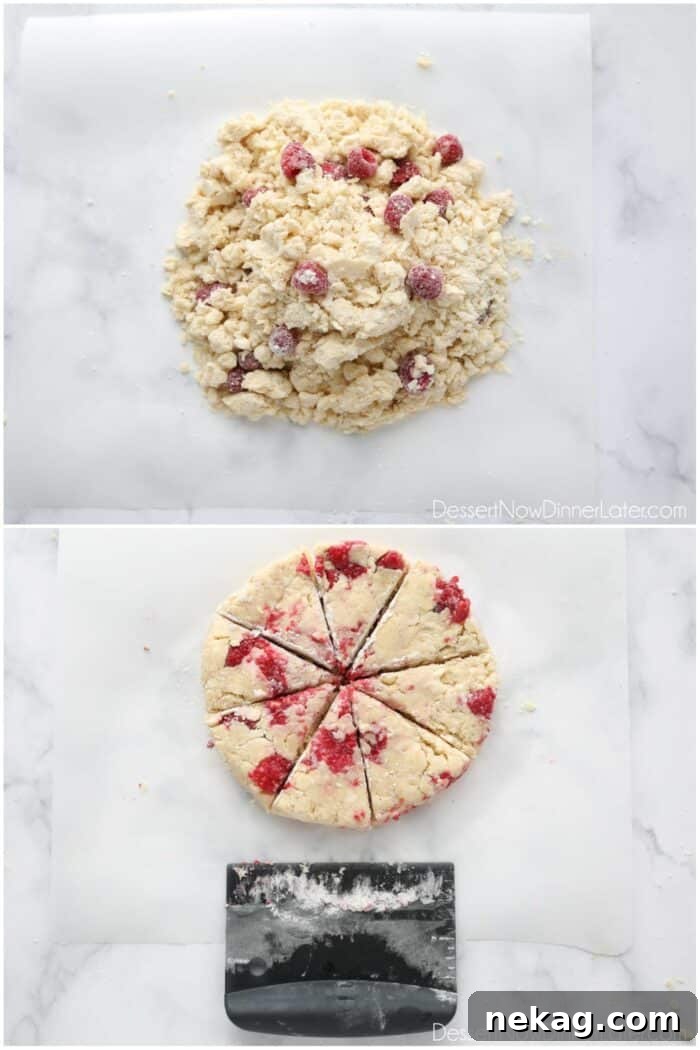
- Carefully empty the scone mixture onto a lightly floured surface, such as a clean countertop or a large pastry mat. Using your hands, gently press the mixture together to form a cohesive, round, flat disc. Aim for a diameter of about 7 inches and a uniform thickness of approximately 1 inch. Add a light dusting of extra flour as needed to prevent any sticking, but avoid incorporating too much additional flour into the dough.
- Once your disc is formed, use a sharp knife or a bench scraper to cut the disc into 8 even wedges, much like slicing a pizza. Handle these wedges with care, using a pie server or a wide spatula to gently transfer each piece to a baking sheet that has been lined with parchment paper or a silicone baking mat. Arranging them with a little space in between will allow for even baking.
Baking to Golden Perfection and Storing for Freshness
The final steps involve baking your scones to a beautiful golden hue and then preparing them for serving or storage. These stages are critical for both taste and presentation.
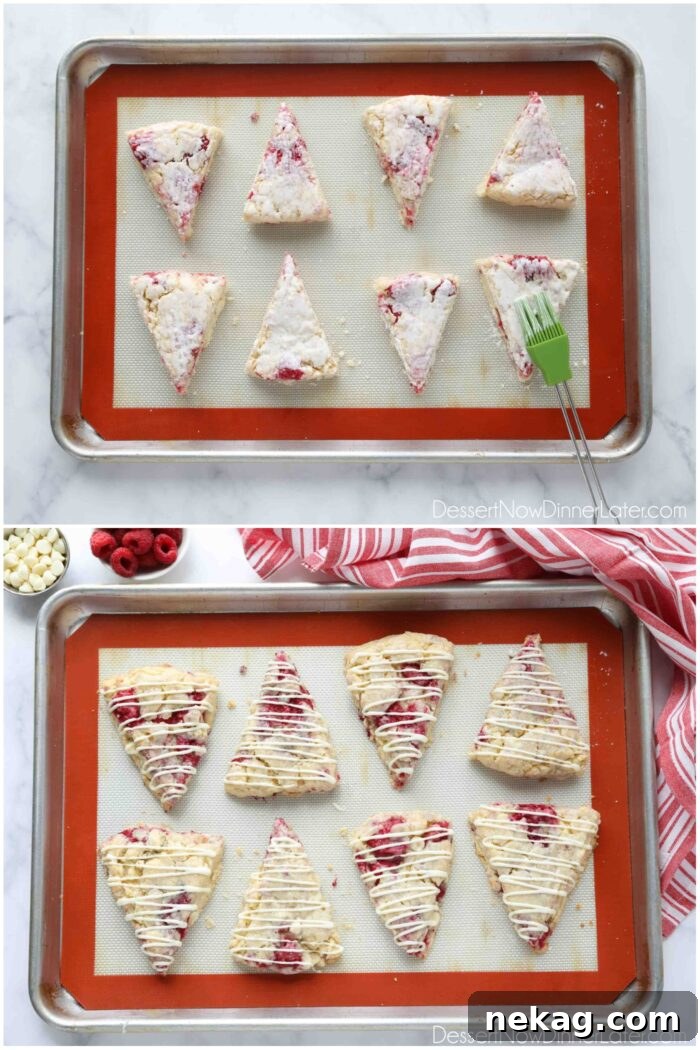
- Before baking, lightly brush the tops of your prepared scones with a little extra heavy cream. This helps them achieve a gorgeous golden-brown finish and adds to their tender crust. For an extra touch of sweetness and texture, you may also choose to sprinkle them with coarse sugar, such as Turbinado or Demerara sugar, at this point. Bake the scones in a preheated oven at 400˚F (200˚C) for approximately 15 minutes, or until the edges and bottoms are beautifully golden brown and a skewer inserted into the center comes out clean.
- Once baked, transfer the scones on their baking sheet to a wire rack and allow them to cool completely. For the luscious white chocolate drizzle, melt 1/4 cup of white chocolate chips with 1/2 teaspoon of a neutral-tasting oil (like canola or vegetable oil) in a microwave-safe bowl. Heat in 15-second intervals, stirring thoroughly after each to ensure smooth melting and prevent burning. Drizzle or pipe the melted white chocolate artistically over the cooled scones. Allow the chocolate to set and harden before serving, which can be expedited by placing them in the refrigerator for a few minutes.
- To maintain their freshness, store white chocolate raspberry scones in an airtight container at room temperature for up to 1-3 days. For extended freshness, they can be stored in the refrigerator for up to 1 week. Always bring them back to room temperature or gently warm them before serving for the best flavor and texture.
Maximizing Freshness: Freezing Scones for Later Enjoyment
One of the many benefits of making homemade scones is their freezer-friendliness, allowing you to enjoy freshly baked treats with minimal effort whenever the craving strikes. So, can you freeze scones? Absolutely! You have the option to freeze either the unbaked dough or the fully baked scones.
To freeze unbaked scone dough: You can freeze the entire shaped dough disc, tightly wrapped in a double layer of plastic wrap to prevent freezer burn. Alternatively, and often preferred for convenience, flash-freeze the individually cut scone wedges. Arrange the wedges on a parchment paper or silicone-lined baking sheet and freeze for about 1 hour until solid. Once firm, transfer the frozen scones into a freezer-safe zip-top bag or airtight container, ensuring they don’t stick together. When you’re ready to bake, place the frozen scones directly onto a prepared baking sheet and bake as directed, adding approximately 5 minutes to the total baking time. This method ensures maximum freshness.
IMPORTANT NOTE: Baking scones directly from frozen is highly recommended. I do NOT advise thawing the scone dough before baking, especially with this raspberry flavor. Thawing can cause the raspberries to “weep,” releasing excess moisture into the dough. This added moisture can lead to the scones spreading out too much and baking flatter, compromising their desirable shape and texture.
To freeze baked scones: Once your white chocolate raspberry scones have fully cooled, flash freeze them using the same method as for the dough: arrange on a baking sheet until solid, then transfer to a freezer-safe zip-top bag or airtight container. To enjoy, simply thaw the scones at room temperature. For a truly fresh-from-the-oven experience, you can gently reheat them in a low oven (around 250°F / 120°C) for 5-10 minutes until warmed through.

Mastering Scones: Advanced Tips for Consistently Perfect Results
While the recipe for white chocolate raspberry scones is straightforward, incorporating a few expert tips can elevate your baking from good to truly exceptional. These insights will help you achieve that sought-after tender, crumbly texture every time.
- The Art of Minimal Handling: Do NOT Over-work the Dough. This is perhaps the most critical tip for tender scones. Over-mixing or over-kneading the dough develops the gluten in the flour, leading to a tough, chewy scone rather than a light, crumbly one. You really only need to bring the ingredients together just enough to form a cohesive disc. Avoid the urge to knead it like bread dough. Gentle handling preserves the delicate structure, ensuring your scones remain melt-in-your-mouth delicious.
- Embrace the Chill: Use Cold Ingredients and Work Quickly. Just like making homemade biscuits or a perfect all-butter pie crust, maintaining the coldness of your butter is paramount. Small, cold pieces of butter create steam as they bake, forming those delightful pockets that give scones their tender, crumbly texture. If the butter melts before baking, your scones may spread and lose their beautiful shape, becoming dense. Using cold heavy cream, a cold egg, and even a chilled mixing bowl can make a significant difference. Work efficiently to minimize the time the dough spends at room temperature.
- Handle Raspberries with Care: Add Them Gently. Fresh raspberries are delicate and can easily break apart when mixed into dough. While a slight breaking is perfectly normal and adds to the rustic charm of homemade scones, try to keep them as intact as possible. If the fruit is completely mashed, the released juices will add excess moisture to the dough, potentially making it too wet and affecting the final texture. This is also why frozen raspberries work exceptionally well in these scones; they hold their shape better during mixing. If using frozen, do NOT thaw them first; incorporate them into the dough while they are still frozen to prevent premature moisture release.
If You Make This Recipe, Please Rate and Review it in the Comments Below. THANKS!

White Chocolate Raspberry Scones
Pin Recipe
Rate This Recipe
Ingredients
- 2 cups (240 g) all-purpose flour, stir, spoon & level
- ⅓ cup (68 g) granulated sugar
- 1 Tbsp baking powder
- 1 tsp salt, use half if you are sensitive to salt
- ½ cup (113 g) unsalted butter, cold (cut into Tablespoons)
- ½ cup (85 g) white chocolate chips, Guittard or Ghirardelli brand recommended
- ½ cup (118 ml) heavy cream
- 1 large egg
- ½ tsp vanilla extract, or almond extract
- ¾ cup (105 g) raspberries, rinsed and dried
For topping:
- 2 Tbsp heavy cream
- ¼ cup (43 g) white chocolate chips (Guittard or Ghirardelli brand)
- ½ tsp oil, canola/vegetable, for thinning the chocolate
Equipment
-
Half Sheet Pans
-
Silicone Baking Mat
-
6-Quart Steel Mixing Bowl
-
Pastry Blender
-
Silicone Spatula Set
-
Stainless Steel Scraper/Chopper
Instructions
-
Preheat oven to 400 degrees Fahrenheit (200°C). Line a baking sheet with parchment paper or a silicone baking mat. Set aside.
-
In a large bowl, stir together the flour, sugar, baking powder, and salt. Add the cold butter and use a pastry blender to cut the butter into the dry ingredients until the mixture resembles coarse crumbs (pea-sized pieces of butter are good). Fold in the white chocolate chips.
-
Whisk together the heavy cream, egg, and vanilla (or almond extract). Add to the dry ingredients. Stir gently until the mixture starts to clump together. Add raspberries and fold gently, being careful not to crush them.
-
Empty the mixture onto a lightly floured surface. Gently press the mixture together to create a round, flat disc about 7-inches in diameter and approximately 1-inch thick, using extra flour as needed to prevent sticking. Cut the disc into 8 wedges and use a pie server or wide spatula to carefully move the pieces to the prepared baking sheet.
-
Lightly brush the top of the scones with heavy cream. (Sprinkle with coarse sugar, if desired.) Bake at 400˚F (200°C) for 15 minutes or until golden brown on edges and bottom.
-
Allow scones to cool on the baking sheet. Melt 1/4 cup of white chocolate chips with 1/2 teaspoon of a neutral-tasting oil in the microwave for 15-second intervals, stirring in-between until smooth. Drizzle or pipe melted white chocolate over cooled scones. Allow chocolate to harden before serving.
Notes
- Frozen raspberries also work really well. Do not thaw them first.
- If skipping the white chocolate drizzle, be sure to sprinkle coarse sugar (like Turbinado or Demerara sugar) over the scones after brushing them with heavy cream. Then bake as directed.
- Store these white chocolate raspberry scones in an airtight container at room temperature for up to 1-3 days, or in the fridge for up to 1 week.
Nutrition
Calories: 421kcal |
Carbohydrates: 44g |
Protein: 6g |
Fat: 25g |
Saturated Fat: 15g |
Polyunsaturated Fat: 8g |
Cholesterol: 78mg |
Sodium: 505mg |
Fiber: 2g |
Sugar: 19g
Disclaimer: Nutritional values were calculated using a third-party tool and are provided as an estimation only.
Sharing this recipe with a link is both encouraged and appreciated. Copying/pasting and/or screenshots of full recipes to any social media is strictly prohibited. Content and photographs are copyright protected.
Did you make this?
Don’t forget to leave a rating below and make sure to follow on Pinterest and Instagram for more!
*Post originally published 2/8/2012. Recipe and photos updated April 2023.