
Indulge in Love: The Ultimate Valentine’s Day Cheesecake with Swirling Hearts
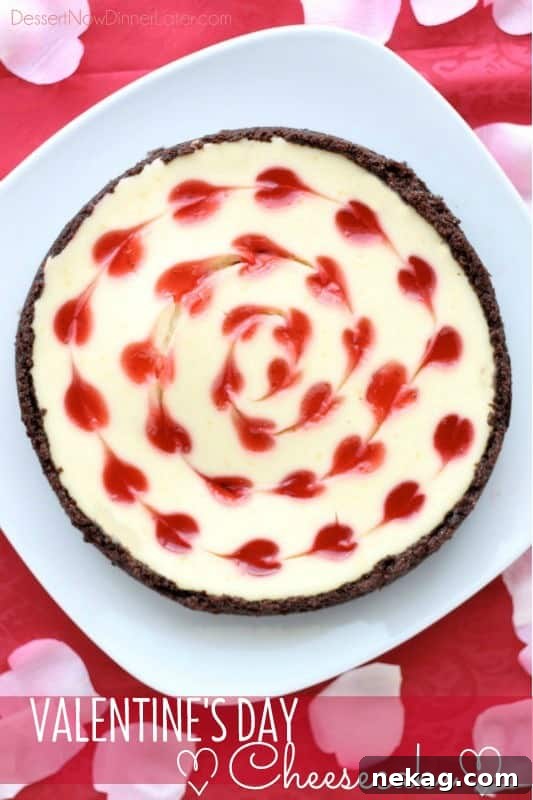
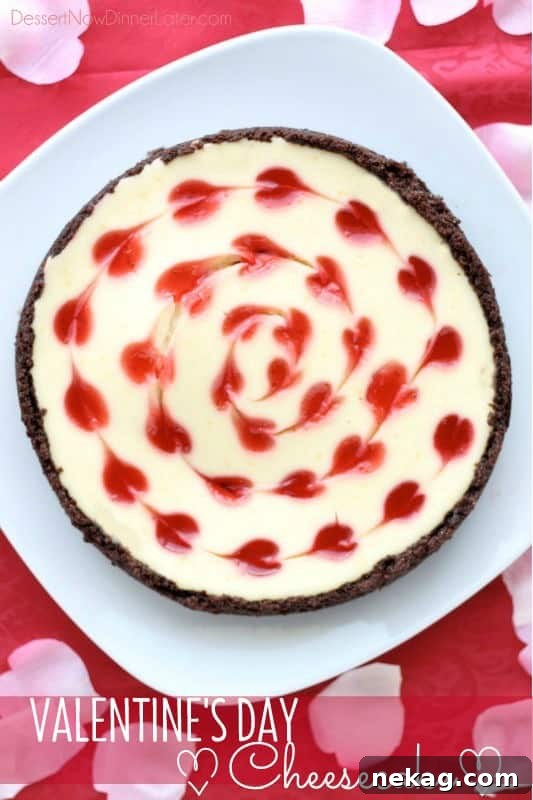
Celebrate love in the most delicious way possible this Valentine’s Day with our show-stopping Valentine’s Day Cheesecake, adorned with mesmerizing heart-shaped strawberry swirls. This isn’t just any dessert; it’s a creamy, dreamy masterpiece designed to impress your sweetheart, delight your family, or simply treat yourself to a moment of pure bliss. With its rich chocolate graham cracker crust, a velvety vanilla cheesecake filling, and a vibrant strawberry puree intricately swirled into adorable hearts, this recipe combines elegance with irresistible flavor.
Why This Valentine’s Day Cheesecake Will Capture Your Heart
Prepare to be absolutely enchanted by this Valentine’s Day Cheesecake! Every element of this dessert has been meticulously crafted to ensure a truly unforgettable experience. It’s more than just a cheesecake; it’s a celebration of flavors and textures that come together in perfect harmony. You’ll fall in love with its:
- Irresistible Charm: Those adorable heart swirls aren’t just for looks – they’re surprisingly simple to create, adding a unique and personal touch that speaks volumes. It’s an edible declaration of affection!
- Velvety Smooth Texture: The vanilla cheesecake filling is exceptionally rich, incredibly creamy, and unbelievably smooth, melting in your mouth with every bite.
- Dynamic Flavor Combination: The classic pairing of rich chocolate from the crust with the bright, fruity sweetness of strawberry puree creates an exquisite flavor profile that tantalizes the taste buds.
- Easy Elegance: Despite its gourmet appearance, this recipe is designed for home bakers of all skill levels. We guide you through each step, making the process enjoyable and the results spectacular.
- Versatility: Perfect for a romantic dinner, a family gathering, or even a delightful self-care treat. There’s no judgment here if you want to enjoy a generous slice (or two!) all to yourself.
The combination of chocolate and strawberry is a timeless classic for a reason, and in this Valentine’s dessert, it truly shines. So, grab your apron, head to the grocery store, and get ready to create something truly special for your loved ones – or simply to indulge your own sweet cravings. You deserve this decadent treat!
Anatomy of a Perfect Heart Swirl Cheesecake
This exquisite heart-shaped cheesecake is meticulously crafted from three distinct, yet perfectly complementary, components:
- Decadent Chocolate Graham Cracker Crust: A rich, buttery base that provides a delightful crunch and deep chocolate flavor, offering the perfect contrast to the creamy filling.
- Luxurious Vanilla Cheesecake Filling: Silky-smooth and subtly sweet, infused with pure vanilla, creating the quintessential cheesecake experience.
- Vibrant Strawberry Purée Hearts: A bright, fruity purée that forms the charming heart swirls, adding both a beautiful visual appeal and a burst of fresh strawberry flavor.
Let’s dive into exactly how to bring these components together to create your masterpiece.
Crafting the Perfect Chocolate Crust
The foundation of any great cheesecake is its crust, and for our Valentine’s Day creation, we’re opting for a rich, chocolatey graham cracker crust. This provides a delightful crunch and a deep cocoa flavor that perfectly complements the creamy vanilla filling and fruity strawberry swirls.
Ingredients for the Crust:
- 9 sheets chocolate graham crackers (about 1 1/3 cups crumbs)
- ¼ cup (50g) granulated sugar
- 8 Tbsp (113g) unsalted butter, melted
Step-by-Step Crust Preparation:
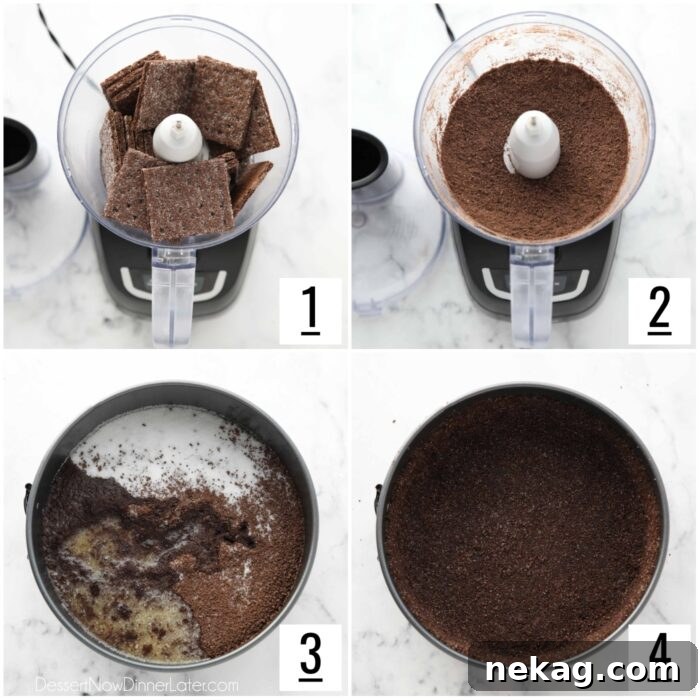
- Preheat Oven & Process Crackers: Begin by preheating your oven to 350°F (175°C). Place the chocolate graham crackers into a food processor. Pulse until they transform into fine, even crumbs. If you can’t find chocolate graham crackers, chocolate wafer cookies are an excellent substitute and will yield a similarly rich crust.
- Combine Ingredients: Transfer the chocolate crumbs into an 8-inch springform pan. Add the granulated sugar and the melted unsalted butter. Mix thoroughly, either with a spoon or your hands, until all the crumbs are uniformly moistened. The mixture should resemble wet sand.
- Press and Form: Using the bottom of a flat glass or your fingers, firmly press the crumb mixture onto the bottom of the springform pan. Continue pressing it up the sides of the pan, about 1½ inches high, creating a sturdy and even edge. A well-pressed crust ensures it won’t crumble when sliced.
- Blind Bake: Bake the crust in the preheated oven for 12 minutes. This brief bake sets the crust, making it deliciously crisp and preventing it from becoming soggy later.
- Cool and Adjust Oven: Remove the baked crust from the oven and set it aside on a wire rack to cool completely while you prepare the other components. Immediately lower your oven temperature to 280°F (135°C) in preparation for the cheesecake baking.
Pro Tip: Ensure your butter is fully melted but not boiling hot when mixing with the crumbs. This helps achieve the perfect consistency for pressing.
Crafting the Sweet & Silky Strawberry Puree
While your chocolate crust is cooling, it’s the perfect time to prepare the star of our visual design: the vibrant strawberry puree. This delicious, fruity component isn’t just for decoration; it infuses every bite with a fresh, sweet tang that perfectly balances the creamy cheesecake.
Ingredients for the Strawberry Puree:
- 10 oz (280g) frozen whole strawberries (about 2 cups)
- 1 cup (200g) granulated sugar
- ¼ cup (59ml) lemon juice
- 1 Tbsp cornstarch
- 1 Tbsp COLD water
Step-by-Step Puree Preparation:
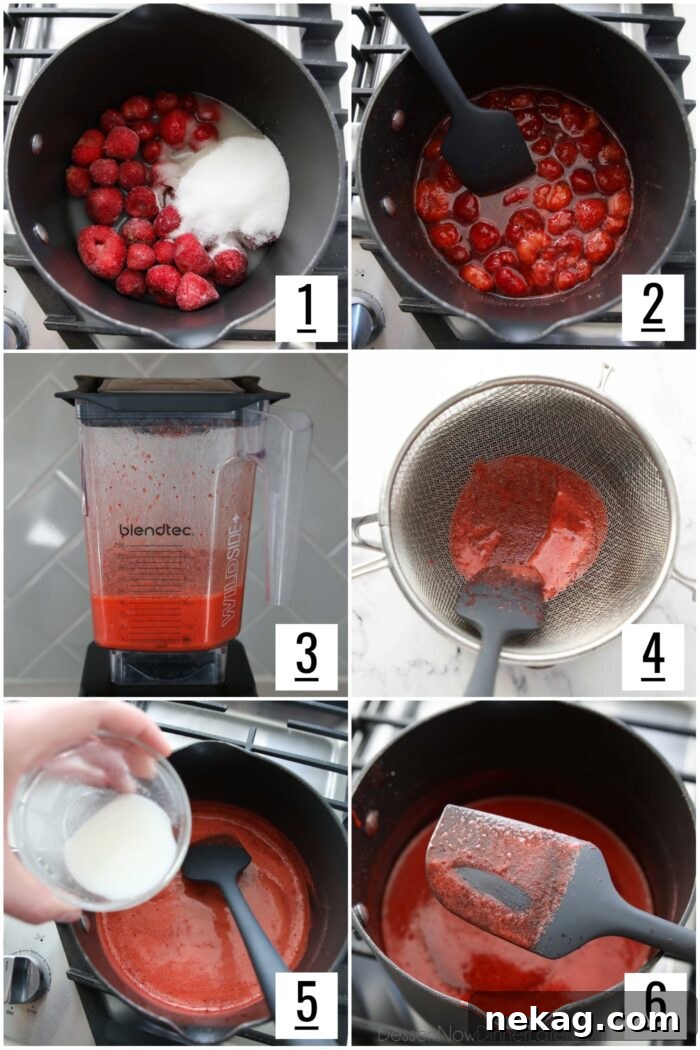
- Cook Strawberries: In a medium saucepan, combine the frozen strawberries, granulated sugar, and lemon juice. Cook this mixture over medium heat, stirring frequently. The strawberries will release their juices, and the sugar will dissolve. Continue cooking until the mixture begins to boil, and the strawberries are soft enough to easily break apart with a spatula. This usually takes about 8-10 minutes.
- Blend for Smoothness: Carefully transfer the hot strawberry mixture to a blender. Process until the puree is completely smooth, with no discernible chunks of fruit. For an extra vibrant color, a high-speed blender works best.
- Strain for Perfection: Place a fine-mesh sieve over the same saucepan. Pour the blended strawberry mixture through the sieve, pressing down on the solids with a spatula to extract as much liquid and flavor as possible. Discard any remaining pulp and seeds. This crucial step ensures your puree is silky-smooth, preventing any gritty texture in your cheesecake design.
- Thicken the Puree: Return the strained puree to medium heat, stirring frequently. In a small separate bowl, whisk together the cornstarch and COLD water to create a smooth slurry. Once the strawberry puree comes to a boil, slowly stir in the cornstarch slurry. Continue stirring constantly as the mixture returns to a rolling boil and visibly thickens. This thickening agent will give your puree the perfect consistency for piping hearts without bleeding into the cheesecake batter.
- Cool Completely: Remove the saucepan from the heat. Place it on a hot pad and transfer it to the refrigerator. Allow the strawberry puree to cool completely to the touch before using it. This will prevent it from thinning out or affecting the cheesecake batter’s temperature.
Versatile Delight: This homemade strawberry puree isn’t just for cheesecake! It’s also fantastic as a topping for pancakes, waffles, or ice cream, mixed into sodas or mocktails for a refreshing twist, or even folded into yogurt.
Whipping Up the Velvety Cheesecake Filling
While your strawberry puree chills in the refrigerator, it’s time to prepare the luxurious heart of our dessert: the creamy vanilla cheesecake filling. The key to a perfect cheesecake lies in smooth, well-combined ingredients and careful mixing.
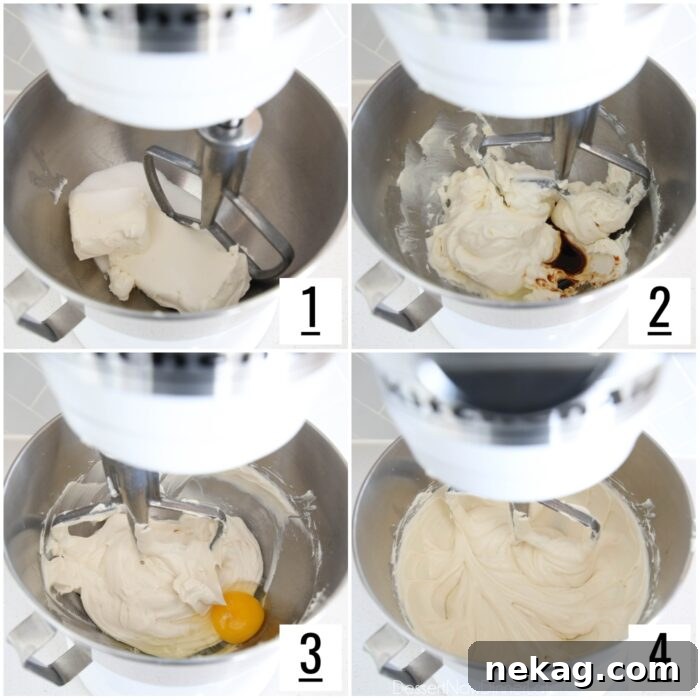
Ingredients for the Cheesecake Filling:
- 12 oz (339g) cream cheese, room temperature
- ½ cup (100g) granulated sugar
- ½ cup (120g) sour cream, room temperature
- 1 tsp lemon juice
- 2 tsp vanilla extract
- 1 large egg, room temperature
Step-by-Step Filling Preparation:
- Cream Cheese and Sugar: In the bowl of an electric stand mixer fitted with the paddle attachment, combine the softened cream cheese and granulated sugar. Beat on medium-low speed until the mixture is light, creamy, and completely smooth. Make sure there are no lumps of cream cheese remaining. Stop and scrape down the sides and bottom of the bowl thoroughly to ensure everything is incorporated.
- Add Sour Cream, Lemon Juice, and Vanilla: Introduce the room temperature sour cream, fresh lemon juice, and vanilla extract to the cream cheese mixture. Mix again on low speed until everything is just combined and smooth. Be careful not to overmix at this stage. Scrape the bowl once more to catch any unmixed bits.
- Incorporate the Egg: Finally, add the single large egg. Mix on the lowest speed possible just until the egg is fully incorporated into the batter. The goal here is to mix minimally after adding the egg. Overmixing eggs can introduce too much air into the batter, which can lead to cracks in your baked cheesecake.
- Achieving Perfection: Your cheesecake filling should now be wonderfully smooth, thick, and ready to be poured over your cooled chocolate crust. Ensure all ingredients are at room temperature for the best results; this prevents lumps and ensures a perfectly emulsified, smooth batter.
Assembling Your Masterpiece: The Valentine’s Day Cheesecake with Heart Swirls
This is where the magic happens! The signature heart swirl pattern is what truly makes this cheesecake perfect for Valentine’s Day, and you’ll be delighted to discover how surprisingly easy it is to create. Follow these steps carefully to achieve a beautiful and flawless design.
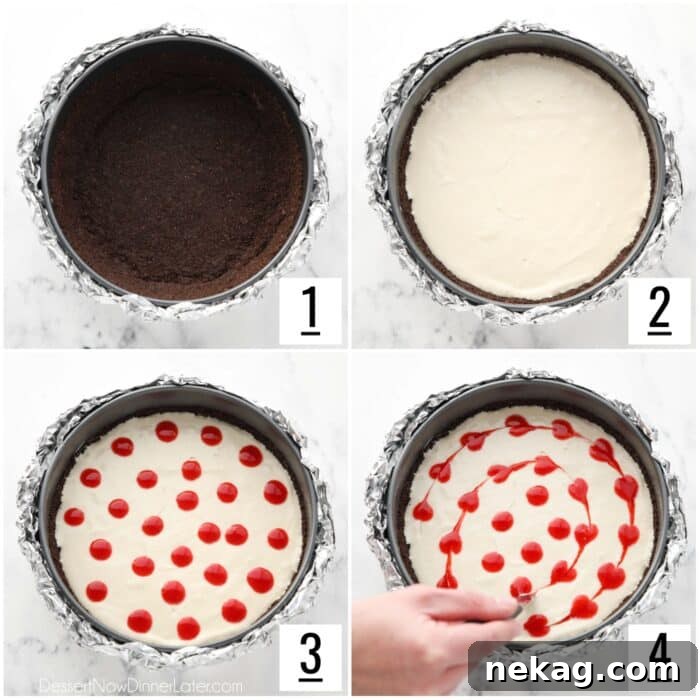
Step-by-Step Assembly and Swirl Technique:
- Prepare for a Water Bath: Cheesecake benefits immensely from a water bath, which provides even, gentle heat and prevents cracking. To prepare, tightly wrap the outside of your springform pan with a double layer of heavy-duty aluminum foil. Ensure it’s sealed well to prevent any water from seeping in.
- Add Cheesecake Batter: Carefully pour the creamy cheesecake batter into your cooled chocolate graham cracker crust. Gently jiggle and tap the pan lightly on your countertop a few times. This helps to even out the top surface of the batter and release any trapped air bubbles, ensuring a smooth finish.
- Create Strawberry Dots: Transfer the cooled strawberry puree into a squeeze bottle with a small, fine tip (or a piping bag with a small round tip). Beginning from the outer edge of the cheesecake, pipe small dots of strawberry puree about an inch apart in a spiral pattern, working your way towards the center. Make the dots slightly larger on the outside and progressively smaller as you reach the middle. Remember to save any leftover strawberry puree for serving later – it makes a fantastic sauce!
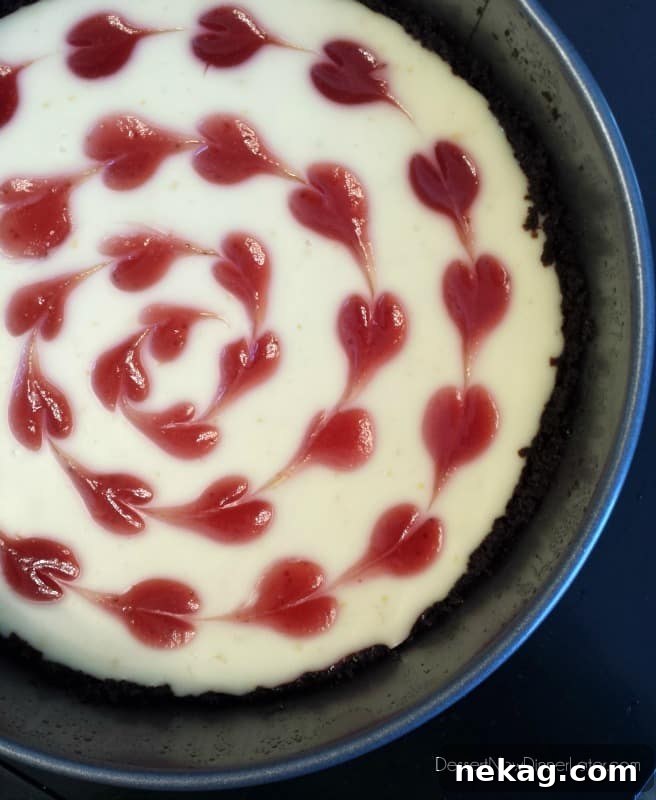
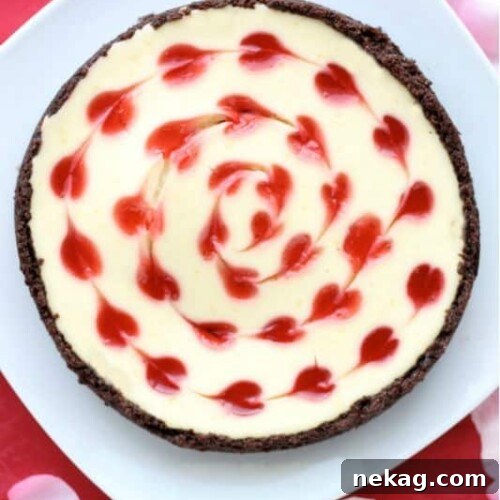
- The Heart Swirl Technique: Now for the fun part! Take a clean toothpick or a small, sharp pointed knife. Starting with an outer dot, gently drag the toothpick through the center of the dot towards the next dot in the spiral. Continue this motion, without lifting the toothpick or knife, through the center of each dot, following the spiral pattern all the way to the very last dot in the middle. The dragging motion will transform each dot into a charming heart shape. This continuous motion is key to connecting the hearts and creating a seamless design.
Ta-da! You’ve just created beautiful, edible hearts! Your cheesecake is now ready for its gentle bake.
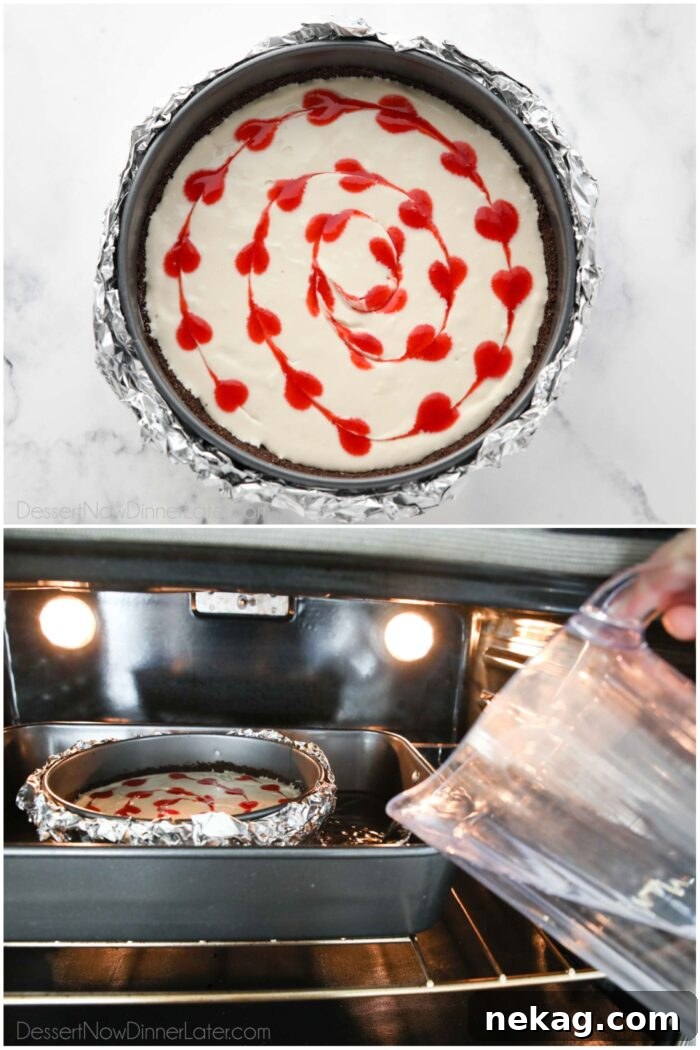
Baking and Cooling for a Flawless Finish:
- Prepare Water Bath & Bake: Carefully place the foil-wrapped springform pan into a slightly larger roasting pan or baking dish. Gently slide the pan into your preheated oven (set to 280°F / 135°C). Once in the oven, carefully pour hot water into the larger pan, filling it halfway up the sides of the springform pan. This water bath creates a humid environment, which helps the cheesecake bake evenly and prevents cracks.
- Low and Slow Baking: Bake for 55-60 minutes. The cheesecake is done when the edges are set and appear dull/matte, but the center still has a slight wobble when gently jiggled. This underbaked center will continue to set as it cools.
- Crucial Cooling Step (No Peeking!): This step is vital for preventing cracks. Once the baking time is complete, DO NOT OPEN THE OVEN DOOR. Turn the oven off and allow the cheesecake to remain inside the cooling oven for an additional 2 hours. The gradual temperature decrease is essential for a perfectly smooth, crack-free top.
- Refrigeration: After the 2-hour rest in the oven, carefully remove the cheesecake. Take off the foil wrapping and place the cheesecake on a wire rack to cool at room temperature for about an hour. Then, transfer it to the refrigerator to chill for a minimum of 2 hours, or preferably overnight. Chilling completely ensures the cheesecake is fully set and easy to slice cleanly.
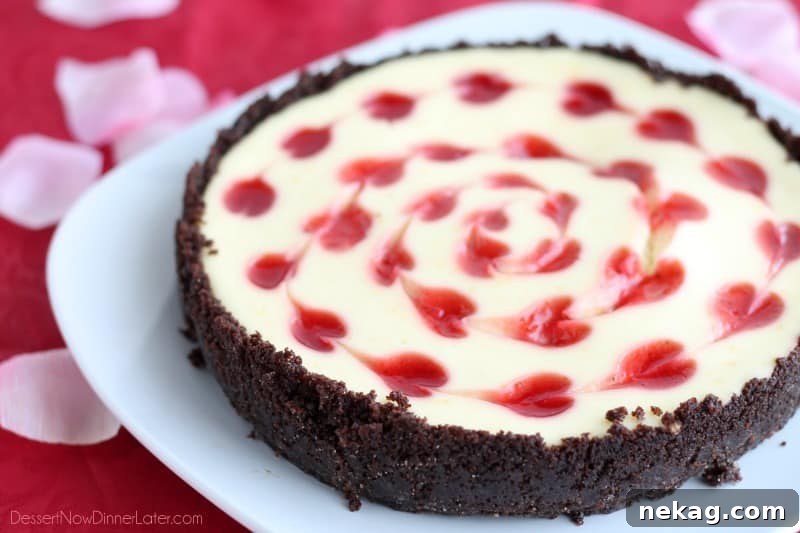
Serving & Storing Your Valentine’s Delight
Once your Valentine’s Day Cheesecake is perfectly chilled, it’s time to slice and savor every decadent bite. Here’s how to serve it beautifully and keep it fresh for days to come.
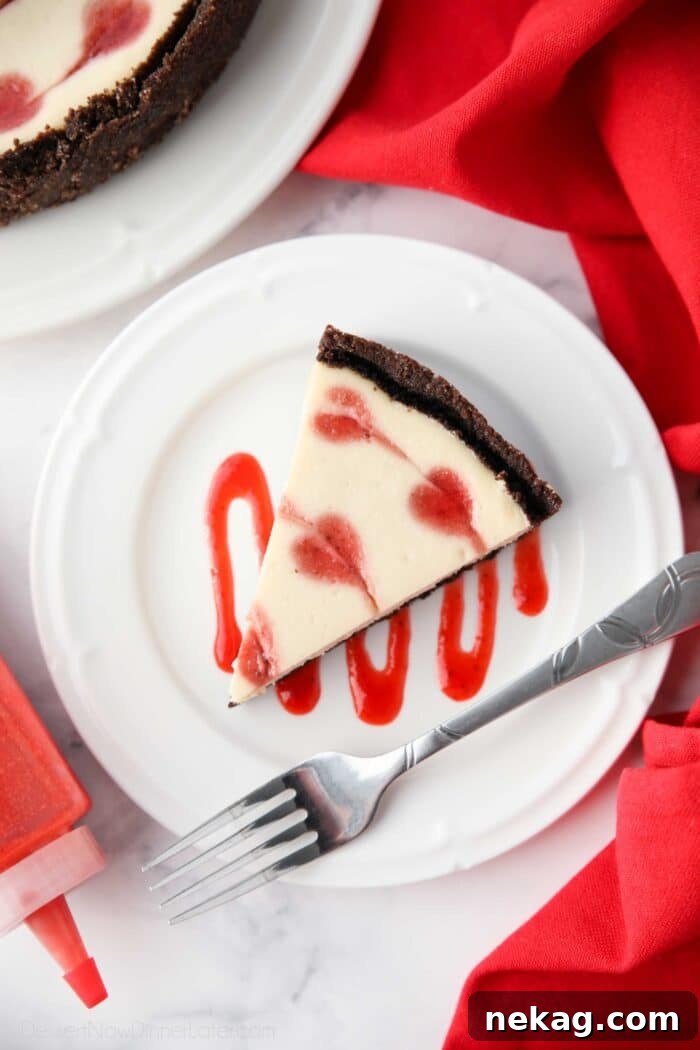
- For Pristine Slices: To achieve crisp, clean slices that show off those gorgeous hearts, dip a sharp, thin knife into hot water, wipe it dry, and then make your cut. Repeat this process for each slice. This keeps the knife warm and prevents the cheesecake from sticking, ensuring a picture-perfect presentation.
- Garnish and Serve: Don’t let that extra strawberry puree go to waste! It’s the ideal accompaniment for your cheesecake. You can artfully spread or pipe a dollop onto the serving plate before carefully placing a slice of cheesecake on top. This enhances the flavor and adds another layer of visual appeal without covering your hard-earned heart design. A few fresh strawberry slices or a sprinkle of grated chocolate can also elevate the presentation.
- Refrigeration: Leftover cheesecake should be lightly covered with plastic wrap and stored in the refrigerator. It will stay fresh and delicious for up to 7 days, allowing you to enjoy this treat throughout the week.
- Freezing for Later: To freeze the cheesecake, first ensure it’s completely chilled. Double-wrap the entire cheesecake (or individual slices) tightly with plastic wrap onto a cardboard round or a freezer-safe plate, then add a final layer of aluminum foil. It can be frozen for up to 3 months. When you’re ready to enjoy, thaw it in the refrigerator overnight. Be aware that the strawberry hearts may develop slight cracks upon freezing and thawing, but the flavor will remain exquisite.
Troubleshooting: Preventing Cracks and Soggy Crusts
Even experienced bakers sometimes encounter common cheesecake woes, like cracks on the surface or a soggy crust. Let’s address these potential issues to ensure your Valentine’s Day Cheesecake is absolutely perfect.
You might have noticed that some of the beautiful cheesecake photos showcasing the heart swirls have tiny cracks, while others are pristine. This is a common challenge, and I’ve refined this recipe to help you avoid it! Previously, the original recipe suggested putting the fruit sauce on the bottom of the crust before adding the cheesecake filling and creating the heart swirls. While a beautiful idea in theory, this method often led to the bottom of the crust becoming soggy. When attempting to remove the cheesecake from the springform pan, this sogginess could cause the crust – and consequently, parts of the cheesecake with the heart designs – to crack. This can be quite disheartening after all your hard work!
Updated Recipe for Flawless Results:
To ensure you don’t face these frustrations, I’ve updated the recipe instructions significantly. By baking the chocolate crust separately, preparing the strawberry puree to a thickened consistency, and swirling it directly into the cheesecake batter on top, we bypass the issues of a soggy crust and minimize the chances of cracking. This method creates a stable and visually stunning cheesecake every time.
Key Takeaways for Crack-Free Cheesecake:
- Room Temperature Ingredients: Always ensure your cream cheese, sour cream, and egg are at room temperature. This allows them to blend smoothly without overmixing, which can incorporate too much air and cause cracks.
- Do Not Overmix: Mix the cheesecake batter just until combined. Overmixing develops gluten in the cream cheese and incorporates excess air, leading to a cheesecake that puffs up too much and then cracks as it cools.
- The Water Bath is Your Friend: The water bath creates a moist, even heat that gently cooks the cheesecake, preventing the edges from baking too quickly and pulling away from the center, which causes cracks.
- Slow Cooling is Essential: The most important step for preventing cracks is the slow cooling process within the turned-off oven. This gradual temperature reduction allows the cheesecake to settle without a drastic change that causes stress on the delicate structure.
By following these updated and detailed instructions, you should have no problems with soggy crusts or cracking. Enjoy creating a truly stunning and delicious Valentine’s Day Cheesecake!
Explore More Decadent Cheesecake Recipes
If you loved this Valentine’s Day Cheesecake, you’ll surely enjoy these other delicious cheesecake creations from our collection:
- Caramel Apple Cheesecake Bars
- Classic Cheesecake Recipe
- Tangy Lemon Cheesecake Bars
- Mini Red Velvet Cheesecake
- Fruit Cheesecake Bars
- Mint Oreo Cheesecake Bars
- Pumpkin Swirl Cheesecake Bars
Valentine’s Day Cheesecake with Heart Swirls
Pin Recipe
Ingredients
Crust
- 9 sheets chocolate graham crackers, (1 sleeve; about 1 1/3 cups crumbs)
- ¼ cup (50 g) granulated sugar
- 8 Tbsp (113 g) unsalted butter, melted
Cheesecake Filling
- 12 oz (339 g) cream cheese, room temperature
- ½ cup (100 g) granulated sugar
- ½ cup (120 g) sour cream, room temperature
- 1 tsp lemon juice
- 2 tsp vanilla extract
- 1 large egg, room temperature
Strawberry Puree
- 10 oz (280 g) frozen whole strawberries, about 2 cups
- 1 cup (200 g) granulated sugar
- ¼ cup (59 ml) lemon juice
- 1 Tbsp cornstarch
- 1 Tbsp COLD water
Equipment
-
Food Processor
-
8-inch Springform Pan
-
Silicone Spatula Set
-
Blender
-
Fine Mesh Strainer
-
Stand Mixer
-
Squeeze Bottle or Piping Bag
Instructions
-
FOR THE CRUST: Preheat oven to 350˚F (175°C). Pulse the chocolate graham crackers in a food processor until fine crumbs. Empty crumbs into an 8-inch springform pan. Add the sugar and melted butter. Mix together until all the crumbs are wet, then press onto the bottom and 1½ inches up the sides of the pan.
-
Bake at 350˚F (175°C) for 12 minutes. Remove from oven and set aside to cool. LOWER THE OVEN to 280˚F (135°C).
-
FOR THE STRAWBERRY PUREE: In a medium saucepan, combine the strawberries, sugar, and lemon juice. Cook over medium heat, stirring frequently, until it’s starting to boil, the strawberries are soft enough to break up with a spatula, and the sugar is dissolved. Transfer the strawberry mixture to a blender and process until smooth.
-
Strain the mixture over a fine-mesh sieve back into the pot, pressing solids to extract all liquid. Continue cooking over medium heat, stirring frequently.
-
In a small bowl, combine the cornstarch and COLD water, creating a slurry. Wait until the strawberry puree comes to a boil, then stir in the cornstarch slurry. Let it come to a rolling boil and thicken up, stirring constantly.
-
Remove from heat and place the saucepan on a hot pad in the fridge until cool to the touch.
-
FOR THE CHEESECAKE FILLING: Using an electric stand mixer with the paddle attachment, beat the room temperature cream cheese and sugar together until creamy and smooth. Scrape the bowl.
-
Add the room temperature sour cream, lemon juice, and vanilla extract. Mix again on low speed until smooth and fully combined, scraping the bowl as needed. Add the large egg and mix on the lowest speed just until well combined. Do not overmix.
Assembly
-
Prepare cheesecake for baking in a water bath by wrapping the outside of the springform pan with a double layer of heavy-duty foil. Spread the cheesecake batter into the chocolate crust. Gently jiggle and tap the pan to even out the top and release any air bubbles.
-
Pour the cooled strawberry puree into a squeeze bottle with a tiny tip. Drop small dots an inch or so apart in a spiral pattern over the cheesecake batter, piping slightly larger dots on the outside and smaller dots as you go in towards the middle. Save the extra strawberry puree for serving.
-
Take a toothpick or a sharp pointy knife and gently drag it through the center of each circle in the same spiral pattern. Be careful NOT to lift the toothpick or knife until you have finished the very last circle, working from the outside towards the middle.
-
Place the cheesecake in its foil-wrapped springform pan into a slightly larger roasting pan or baking dish. Carefully slide it into the oven. Then, pour hot water into the larger pan, filling it halfway up the sides of the springform pan.
-
BAKE at 280˚F (135°C) for 55-60 minutes, until the top looks dull/matte and is slightly puffed up, but the center still jiggles slightly. DO NOT OPEN THE OVEN. Turn the oven off and keep the cheesecake in there for 2 hours.
-
Remove cheesecake from the oven, carefully take the foil off the pan, and let it cool at room temperature for about an hour. Then, transfer to the refrigerator to finish cooling and chilling for 2+ hours, preferably overnight. Once fully chilled, cut the cheesecake with a hot, dry knife for crisp, clean slices. Serve with extra strawberry puree.
Notes
- Store cheesecake covered lightly with plastic wrap in the refrigerator for up to 7 days.
- To freeze, double wrap the cheesecake with plastic wrap onto a cardboard round or freezer-safe plate and then wrap with a layer of foil. Freeze up to 3 months. Thaw in the refrigerator overnight. NOTE: Strawberry hearts may crack upon freezing/thawing.
Nutrition
Disclaimer: Nutritional values were calculated using a third-party tool and are provided as an estimation only.
Sharing this recipe with a link is both encouraged and appreciated. Copying/pasting and/or screenshots of full recipes to any social media is strictly prohibited. Content and photographs are copyright protected.
Did you make this?
Don’t forget to leave a rating below and make sure to follow on Pinterest and Instagram for more!
*Originally published 2/6/2014. Post updated December 2023.