
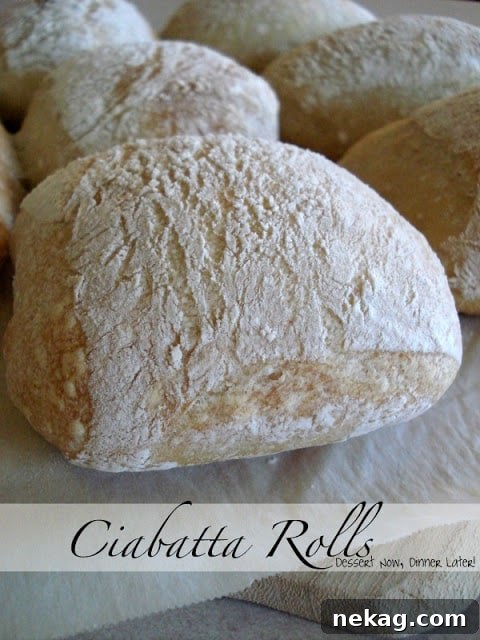
Mastering Homemade Ciabatta: Your Ultimate Guide to Crafting Rustic Italian Bread
There’s an undeniable magic in a perfectly baked Ciabatta. Its distinctively chewy, airy interior and wonderfully crisp, golden-brown exterior make it the quintessential bread for any sandwich, or simply enjoyed with a drizzle of olive oil and a pinch of salt. For years, I, like many others, relied on store-bought Ciabatta to satisfy my cravings. However, the journey into baking my own has been nothing short of a revelation. While it asks for a little patience and a two-day commitment, the process is incredibly rewarding, transforming simple ingredients into a truly artisanal loaf.
The anticipation builds with every stage – from mixing the initial biga to watching the dough slowly rise, then finally peering through the oven window as the Ciabatta puffs up and takes on its magnificent color. This process fills me with childlike excitement. The moment these rustic rolls emerge, still warm from the oven, and I get to slather one with butter and jam, is a moment of pure culinary bliss. It’s an experience that truly connects you to the art of bread-making, and the flavor of homemade Ciabatta far surpasses any store-bought alternative.
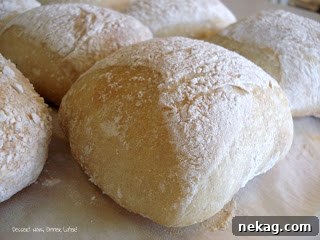
The Irresistible Allure of Ciabatta: Why Bake Your Own?
Ciabatta, meaning “slipper” in Italian, earns its name from its characteristic elongated, somewhat flattened shape. But it’s more than just its form; it’s the texture that truly captivates. The incredibly open crumb, riddled with large, irregular holes (often referred to as an “open cell structure”), and a thin, shatteringly crisp crust are the hallmarks of a well-made Ciabatta. This unique texture makes it perfect for soaking up juices from roasted meats, complementing fresh vegetables, or simply serving as a delightful vehicle for your favorite spreads.
Baking this bread at home allows you to control every aspect, from the quality of the ingredients to the depth of flavor developed through a slow fermentation process. Store-bought versions often lack the complexity and the truly airy structure that defines authentic Ciabatta. By making it yourself, you unlock a superior taste and a sensory experience that cannot be replicated by commercial bread.
While the prospect of a two-day recipe might seem daunting at first glance, I assure you, it’s far less intimidating than it appears. Most of the time involved is hands-off, dedicated to allowing the dough to slowly ferment and develop its signature flavor and texture. This makes it a perfect weekend project, offering a rhythm of activity and waiting that culminates in deeply satisfying results. This recipe yields a generous batch – enough for one large loaf and six substantial sandwich-sized rolls – perfect for sharing, serving at a gathering, or enjoying throughout the week. Forget those tiny, delicate dinner rolls; these are hearty Ciabatta rolls, robust enough to hold up to the most decadent fillings, making them an ideal base for gourmet sandwiches, paninis, or hearty toast.
Essential Tips for Ciabatta Success: From Ingredients to Baking Techniques
Achieving that coveted light, airy crumb and signature crisp crust requires attention to a few key details. My personal journey through this recipe has taught me some valuable lessons that I’m eager to share, helping you avoid common pitfalls and enhance your baking experience:
Precision is Key: Weighing vs. Measuring Ingredients
The original recommendation to weigh ingredients, especially flour and water, is something I wholeheartedly endorse for high-hydration doughs like Ciabatta. While I didn’t always observe my dough “slapping the mixer” exactly as described in the original source’s step 4 (you can find their detailed photos here for visual guidance), the precision afforded by a kitchen scale is paramount. Even slight variations in flour density or how you pack a measuring cup can significantly alter the hydration percentage of the dough, directly impacting its final texture and manageability. For instance, too much flour can make the dough too stiff, hindering the formation of those desirable large air pockets. Next time, I might experiment with slightly adjusted ratios or measuring just to compare, but generally, for consistently professional results with artisan breads, scales are superior. It’s possible I deflated my dough a bit too much when carefully transferring it from the bowl to the floured surface, which can impact the final aeration. However, despite these minor nuances, the outcome was still wonderfully crusty and airy – a testament to the forgiving nature of homemade bread, even with slight imperfections. My personal preference is for Ciabatta with abundant large air bubbles, and I’m committed to perfecting this delicate technique with future attempts. Remember, patience and gentle handling are your best friends with this delicate dough.
The Right Environment: Baking Surface Matters for Optimal Crust
Another crucial element in baking Ciabatta is the choice and preparation of your baking surface. I initially used my pizza stone, which performed well but barely accommodated all the bread, leading to some crowding. For a more efficient bake and to allow better heat distribution around each piece, I might opt for the back of a large, heavy-duty baking sheet next time, or perhaps divide the dough into smaller batches across two sheets if necessary. A preheated baking stone or a heavy-duty baking steel is ideal for creating that initial burst of intense heat that encourages a good oven spring (the rapid expansion of the dough in the oven) and a robust, crisp crust. If you don’t have a specialized stone or steel, a sturdy metal baking sheet, thoroughly preheated in the oven, will still deliver excellent results. Just ensure it’s scorching hot before the dough goes in. Always prioritize safety, using oven mitts and allowing ample space between your loaves or rolls for even cooking and optimal air circulation.
This recipe is just the beginning of a delightful culinary series! Stay tuned, as this exceptional homemade Ciabatta forms the foundation for two more exciting, intertwined recipes coming your way this week. You won’t want to miss the delicious creations we’ll be building upon this beautiful, versatile bread!
Authentic Homemade Ciabatta Rolls
Amber Brady
Pin
Rate
12
servings
Ingredients
For the Biga (Pre-ferment):
-
4 ounces (118 ml) water, (½ cup) -
½ teaspoon active-dry yeast -
5 ounces (120 g) all-purpose flour, (1 cup)
For the Ciabatta Dough:
-
17 ounces (207 ml) water, (2 cups + 2 Tablespoons) -
1 teaspoon active-dry yeast -
All of the Biga (pre-ferment) -
20 ounces (480 g) all-purpose flour, (4 cups) -
2 teaspoons kosher salt
Instructions
Day 1: Preparing the Biga (Pre-ferment)
-
Begin your Ciabatta journey by preparing the biga, a crucial pre-ferment that develops rich flavor and excellent texture. In a medium bowl, dissolve the active-dry yeast completely in the measured water. Once the yeast has fully dissolved, add the all-purpose flour. Stir vigorously with a sturdy spoon or spatula until a thick, gloppy paste forms. This mixture is quite sticky, but don’t be tempted to add more flour. Continue stirring briskly for approximately fifty strokes; this initial mixing helps to build up the gluten network. Cover the bowl tightly with plastic wrap or a damp cloth to prevent it from drying out, and let it rest at room temperature (ideally between 70-75°F or 21-24°C) for a minimum of eight hours, or even better, overnight. This slow fermentation is key to the biga’s development.
-
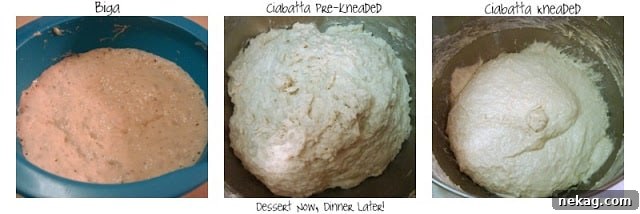
By the following day, your biga should have undergone a noticeable transformation. It will appear looser and somewhat soupy, with numerous large, active bubbles populating its surface. This effervescent appearance is a clear indication of a healthy and active fermentation, signaling that your biga is perfectly ready for the next stage of Ciabatta production. It should also have a slightly sweet, yeasty aroma.
Day 2: Crafting the Ciabatta Dough and Baking
-
In the bowl of a standing mixer (preferably fitted with a dough hook), dissolve the remaining active-dry yeast in the measured water. This ensures the yeast is fully activated and ready to work in the main dough. Then, carefully scrape all of the prepared biga from its bowl into the yeast-water mixture. Using your spatula or clean hands, gently break up the biga into smaller, stringy blobs. It doesn’t need to be completely dissolved into a smooth liquid; the goal is simply to loosen it up and ensure it’s well-distributed within the liquid.
-
Add all of the remaining all-purpose flour and the kosher salt to the mixer bowl. Stir everything together on a low speed (or by hand) just until a thick, very wet, and shaggy dough forms. This will be a notably sticky mixture, which is perfectly normal and desired for Ciabatta’s high hydration. Once combined, cover the bowl and let the dough rest for an initial period of 10-20 minutes. This resting period, often referred to as autolyse, allows the flour to fully hydrate and the gluten proteins to begin developing naturally without the stress of kneading, making subsequent kneading more efficient and resulting in a more extensible dough.
-
Now for the intensive kneading: Attach the dough hook to your standing mixer and knead the dough at medium speed (typically Level 5 or 6 on a KitchenAid mixer, or a similar medium setting on other brands) for an extended period of 15-18 minutes. This long kneading time is crucial for developing the strong gluten structure needed to support Ciabatta’s open crumb. It’s important to keep a watchful eye on your mixer during this vigorous kneading, as the high-hydration dough can cause the mixer to “walk” or move across your counter due to the dough’s resistance and the mixer’s power. Ensure your mixer is stable and supervised throughout.
-
During the kneading process, observe the dough’s transformation. Initially, it will be very sticky and cling tenaciously to the bottom and sides of the bowl. However, around the 7-minute mark, you should notice a significant change: the dough will begin to pull away more cleanly from the sides, gather predominantly around the dough hook, and occasionally slap audibly against the bowl. If this isn’t happening, gently increase your mixer speed by one notch. Should the dough start to climb excessively up the dough hook, pause the mixer, scrape it back down, and resume kneading. By the end of the full kneading cycle, the dough will appear remarkably smooth and creamy, boasting a distinctive glossy sheen. Don’t be alarmed if it settles back into a soft, slightly spread-out puddle once the mixer is turned off – this high-hydration characteristic is exactly what we want for an airy Ciabatta. The dough should pass the “windowpane test,” meaning you can stretch a small piece thinly enough to see light through it without tearing, indicating excellent gluten development.
-
Once thoroughly kneaded, gently transfer the dough to a lightly oiled large bowl (or keep it in the mixer bowl if space allows and it’s large enough), ensuring you handle it as little as possible to preserve the air. Cover the bowl loosely with plastic wrap or a damp towel, and let it undergo its first bulk fermentation (rise) in a warm environment (70-75°F or 21-24°C) for 2-3 hours. The dough should visibly triple in bulk, becoming light, deeply aerated, and visibly bubbly. This long fermentation is vital not only for developing robust flavor but also for establishing the characteristic open crumb structure that Ciabatta is famous for.
-
When the dough has tripled, generously dust your work surface with all-purpose flour. Prepare two sheets of parchment paper and place them near your workspace. Carefully scrape the risen dough out of the bowl onto the floured surface, being extremely gentle to avoid deflating the precious air bubbles you’ve worked so hard to create. Dust the top of the dough with more flour. Using a pastry scraper or a pizza wheel, divide the dough according to your desired yield. You can cut it into two large pieces for traditional Ciabatta loaves, or into 12-16 smaller, roughly rectangular pieces for individual rolls. The high hydration makes this dough very extensible, so embrace its looseness.
-
Lightly flour your hands to prevent sticking. Working with a delicate but swift touch, transfer each shaped dough piece (whether loaves or rolls) one at a time from your work surface to the prepared parchment paper. Arrange them with ample space between each, as they will expand. With floured fingertips, gently press about halfway into the dough to create characteristic dimples on the surface and slightly flatten their shape. This helps maintain the airy structure and gives Ciabatta its rustic appearance. Avoid pressing too hard or reshaping too much. Let these shaped loaves or rolls undergo their final proof, uncovered, for another 30-40 minutes at room temperature. They should become visibly puffy with many large bubbles forming just beneath the surface, indicating they are fully proofed and ready for the oven.
-
While the shaped dough is undergoing its final proof, preheat your oven to a blazing 475°F (245°C). This high temperature is essential for achieving a beautiful oven spring and a deeply crispy crust. If you possess a baking stone or steel, place it in the oven during this preheating phase to ensure it’s intensely hot. A well-heated baking surface will deliver the necessary thermal shock to the dough, helping it expand quickly and form a crisp bottom crust.
-
Once the loaves or rolls are sufficiently proofed and the oven is fully preheated, carefully slide the parchment paper (with the dough still on it) onto a pizza peel or a regular baking sheet. Transfer them swiftly into the scorching hot oven, either directly onto your preheated baking stone/steel or onto the hot baking sheet if a stone is unavailable. Bake for 20-30 minutes, or until the Ciabatta is beautifully puffed up, deeply golden brown, and sounds hollow when tapped on the bottom, indicating a perfectly cooked interior and a robust crust. For an extra crispy crust, you can also introduce a small amount of steam into your oven during the first 10 minutes of baking (e.g., by spraying water or placing a pan of hot water at the bottom). Once baked, gently slide the parchment paper out from under the loaves or rolls and transfer them to a wire rack. Allow them to cool completely before attempting to slice or eat. This crucial cooling period is essential for the crumb to set, for residual moisture to escape, and for optimal flavor and texture development. Enjoy your magnificent homemade Ciabatta!
Notes for Perfect Ciabatta
- Yield: This recipe is designed to be generous, typically yielding 2 large, rustic Ciabatta loaves or a batch of 12-16 individual Ciabatta rolls. You can easily adjust the sizing during the shaping stage to fit your needs.
- Tip #1: To Freshen Stale Ciabatta: If your beautiful Ciabatta loaves or rolls lose their fresh crispness and become a bit stale, don’t despair! Simply wrap a single roll or a portion of a loaf in a damp paper towel and heat it in the microwave for approximately 15-20 seconds. This quick burst of steam will miraculously bring back its softness and some of its delightful crusty appeal, making it almost as good as fresh.
- Tip #2: Slicing for Sandwiches: When preparing your Ciabatta for sandwiches, it’s best to use a sharp, serrated bread knife. Begin slicing at an angle from one corner; this approach allows for easier cutting and helps to preserve the bread’s delicate, airy structure. Always use a stable cutting board and exercise extreme caution to protect your hands and fingers while slicing.
- Achieving an Open Crumb: The hallmark of excellent Ciabatta is its incredibly airy, open interior. The key to cultivating this lies in three main factors: high dough hydration, exceptionally gentle handling of the dough after its first rise, and proper, extended fermentation. Avoid the temptation to over-knead, which can tighten the crumb, and be as delicate as possible when transferring and shaping the dough to preserve those precious air bubbles.
- Creating Steam in Your Oven: For an even more dramatically crisp and golden crust, consider introducing steam into your oven during the initial phase of baking. A simple method is to place a cast-iron pan or another oven-safe dish on the bottom rack of your oven during preheating. Once the bread is loaded, carefully pour about ½ to 1 cup of hot water into the preheated pan (be cautious of the steam!). Alternatively, you can use a clean spray bottle to mist the interior of the oven with water during the first few minutes of baking (again, be quick and careful when opening the hot oven door!).
Disclaimer: Nutritional values provided are calculated using a third-party tool and are offered as an estimation only. Exact values may vary based on specific ingredients, brands used, and preparation methods. Please consult a qualified nutritionist for precise dietary information.
Sharing this recipe with a direct link is both encouraged and deeply appreciated. Copying/pasting and/or taking screenshots of full recipes to any social media platform, website, or publication is strictly prohibited. All content and photographs within this article are copyright protected.
Did you bake this delicious Homemade Ciabatta?
We’d absolutely love to hear about your experience and see your beautiful creations! Don’t forget to leave a rating and comment below to share your feedback. Also, make sure to follow us on Pinterest and Instagram for more inspiring recipes, baking adventures, and delicious meal ideas!