
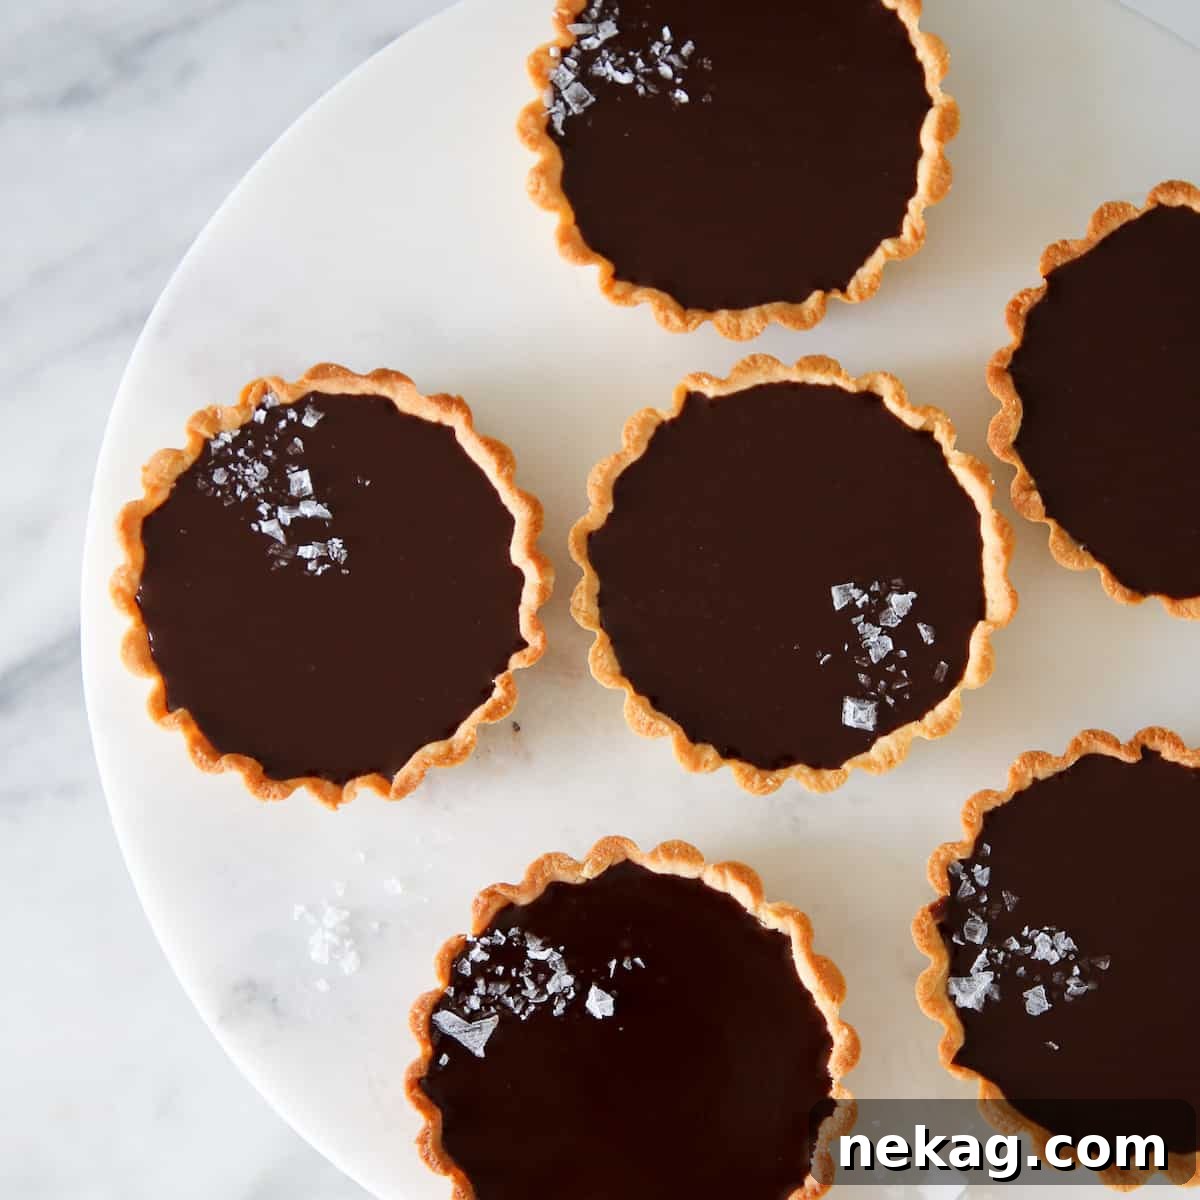
These mini salted chocolate tarts are a true revelation – unbelievably easy to make, yet elegant enough to impress at any gathering. The secret lies in their perfect balance: a tender, nutty almond crust that provides a delightful counterpoint to the irresistibly silky, rich chocolate ganache filling. Each bite offers a harmonious blend of textures and flavors, making them an instant favorite for any chocolate lover.
Mini Salted Chocolate Tarts: A Decadent Escape
In a world that often feels chaotic, sometimes all you need is a little indulgence to bring joy to the everyday. And these mini salted chocolate tarts are exactly that – a culinary bright spot that can transform a mundane evening into something truly special. Forget the stress; these delectable treats have a magical way of making any moment feel like a festive occasion, much like a cozy Christmas morning.
My personal experience with these tarts has always been one of pure delight. They’re not just a dessert; they’re an experience. The delicate crunch of the crust combined with the smooth, melting chocolate creates an unforgettable sensation that comforts and exhilarates simultaneously. It’s the kind of dessert that makes you pause, savor, and appreciate the simple pleasures in life.
Crafting the Perfect Tart Crust: Almond for Superior Flavor
The foundation of any great tart is its crust, and for these mini chocolate delights, selecting the right one is crucial. While you could certainly use a variety of pie crust recipes, I wholeheartedly recommend this almond tart crust recipe or a classic pâte sucrée. The almond crust, in particular, offers a tender texture and a subtle nutty flavor that beautifully contrasts with the deep richness of the chocolate ganache. It’s this thoughtful pairing that elevates these tarts from good to extraordinary.
The almond tart crust brings a delicate crispness and a hint of marzipan-like essence, enhancing the chocolate without overpowering it. Alternatively, pâte sucrée, a sweet shortcrust pastry, provides a sturdy yet crumbly base with a buttery sweetness that complements the filling perfectly. Whichever you choose, ensure your dough is properly chilled and handled to achieve that coveted tender, flaky texture. A well-baked crust is the unsung hero, providing structural integrity and an essential textural component to balance the creamy ganache.
The Art of Chocolate: Selecting Your Ganache Star
For the ganache, the quality and type of chocolate you choose will significantly impact the final flavor and texture. I typically use a 54% cacao chocolate, primarily because it’s what I keep readily available in my pantry. However, feel free to use any good quality semi-sweet chocolate that you prefer or, as I like to say, “whatever you dig out of your chocolate drawer.”
A Chocoholic’s Secret: The Indispensable Chocolate Stash
Speaking of chocolate drawers, allow me a brief digression into the glorious world of a true chocoholic’s pantry. You simply cannot be a card-carrying member of the chocolate enthusiasts’ club without at least one dedicated chocolate drawer or stash. Growing up, as the daughter of a genuine chocoholic, our household was never short on chocolate, often featuring several strategic stashes:
- The Everyday Kitchen Chocolate Drawer: This was the workhorse of our chocolate supply, housing baking chocolates like chips, bars for melting, and occasionally impulse-purchased snacking bars for immediate gratification. It was functional, practical, and always somewhat depleted.
- The Secret Truffle Drawer: Ah, my favorite! Tucked away and harder to find, this drawer was reserved for the really good stuff – gourmet chocolate truffles, artisanal bars, and fine European chocolates. This was for special moments, or when a serious chocolate craving demanded superior quality.
- The “Break in Case of Emergency” Stash: This was the last resort, often consisting of slightly less premium but still perfectly acceptable chocolate. It was typically hidden in the basement freezer (a place I, as a pastry chef, now know is less than ideal for chocolate storage, but desperation knows no bounds!). If you were delving into this stash, it meant all other options were exhausted, and a chocolate fix was an absolute necessity. It served its purpose in dire situations, proving that any chocolate is better than no chocolate when the need arises.
So, raid your own chocolate treasury, whether it’s an organized drawer or a secret emergency stash, and choose a chocolate that speaks to you. A good quality semi-sweet chocolate with a cacao percentage between 50-65% will provide a rich, balanced flavor that isn’t overly bitter or too sweet, perfect for this ganache.
Mastering the Silky Smooth Chocolate Ganache
Creating a perfectly smooth and glossy ganache is simpler than it sounds, and it’s the heart of these irresistible tarts. Usually, I have a lengthy list of cautionary tales or extensive additional information for most recipes. However, this ganache filling is fundamentally a basic emulsion, and even I don’t have too many complicated notes beyond a few crucial tips.
The Magic of Corn Syrup
Before any purists out there think about omitting it, let me make a strong case for the corn syrup. While you *can* leave it out, I highly advise against it! A small amount of corn syrup in your ganache works wonders. It acts as an invert sugar, preventing crystallization and contributing to an incredibly soft, luscious texture and that desirable, beautiful shine. Oh, hello, gorgeous! That luster, though – it’s undeniable, and it makes all the difference in presentation and mouthfeel. It’s a chef’s secret for a truly professional-looking ganache.
Understanding Emulsions and Troubleshooting
Remember, ganache is an emulsion – a stable mixture of two liquids that normally don’t mix (fat from chocolate and water from cream). While simple, emulsions can break if not handled correctly. A broken ganache will look curdled, greasy, or grainy, and its texture will be far from divine – leading to sadness, which we definitely don’t do here! The most common culprits are over-whisking, using cream that’s too cold or too hot, or introducing ingredients too quickly.
But fear not! If your ganache does happen to break, it’s usually fixable. The “hail Mary” solution is to pour a small amount (start with a tablespoon or two) of *cold* heavy cream into the ganache and whisk gently but continuously from the center outwards. The cold cream helps to re-emulsify the mixture by bringing the fat and water components back together. Keep whisking gently until it comes back together and becomes smooth and homogenous again. You can add up to about ¼ cup of cold cream if needed, but often just a little bit does the trick. Don’t be afraid to try this; it won’t make things worse, and it’s your best shot at salvaging a broken ganache!
Essential Steps: Blind Baking and Assembly
Once you’ve mastered the crust and the ganache, the rest is smooth sailing. Blind baking your tart shells is a critical step to ensure a crisp, golden base that won’t become soggy when filled. You can find further detailed instructions on how to blind bake pie crust here, which will guide you through the process for perfectly pre-baked shells. And for more comprehensive insights into ganache, I’ve dedicated a whole post on how to make chocolate ganache as well!
When filling your pre-baked crusts, aim for an even pour to ensure a consistent, beautiful finish. If you notice any small air bubbles on the surface of your filled tarts, a quick, gentle pass with a kitchen torch can pop them, leaving you with an impeccably smooth, glossy top. Once refrigerated and set, these tarts are typically garnished with a sprinkle of flaky sea salt, which not only enhances the chocolate’s flavor but also adds an elegant visual touch and a subtle textural contrast. The salt truly makes the chocolate sing!
So, break into your chocolate drawer (or your “emergency stash” if necessary) and make these divine tarts tonight. I promise, the effort will be immensely rewarding, yielding a dessert that’s both impressive and incredibly satisfying!
Mini Salted Chocolate Tarts
by Chef Lindsey
These mini salted chocolate tarts are incredibly easy and perfect for entertaining. The tender almond crust is filled with an irresistibly silky chocolate ganache!
Comment
Print Recipe
Ingredients
For the Ganache:
- 200 g 54% Chocolate
- 20 g Corn Syrup
- 2 g Salt
- 260 g Heavy Cream
- 4 g Vanilla Extract
- 56 g Butter room temperature
For the Crust:
- Almond Tart Crust Recipe (prepared dough for 1 large tart or 10 mini tarts)
Instructions
For the Crusts:
- Preheat oven to 350°F (175°C) convection or 375°F (190°C) standard.
- Roll out chilled dough to about 1/8 inch (3mm) thick. Cut out circles using a ring cutter or a glass slightly larger than your tart shells.
- Place each circle into a mini tart shell. Carefully line each mold, pressing the dough gently without stretching it too much.
- Chill the lined tart shells for at least 15-20 minutes.
- Line each chilled tart shell with parchment paper and fill with baking beans or pie weights.
- Bake in the preheated oven for about 15 minutes, or until the dough no longer looks raw and the edges are slightly golden.
- Remove the parchment paper and baking beans/weights. Continue baking for another 5-10 minutes until the bottoms are a lovely golden brown. Cool completely on a wire rack.
For the Ganache Filling:
- In a medium heat-proof bowl, add the chopped chocolate, corn syrup, and salt.
- Pour the heavy cream into a small saucepot and bring it just to a boil over medium heat. Remove from heat immediately once boiling.
- Pour the hot cream over the chocolate mixture and allow it to sit undisturbed for about one minute. This allows the chocolate to melt gently.
- Begin whisking gently and slowly in the very center of the bowl using a small whisk, allowing an emulsion to begin to form. The chocolate should start to look shiny and smooth. Slowly expand your whisking motion outwards to the edges, gradually incorporating all the chocolate and cream until the mixture is completely smooth, glossy, and homogenous.
- Once smooth, whisk in the vanilla extract, followed by the room temperature butter, piece by piece, until fully incorporated and the ganache is lustrous.
- If the ganache appears broken (separated or grainy), pour a small amount (1-2 tablespoons) of cold whipping cream into the ganache and whisk gently but continuously until it re-emulsifies and becomes smooth again. Add up to ¼ cup if necessary, but typically a small amount is sufficient.
- Gently tap the bowl on a folded towel a few times to release any large air bubbles that may have formed during whisking.
- Pour the warm ganache into the pre-baked and cooled tart shells. If desired, you can gently run a kitchen torch over the surface for a moment to pop any remaining tiny surface bubbles for an ultra-smooth finish.
- Refrigerate the tarts until the ganache is fully set, usually about 2-3 hours. Before serving, sprinkle with flaky sea salt for an extra burst of flavor and a beautiful presentation.
Video
Notes
This recipe yields enough ganache for 1 large tart or approximately 10 individual 2.5-inch mini tarts.
Nutrition Information (per tart)
Approximate values based on 10 servings.
- Calories: 251 kcal
- Carbohydrates: 13g
- Protein: 2g
- Fat: 22g
- Saturated Fat: 13g
- Polyunsaturated Fat: 1g
- Monounsaturated Fat: 6g
- Trans Fat: 1g
- Cholesterol: 43mg
- Sodium: 124mg
- Potassium: 140mg
- Fiber: 2g
- Sugar: 10g
- Vitamin A: 532IU
- Vitamin C: 1mg
- Calcium: 31mg
- Iron: 1mg
Enjoyed this recipe? Leave a comment below!
Your feedback is always appreciated. Share your experience and rating!