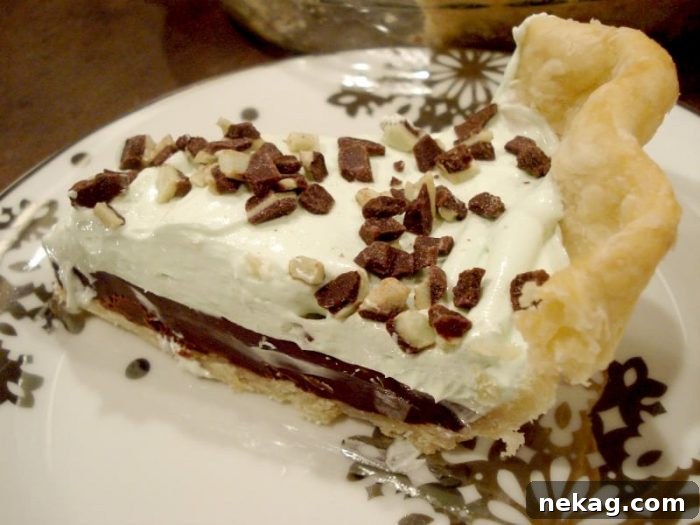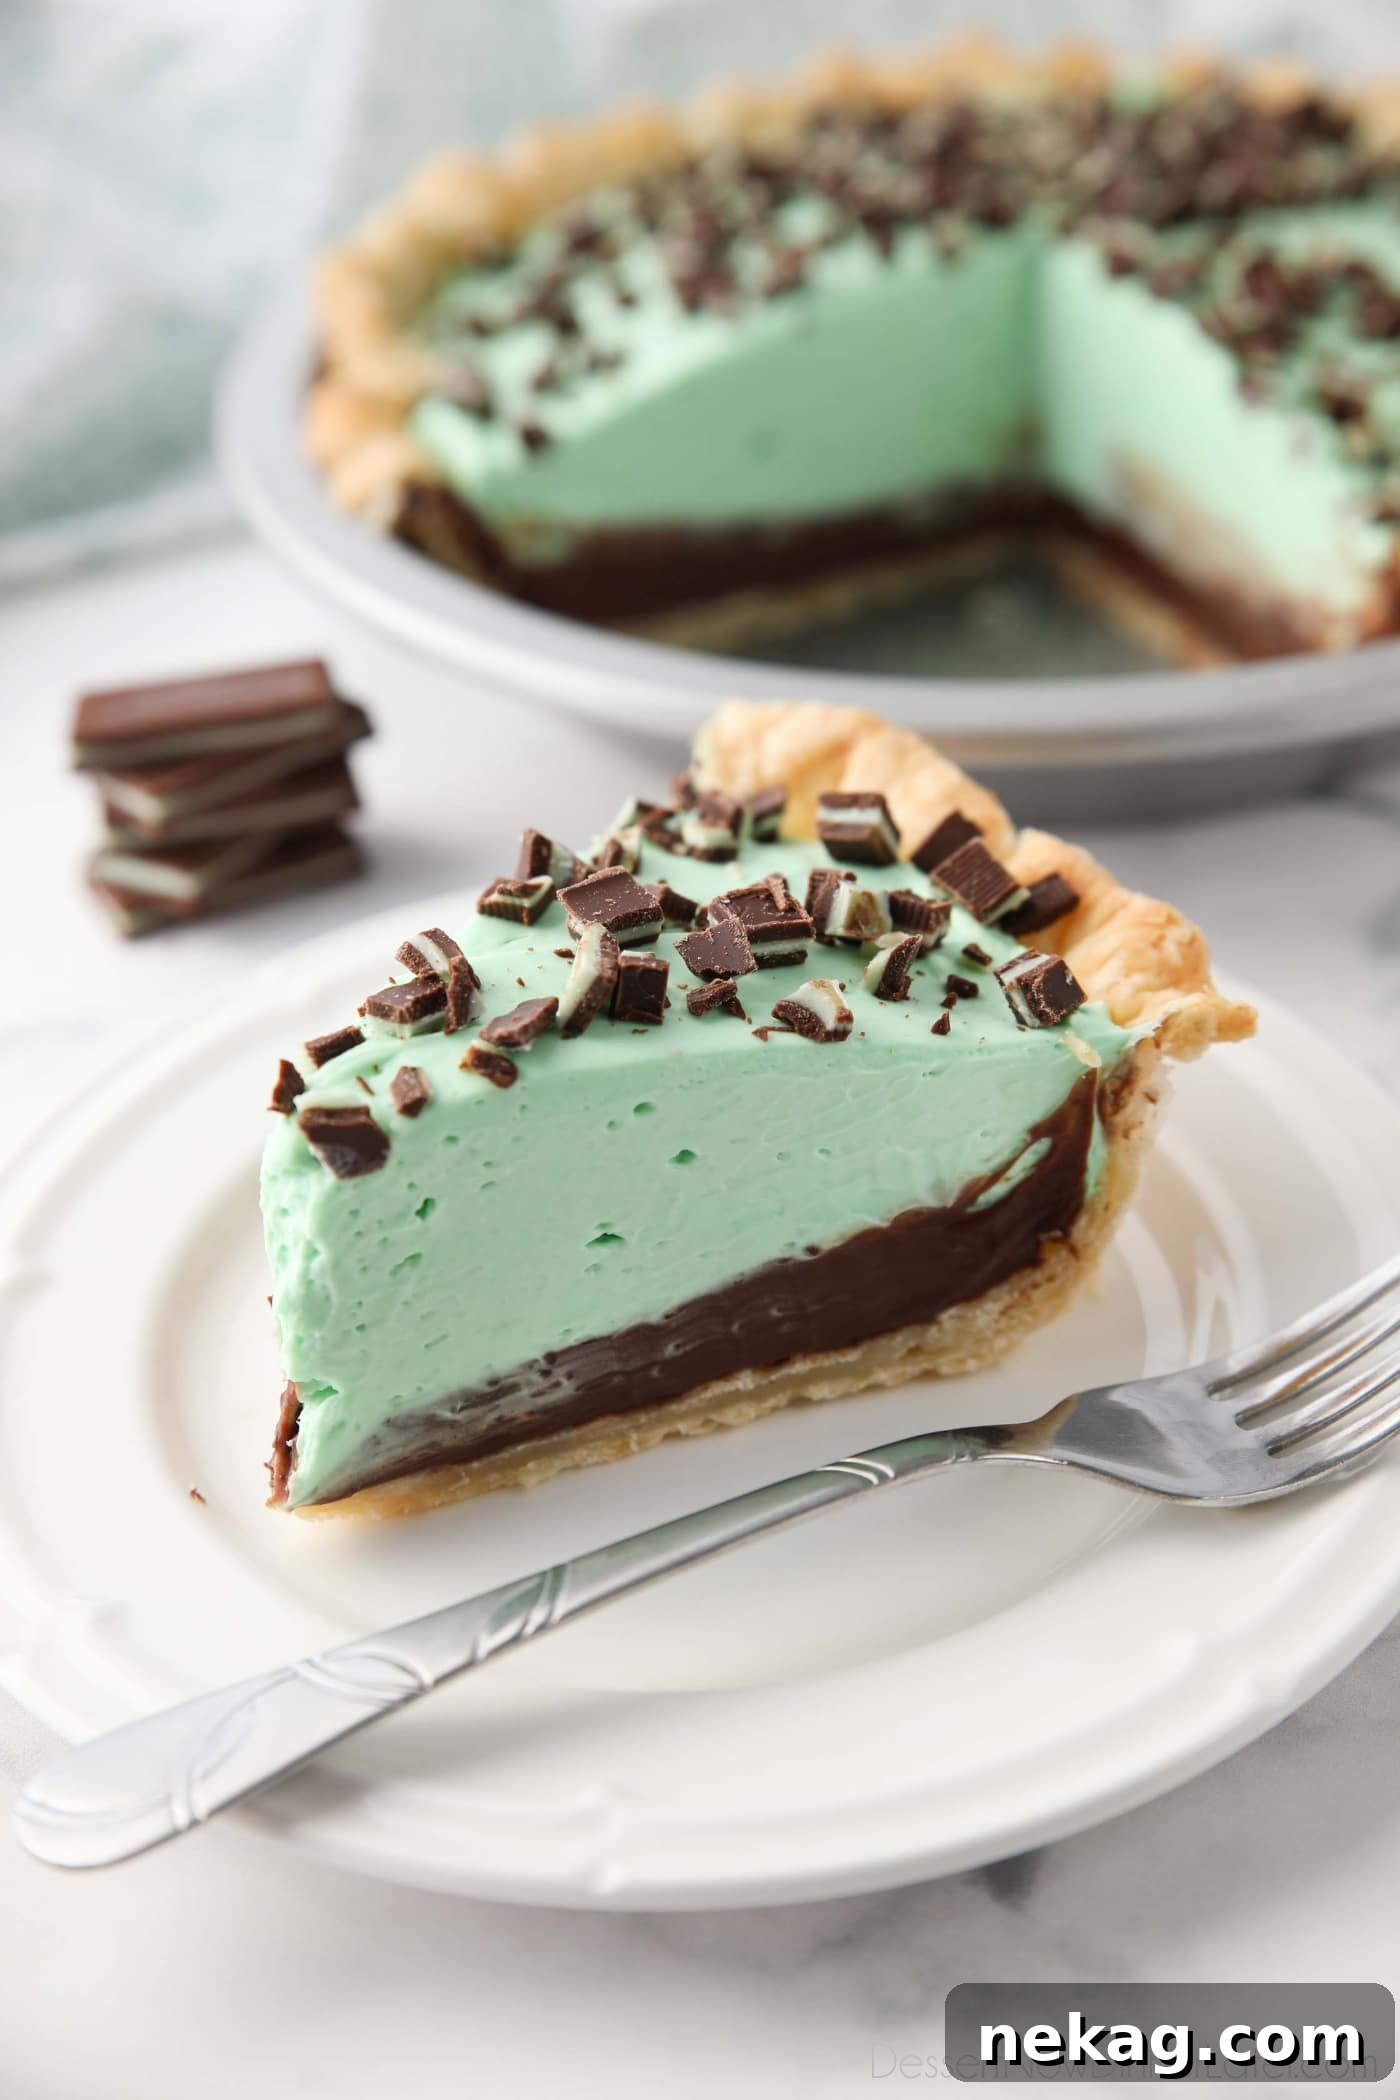
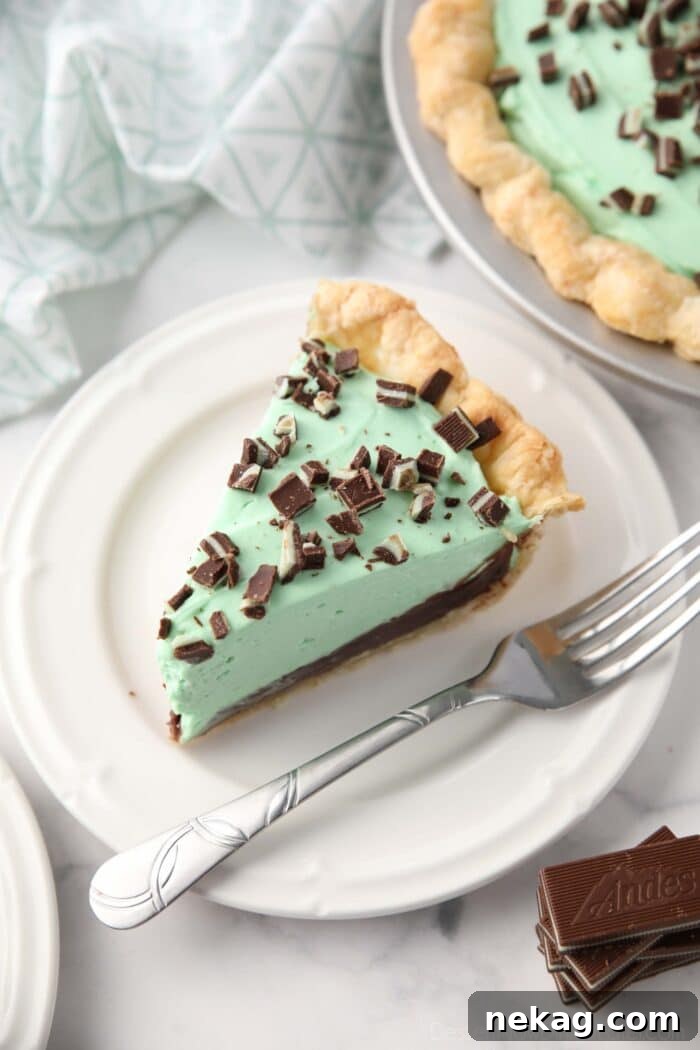
Step into a world of festive flavors with our exquisite Christmas Chocolate Mint Pie. Imagine a perfectly flaky, buttery pie crust cradling a rich layer of glossy chocolate ganache, topped with an irresistibly creamy, no-bake mint cheesecake filling. Each slice is crowned with delicate pieces of Andes thin mints, creating a show-stopping dessert that’s as delightful to behold as it is to taste. This holiday season, elevate your dessert table with a pie that promises pure indulgence in every refreshing, chocolatey bite.
Why You’ll Adore This Christmas Chocolate Mint Pie
This isn’t just another dessert; it’s a celebration in itself, designed to bring joy and festive cheer to your holiday gatherings. Here’s why this particular Chocolate Mint Pie is destined to become a cherished tradition in your home:
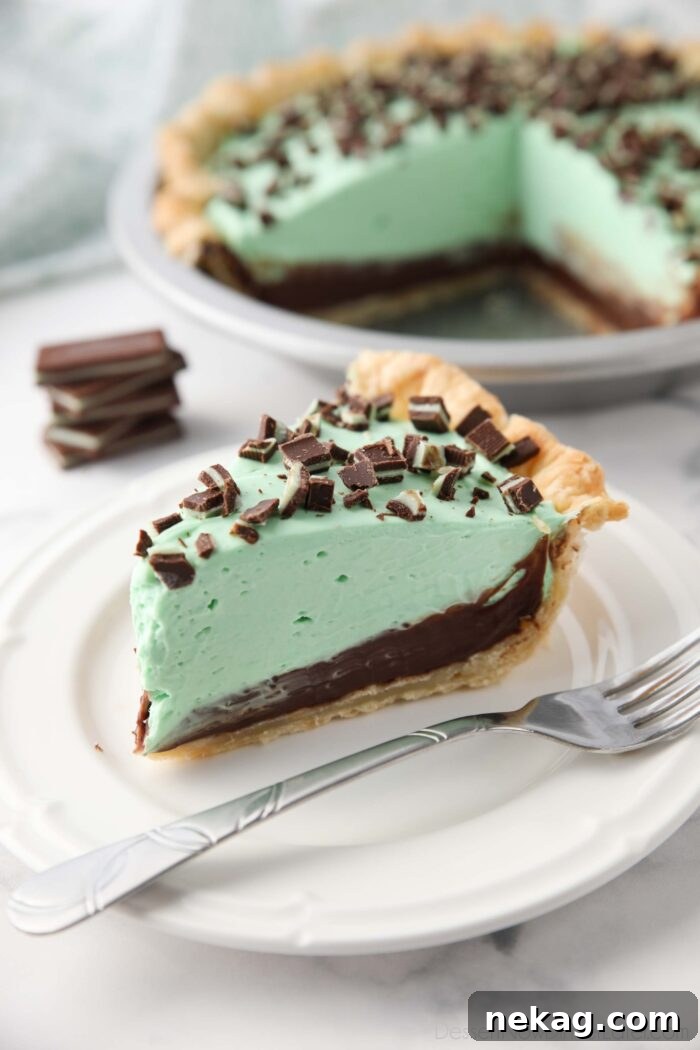
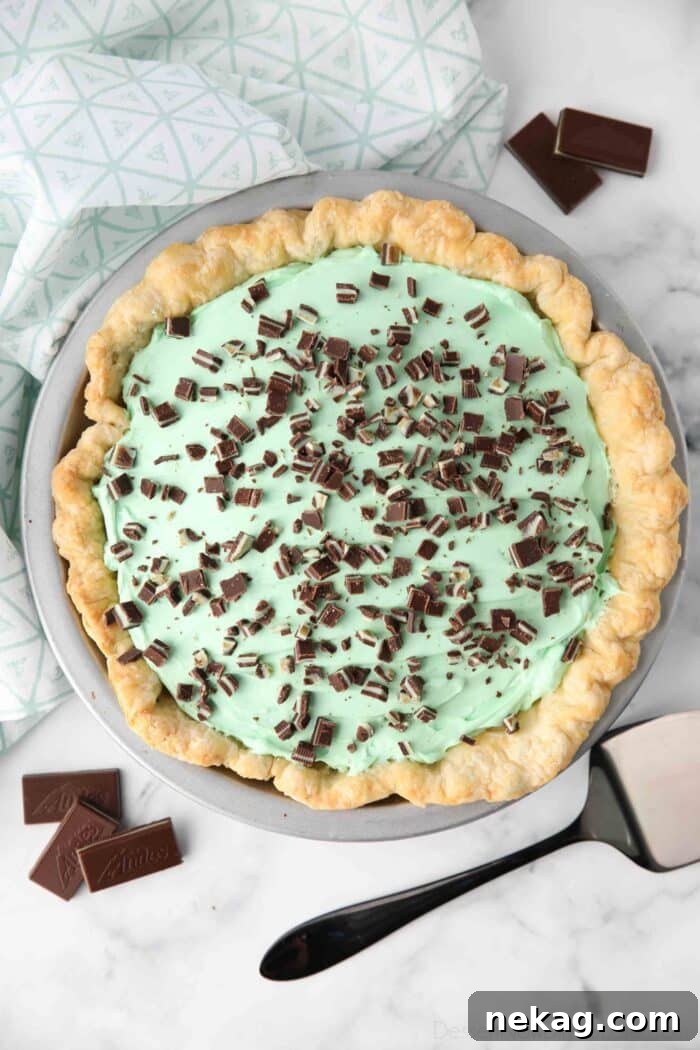
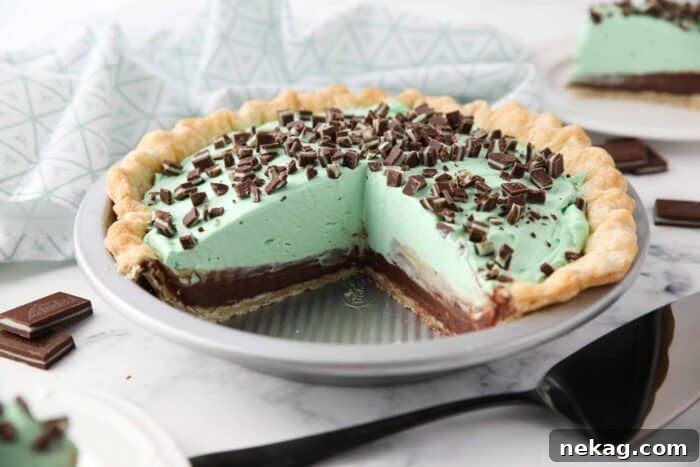
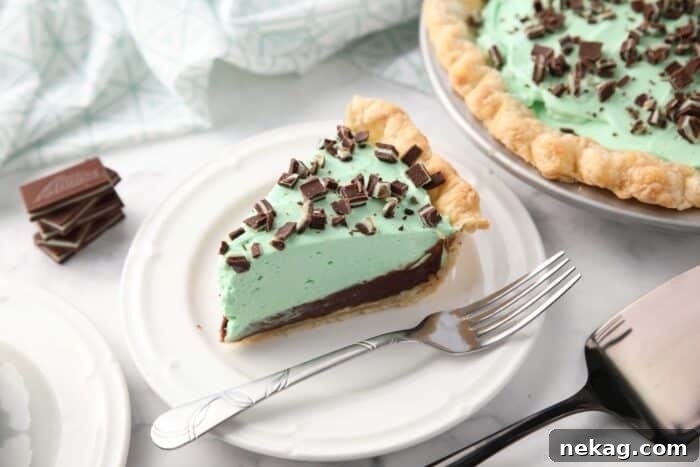
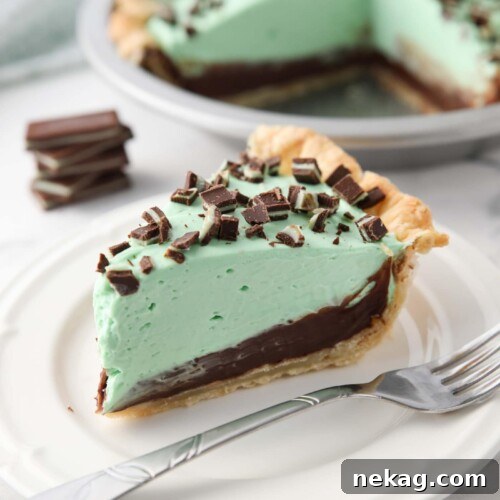
- Stunning Visual Appeal: During the holidays, presentation is everything. This pie boasts distinct, beautiful layers: a golden, flaky pastry crust, a deep, glistening chocolate ganache, and a vibrant, creamy mint cheesecake. The chopped Andes mints sprinkled on top add a finishing touch of elegance, making it an undeniable centerpiece that will impress every guest.
- Harmonious Flavor Fusion: The classic pairing of rich chocolate and cool, invigorating mint is truly irresistible. This pie perfectly balances the deep sweetness of chocolate with the refreshing zest of mint, all encased in a tender, buttery crust. It’s a sophisticated flavor combination that evokes the joyous spirit of Christmas.
- Delightful Texture Contrast: Prepare your senses for a journey through varied textures. You’ll experience the satisfying crispness of the pastry crust, followed by the smooth, velvety indulgence of the chocolate ganache, and finally, the light, airy creaminess of the no-bake mint cheesecake. Each mouthful offers a delightful interplay of sensations that keeps you coming back for more.
- Effortless Elegance: While this pie looks incredibly impressive, it’s surprisingly simple to make. The no-bake cheesecake filling means less time in front of the oven, allowing you more time to enjoy the holiday festivities. It’s the perfect blend of gourmet appeal and stress-free preparation.
The Ultimate Christmas Chocolate Mint Pie Experience
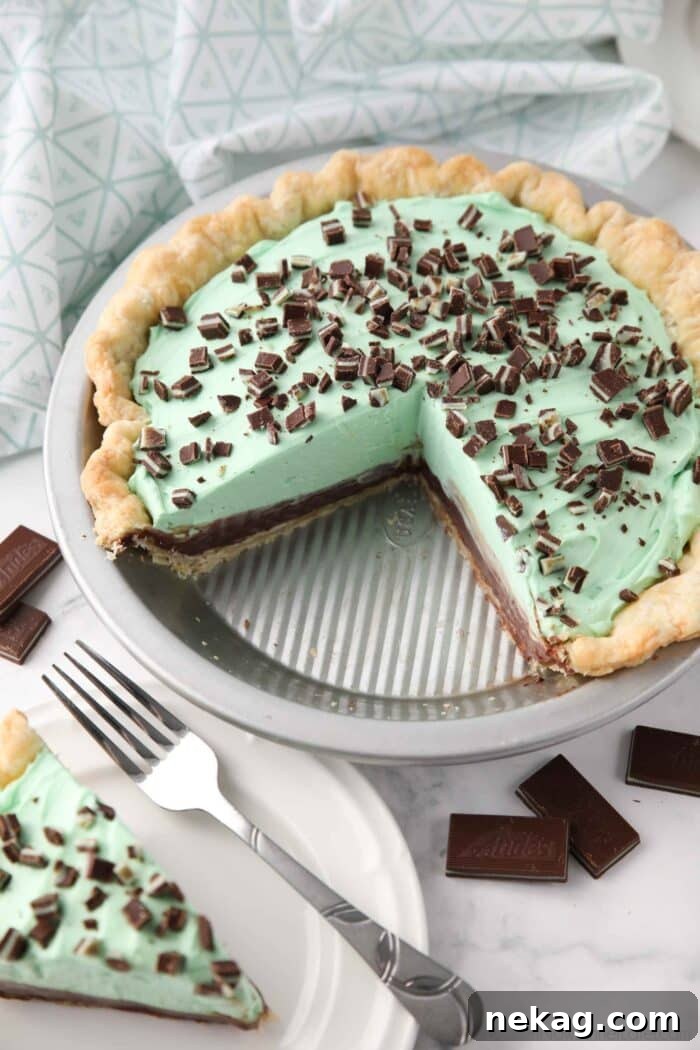
While Thanksgiving often gets all the pie glory, Christmas is equally deserving of a spectacular pie, and this chocolate mint creation is truly exceptional. It stands out as a must-make flavor combination for the holiday season, with its stunning, multi-layered appearance that’s a treat for the eyes.
This chocolate mint pie offers a more refined twist on traditional mint desserts, elevating the experience beyond simpler versions like classic grasshopper pie. Instead of a basic cookie crust, it features a homemade all-butter pie crust that provides a superior flaky texture and rich flavor. What truly sets it apart is the luxurious layer of velvety chocolate ganache at the base, which adds depth and an extra dimension of decadence before the pie is generously filled with a creamy, airy no-bake mint cheesecake.
To complete this festive masterpiece, we crown it with a generous sprinkle of chopped Andes mints. These iconic thin mints not only add a burst of refreshing mint chocolate flavor but also provide an elegant visual garnish, ensuring your holiday pie is perfectly adorned and ready to shine as the star of your dessert table.
Crafting Your Decadent Chocolate Mint Pie: A Step-by-Step Guide
The beauty of this chocolate mint pie lies in its harmonious balance of flavors and textures. The richness of the chocolate ganache is perfectly complemented by the refreshing mint cheesecake and the crisp, tender pastry crust. Here’s how to bring this holiday delight to life:
The Foundation: Perfecting Your Pie Crust
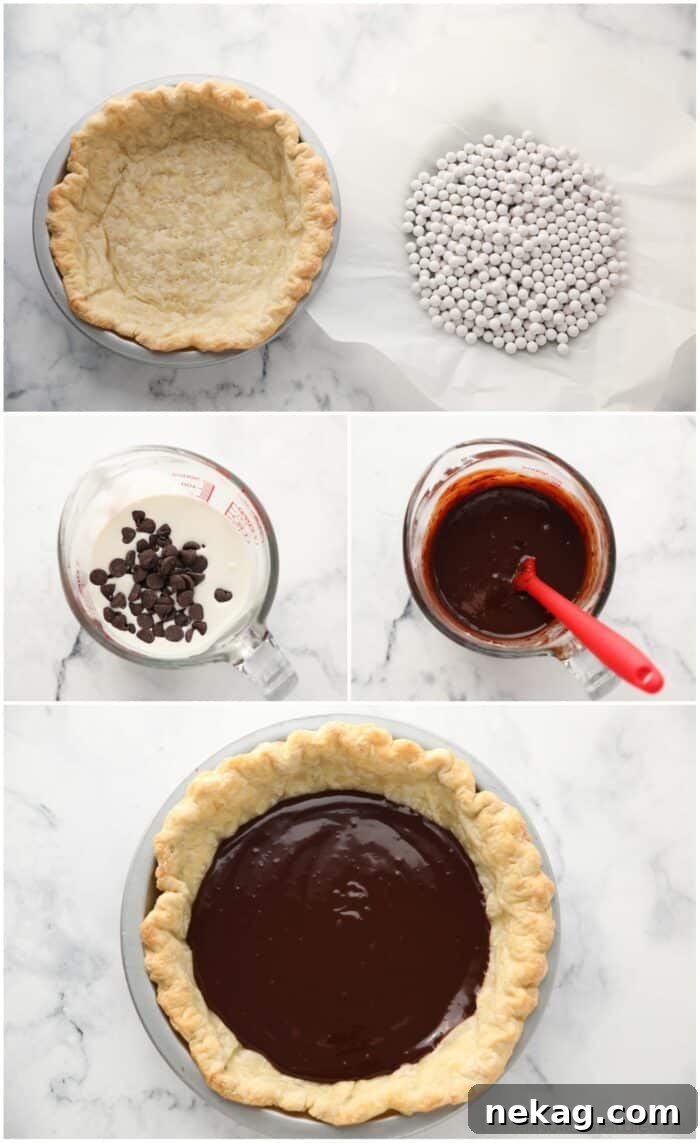
To begin, you’ll need a perfectly blind-baked pie crust. Whether you opt for a homemade all-butter crust for superior flavor and flakiness or a high-quality store-bought option for convenience, ensuring it’s properly pre-baked is key to preventing a soggy bottom and achieving that delightful crunch.
- First, prepare your 9-inch pie crust for blind baking. This involves lining the raw crust with parchment paper or aluminum foil and filling it with pie weights, dry beans, rice, or even sugar to hold its shape during baking.
- Blind bake the pie crust until it’s beautifully golden brown and fully cooked. This step ensures the crust is firm and crisp, ready to hold our decadent fillings.
- Once baked, allow the crust to cool completely. For faster chilling, you can place the cooled crust in the refrigerator or freezer. A thoroughly chilled crust is crucial for the subsequent layers to set properly.
If you’re new to blind baking, a detailed tutorial on how to blind bake pie crust can guide you through the process, whether you’re using a homemade or store-bought shell.
Silky Smooth Chocolate Ganache Layer
The next layer is a rich, glossy chocolate ganache that provides an intensely chocolatey base for the mint filling. This simple yet luxurious component adds significant depth of flavor and a beautiful contrast to the refreshing mint.
- Combine ⅔ cup (159 ml) of heavy cream with 1 cup (170g) of semi-sweet chocolate chips in a microwave-safe bowl or glass measuring cup.
- Heat the mixture in the microwave at half power, in 30-second intervals. Stir thoroughly after each interval until the chocolate is completely melted and the mixture is smooth and glossy. Be patient and avoid overheating to ensure a perfectly smooth ganache.
- Immediately pour the melted chocolate ganache into the bottom of your cooled, blind-baked pie crust. Spread it evenly to create a uniform layer.
- Transfer the pie to the refrigerator or freezer to chill. Allow it to set until the ganache is firm enough to support the next layer without mixing, typically about 15-20 minutes in the freezer or 30-45 minutes in the fridge.
The Star: No-Bake Mint Cheesecake Filling
While your chocolate ganache is chilling, it’s time to prepare the star of the show: the light and creamy no-bake mint cheesecake filling. This vibrant green layer brings the essential refreshing mint flavor that defines this holiday pie.
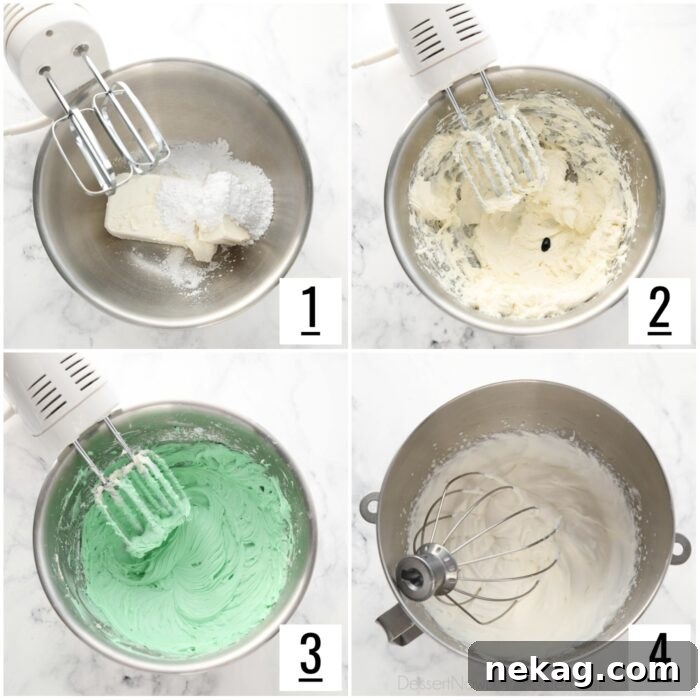
- In a large mixing bowl, beat 12 oz (339 g) of softened block-style cream cheese with 1 cup of powdered sugar using an electric hand mixer until the mixture is completely smooth and free of lumps. This creates a fluffy, sweet cream cheese base.
- Add 1 to 2 teaspoons of pure mint extract (start with 1 tsp and adjust to taste) and approximately 3 drops of liquid green food coloring. The food coloring is optional but gives the pie its characteristic festive green hue.
- Continue to mix until the mint extract and food coloring are thoroughly combined, ensuring a consistent color and flavor throughout the cream cheese mixture.
- In a separate, clean bowl, whip 1 cup (237 ml) of heavy cream with the remaining ½ cup of powdered sugar using a stand mixer fitted with the whisk attachment. Beat until stiff peaks form. This will create a light and airy whipped cream that will give the cheesecake its delicate texture.
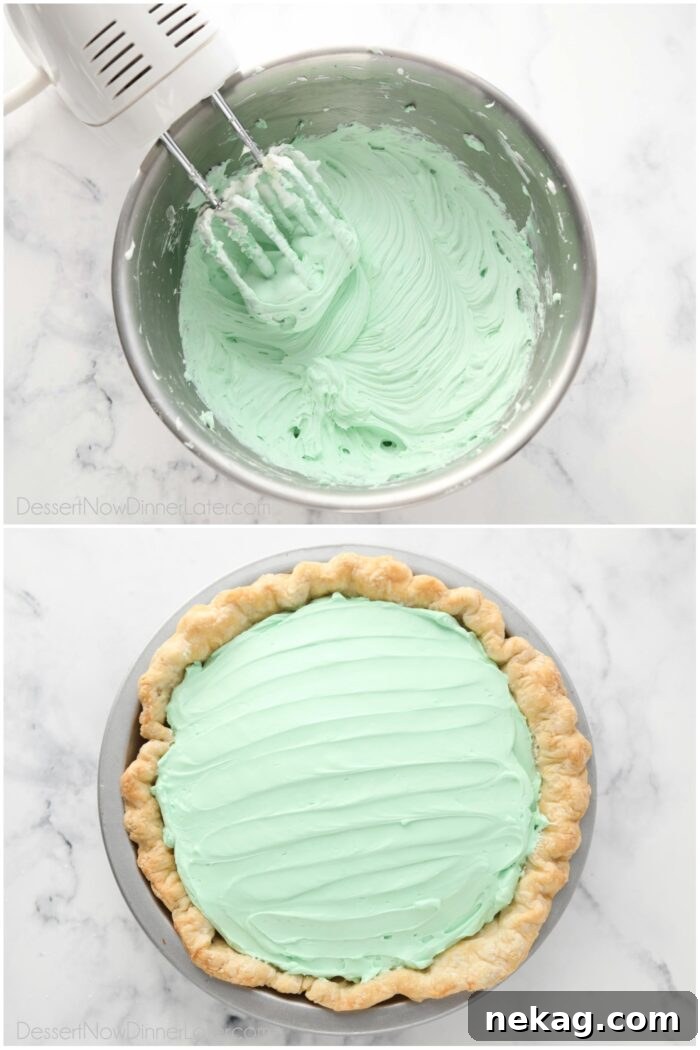
- Gently fold the whipped cream into the mint cream cheese mixture. For best results, use an electric hand mixer on low speed or a spatula to combine the two mixtures until just blended. The resulting filling should be wonderfully thick and airy. Taste and add an additional ½ teaspoon of mint extract at a time if you prefer a stronger mint flavor.
The Grand Finale: Assembling and Garnish
- Carefully spread the prepared mint cheesecake filling evenly over the chilled chocolate ganache layer in the pie crust. Create a smooth, appealing top surface.
- Finally, generously sprinkle chopped pieces of Andes creme de menthe chocolates over the entire surface of the chocolate mint pie. This adds extra texture, flavor, and a beautiful visual flourish.
Expert Tips for Serving and Storing Your Chocolate Mint Pie
To ensure your Christmas Chocolate Mint Pie is enjoyed at its absolute best, follow these expert tips for chilling, slicing, and storing:
- Chilling for Perfection: After assembly, gently cover the pie with plastic wrap, being careful not to touch the topping. Chill the pie in the refrigerator for at least 2 hours, or until it is completely firm. This crucial step allows the layers to set properly, making for clean slices and optimal texture. If you’re in a hurry, you can place the pie in the freezer for 30-60 minutes to speed up the setting process.
- Effortless Slicing: This rich pie is best enjoyed in smaller portions. To achieve clean, beautiful slices, run a sharp knife under hot water for a few seconds, then wipe it completely dry with a towel before each cut. This simple trick helps the knife glide through the chocolate ganache and cheesecake layers without sticking. Depending on slice size, this pie can serve 8-12 people.
- Storing Leftovers: Should you have any delicious leftovers, cover the pie tightly with plastic wrap or aluminum foil. Store it in the refrigerator for up to 5-7 days. The airtight seal will help maintain its freshness and prevent it from absorbing any unwanted odors from your fridge.
- Freezing for Later Enjoyment: This pie freezes beautifully! To freeze, ensure the pie is thoroughly chilled and firm. Wrap it tightly first in plastic wrap, then in aluminum foil, ensuring no part is exposed to air. Freeze for up to 3 months. When you’re ready to enjoy, thaw the pie overnight in the refrigerator before serving.
Mint vs Peppermint: Choosing Your Flavor Profile
Understanding the subtle differences between mint and peppermint extracts can help you tailor this pie to your exact preferences and holiday theme. For this Christmas Chocolate Mint Pie, we’ve specifically used mint extract. This extract is a balanced blend, often incorporating both spearmint and peppermint notes, which pairs wonderfully with the classic Andes creme de menthe thin mints, giving a familiar and universally loved flavor profile.
However, if you lean towards a more intense, sharp minty flavor, you can certainly use peppermint extract instead. Peppermint offers a bolder, cooler sensation, which some prefer, especially during the winter holidays. If you opt for peppermint, consider changing the food coloring to red (which might result in a charming pink hue) or omitting it entirely for a more natural look. For the topping, use Andes peppermint crunch thins to complement the stronger peppermint flavor, adding a delightful crunch and extra festive touch.
For added convenience, Andes also offers mint and peppermint baking chips. These are a fantastic alternative to chopping up whole chocolates, saving you time and effort while still delivering that unmistakable Andes flavor and aesthetic to your pie topping.
Frequently Asked Questions (FAQs)
Here are some common questions about making and enjoying this delicious Christmas Chocolate Mint Pie:
- Can I make this pie ahead of time? Absolutely! This pie is an excellent make-ahead dessert. You can prepare it up to 2-3 days in advance and keep it covered in the refrigerator. In fact, chilling it overnight often enhances the flavors and allows the layers to set perfectly.
- What if I don’t have pie weights for blind baking? No worries! You can use dried beans, uncooked rice, or granulated sugar as substitutes for pie weights. Just make sure to line the crust with parchment paper or foil before filling it with your chosen weights to prevent sticking.
- Can I use a different type of chocolate for the ganache? Yes, you can. While semi-sweet chocolate chips are recommended for a balanced sweetness, you could use dark chocolate for a more intense chocolate flavor or milk chocolate for a sweeter, creamier ganache. Adjust the heavy cream slightly if needed to achieve the right consistency, as different chocolates have varying fat contents.
- Is it possible to make this gluten-free? To make this pie gluten-free, simply use a pre-made gluten-free pie crust. Ensure all other ingredients, like chocolate chips and extracts, are certified gluten-free.
- How can I prevent the ganache from cracking when I cut the pie? Ensuring the ganache is properly chilled but not frozen solid helps. Running your knife under hot water and wiping it dry before each cut is the best way to get clean slices through both the ganache and the firm cheesecake.
More Irresistible Mint Chocolate Desserts
If you’re a fan of the refreshing combination of mint and chocolate, you’ll love these other delightful recipes:
- Mint Chocolate Chip Cookies
- Homemade Mint Oreos
- Mint Brownies
- Chocolate Mint Chip Cookies
- Mint Chocolate Rice Krispie Treats
- Mint Truffle Thumbprint Cookies
Chocolate Mint Pie
Pin Recipe
Ingredients
- 1 9-inch pie crust, homemade or store-bought
Chocolate Ganache
- ⅔ cup (159 ml) heavy cream
- 1 cup (170 g) semi-sweet chocolate chips
Mint No Bake Cheesecake Filling
- 12 oz (339 g) block-style cream cheese
- 1 ½ cups (180 g) powdered sugar, divided
- 1 to 2 tsp pure mint extract, not peppermint
- 3 drops liquid green food coloring
- 1 cup (237 ml) heavy cream
- 8 pieces Andes creme de menthe chocolates, chopped; optional, for garnish
Equipment
- Silicone Spatula Set
- 6-Quart Steel Mixing Bowl
- Electric Hand Mixer
- KitchenAid 5-Qt. Stand Mixer
- Pie Weights
- 9-Inch Pie Pan USA Pan Bakeware
Instructions
-
CRUST: Blind bake 1 empty 9-inch pie crust until golden brown. (See instructions on how to blind bake pie crust) Allow crust to cool completely. Chill the baked crust in the fridge/freezer to speed things along.
-
CHOCOLATE GANACHE: Combine ⅔ cup of heavy cream with 6 ounces of semi-sweet chocolate chips inside of a microwave-safe bowl or glass measuring cup. Microwave at half power in 30 second increments, stirring in-between each interval. Repeat until fully melted and smooth.
-
Once melted, immediately pour the chocolate onto the bottom of the baked pie crust. Place pie in the fridge or freezer to chill the chocolate until firm enough to top with the next layer.
-
MINT LAYER: Beat the cream cheese and 1 cup of powdered sugar together with an electric hand mixer inside of a large bowl until smooth. Add the mint extract (start with 1 teaspoon) and 3 drops or so of green food coloring. Mix until well-combined.
-
Whip the heavy cream and ½ cup of powdered sugar together until stiff peaks, using a stand mixer with the whisk attachment. Add the whipped cream to the mint cream cheese mixture. Use the electric hand mixer to beat the two mixtures together. Mixture should be very thick. (Taste and add more mint extract 1/2 tsp at a time, if desired.)
-
Spread filling evenly on top of the layer of chilled ganache. Sprinkle chopped pieces of Andes mints on top of the chocolate mint pie.
-
Gently cover with plastic wrap. Chill the pie in the fridge for 2+ hours or until firm. Alternately chill the pie in the freezer for 30-60 minutes if desired, to speed things along.
Notes
- CUT: To cut the pie, run a knife under hot water and dry it off with a towel before making each cut. This pie will serve 8-12 people, depending on the size of the slice. We prefer smaller pieces, since this chocolate mint pie is rich.
- STORE: Cover any leftovers with plastic wrap or foil and store in the fridge up to 5-7 days.
- FREEZE: To freeze, cover the chocolate mint pie tightly with plastic wrap and foil and freeze up to 3 months. Thaw in refrigerator overnight before serving.
Nutrition Information
Disclaimer: Nutritional values were calculated using a third-party tool and are provided as an estimation only.
Sharing this recipe with a link is both encouraged and appreciated. Copying/pasting and/or screenshots of full recipes to any social media is strictly prohibited. Content and photographs are copyright protected.
Did you make this?
Don’t forget to leave a rating below and make sure to follow on Pinterest and Instagram for more!
*Originally published 12/6/2011. Post updated November 2023.