
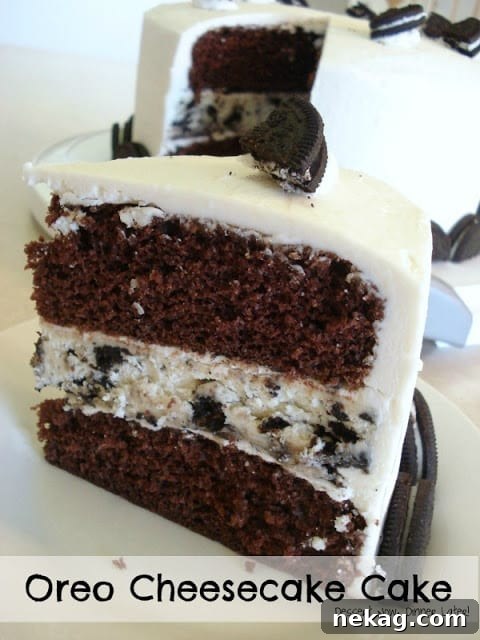
The Ultimate Oreo Cheesecake Cake: A Decadent Layered Masterpiece
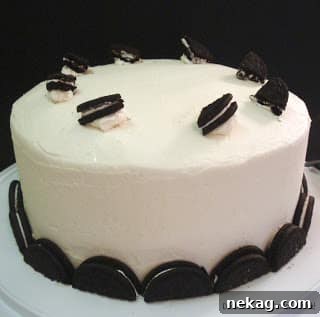
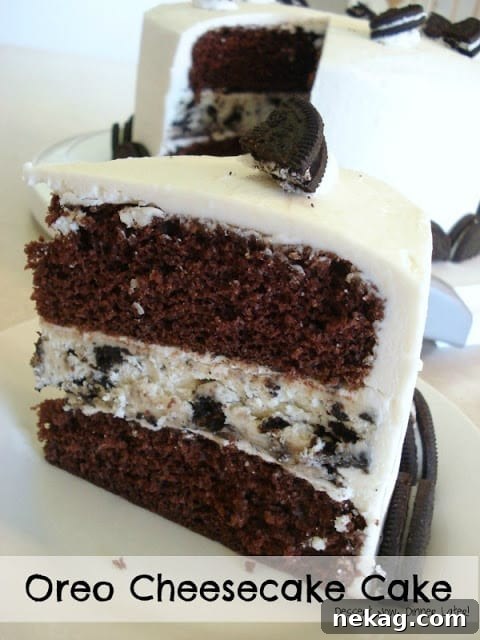
There are cakes, and then there are celebration cakes. For special occasions, nothing quite captures the joy and indulgence like a dessert that goes above and beyond. This Oreo Cheesecake Cake isn’t just a cake; it’s a meticulously crafted experience, combining the rich creaminess of a classic cheesecake with the moist, decadent crumb of a chocolate cake, all enveloped in a luscious white chocolate frosting. It’s truly a showstopper, perfect for birthdays, anniversaries, or any moment that calls for something extraordinary.
My husband is wonderfully easy-going, especially when it comes to food. So, when his birthday rolled around, and I asked for his cake preference, his reply was a classic, “Whatever you want to make, honey.” With a pantry full of possibilities, I stumbled upon the blueprint for this magnificent creation. It seemed ambitious at first glance – a three-part symphony involving cheesecake, a chocolate cake, and a luxurious frosting. But I assured myself, and now I assure you, that while it’s a project that requires a little planning and patience, the result is absolutely worth every single step. This cake is a testament to love and homemade deliciousness, and it never fails to impress.
Indeed, this is not a cake you whip up on a whim for same-day consumption unless you possess superhuman baking abilities! It’s a “plan-ahead” masterpiece, designed to be broken down into manageable stages. Each component contributes to a harmonious whole, and allowing proper chilling and setting times is crucial for its structural integrity and exquisite flavor. Don’t be intimidated by the length of the recipe; when viewed as three distinct preparations—the creamy cheesecake, the fluffy chocolate cake, and the silky frosting—it becomes an enjoyable culinary adventure. The anticipation builds with each completed layer, promising a grand finale that will delight every palate.
Crafting the Perfect Layers: Cheesecake, Cake, and Frosting
The Creamy Oreo Cheesecake Layer
The foundation of this extraordinary dessert is a rich, creamy cheesecake studded with crushed Oreo cookies. Achieving that signature smooth texture and perfect set is simpler than you might think, especially with a few key techniques. Start with your cream cheese at room temperature; this is non-negotiable for a lump-free batter. Be gentle with your mixing once the eggs are added, as over-mixing can incorporate too much air, leading to cracks. The water bath, or “bain-marie,” is another critical step, providing a moist baking environment that ensures even cooking and prevents the cheesecake from drying out. But perhaps the most genius trick for this layered cake is to freeze the cheesecake overnight. This step not only allows it to firm up beautifully, making it incredibly easy to handle and stack, but it also creates a distinct, firm layer that contrasts wonderfully with the softer chocolate cake.
The Moist Chocolate Cake Base
A truly great layer cake needs a robust yet tender foundation, and this homemade chocolate cake recipe delivers just that. It’s incredibly moist, rich in cocoa flavor, and boasts a fine crumb that holds up beautifully to the cheesecake layer. My own baking journey with this cake wasn’t without its minor hiccups, offering a valuable lesson that I’m thrilled to share. I discovered, to my slight dismay, that my trusty 9-inch round cake pan was actually 8.5 inches! This slight difference led to a minor overflow in the oven and some tricky removal. In a pinch, I had to resort to a boxed devil’s food cake mix, which, thanks to kind neighbors, still made for a delicious treat, identifiable by its reddish hue in some of the pictures. While a boxed mix can be a decent backup, I wholeheartedly encourage you to make the cake from scratch for the ultimate flavor and texture profile.
To avoid my “pan-demic” and ensure a pristine cake layer every time, here’s my golden rule: always use parchment paper. Cut a circle to fit the bottom of your pan and secure it with a quick spritz of non-stick spray before adding the batter. Then, generously grease and flour the sides of the pan. This meticulous preparation creates a foolproof barrier, ensuring your cake releases effortlessly from the pan, perfectly intact and ready for its next layer. This simple step truly makes all the difference, transforming potential frustration into baking triumph.
The Velvety White Chocolate Buttercream Frosting
Completing this magnificent dessert is a luscious white chocolate buttercream frosting. This isn’t just any frosting; it’s a sweet, velvety dream with a subtle yet distinct hint of white chocolate that perfectly complements the rich chocolate cake and tangy cheesecake. The inclusion of melted white chocolate gives it a unique depth of flavor and helps it set beautifully, creating a stable and delicious coating for your cake. When I first made this, I might have gone a bit overboard with the powdered sugar (5 cups!) and a conservative amount of milk (1/4 cup), resulting in a rather stiff frosting. While it tasted amazing, spreading it smoothly for decoration was a bit of a challenge.
My advice for your frosting journey is to aim for a slightly softer consistency. Start with the lower end of the powdered sugar recommendation and gradually add more, alternating with heavy cream or milk, until you achieve a wonderfully smooth, spreadable consistency that’s easy to work with. Remember, the melted white chocolate will cause the frosting to firm up as it chills, so a slightly softer texture initially will give you much more control during assembly and decoration. This thoughtful approach ensures your cake looks as incredible as it tastes, providing that final touch of elegance and flavor.
Assembling Your Oreo Cheesecake Dream
With all your components prepped and perfectly chilled, the assembly stage is where your masterpiece truly comes to life. The key to a neat and stable layered cake, especially one with a cheesecake layer, is working with cold layers. This minimizes crumbling and ensures the structure holds firm as you stack and frost. Begin by placing one chocolate cake layer onto your chosen cake stand or serving plate. A thin layer of frosting and a sprinkle of crushed Oreos here can add an extra burst of flavor and texture right in the middle.
Next, the star of the show: the frozen cheesecake. Carefully remove it from the freezer, unwrap, and gently detach the metal bottom and parchment paper. Place this firm, cold disk directly on top of the first cake layer. If your cheesecake happens to be slightly wider than your cake, don’t fret! Allow it to soften for just 5-10 minutes at room temperature, then use a sharp knife or even kitchen shears to carefully trim any overhang. Once trimmed, frost the top of the cheesecake with another thin layer and more crushed Oreos. Finally, crown your creation with the second chocolate cake layer. Apply a thin layer of frosting over the entire cake – this is your “crumb coat,” essential for trapping loose crumbs and creating a smooth canvas for the final frosting layer. Pop it in the refrigerator for about 30 minutes to set, then apply the remaining frosting, decorating with mini Oreos, more crushed Oreos, or any festive adornments you desire. Refrigerate until ready to serve, allowing the flavors to meld beautifully.
Essential Tips for Success
- Plan Ahead: This cake is a multi-day project. Embrace the process and spread out the tasks (e.g., cheesecake one day, cake the next, frosting/assembly on the third).
- Room Temperature Ingredients: Especially crucial for the cheesecake and frosting. It ensures smooth batters and prevents curdling or lumps.
- Accurate Measurements: Baking is a science. Use a kitchen scale for dry ingredients like flour and sugar for the most consistent results.
- Don’t Skimp on Pan Preparation: Parchment paper is your best friend for non-stick cakes. Grease and flour thoroughly.
- Cool Completely: Ensure all cake layers are fully cooled before frosting and assembling. Warm cakes will melt your frosting and cause structural issues.
- Freeze Layers: Freezing both the cheesecake and the cake layers is a game-changer. It makes them much easier to handle, stack, and frost cleanly.
- Adjust Frosting Consistency: Don’t be afraid to add a little more milk or powdered sugar to achieve your desired spreadability.
- Portion Control: This cake is incredibly rich and sweet. Cutting it into 16 smaller slices ensures everyone can enjoy a generous, satisfying portion without feeling overwhelmed.
The Recipe: Oreo Cheesecake Cake
Oreo Cheesecake Cake
Amber Brady
Pin
Rate
Save
10 + Servings
Ingredients
CHEESECAKE:
- 20 oz (565 g) block-style cream cheese, room temperature
- ¾ cups (150 g) granulated sugar
- ½ Tablespoon vanilla extract
- ¼ teaspoon coarse salt
- 2 large eggs
- ½ cup (120 g) sour cream
- 6 regular Oreo cookies, coarsely crushed
CAKE:
- 2 cups (400 g) granulated sugar
- 1 ¾ cups (210 g) all-purpose flour (stir, spoon & level)
- ¾ cup (60 g) dutch processed cocoa powder
- 1 ½ teaspoons baking powder
- 1 ½ teaspoons baking soda
- 1 teaspoon salt
- 2 large eggs
- 1 cup (237 ml) milk
- ½ cup (118 ml) vegetable oil
- 2 teaspoons vanilla extract
- 1 cup (237 ml) boiling water
FROSTING:
- 8 oz (226 g) white chocolate chips
- 1 cup (226 g) butter (2 sticks), softened slightly to room temperature
- 2 teaspoons vanilla extract
- 4-6 cups (480-720 g) powdered sugar
- ¼ – ⅓ cup (59-80 ml) heavy cream or milk
DECORATION:
- 3-4 regular Oreo cookies, crushed
- Extra Oreos for border, etc.
Instructions
-
CHEESECAKE:
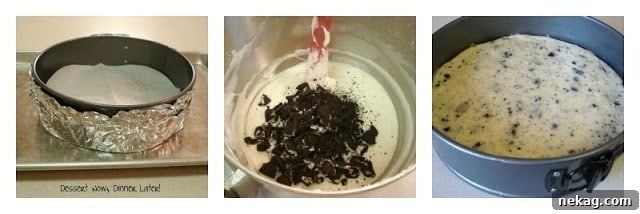
Preheat oven to 325˚F (160°C). Set a kettle of water to boil. Using an electric mixer, beat cream cheese on medium until fluffy, scraping down the side of the bowl. Gradually add sugar, beating until fluffy. Beat in vanilla extract and salt. Beat in eggs, one at a time, scraping down the side of the bowl after each addition. Beat in sour cream. Fold in crushed Oreos.
-
Cut parchment paper in a circle and line the bottom of an 9-inch spring-form pan (with the raised side of the bottom insert facing up). Wrap the bottom half of the pan tightly in foil. Pour in the filling. Place the spring-form pan in a roasting pan or rimmed baking sheet. Pour boiling water into the roasting pan to come halfway up the side of the spring-form pan (or as high as possible without spilling water into the oven).
-
Bake until just set in the center, about 45 minutes. Turn the oven OFF. Let rest in the CLOSED oven for 2 hours. Run a paring knife around the edge of the cheesecake. Remove the outer ring of the spring-form pan, but leave the metal bottom attached. Wrap in plastic wrap and FREEZE OVERNIGHT.
-
CAKE:
Heat oven to 350˚F (175°C). Grease and flour the edges of two 9-inch round cake pans. Cut a parchment circle to fit the bottom of each pan. A quick squirt of pan spray in the bottom before adding the parchment circle will help it stay in place. (This parchment & flouring method is HIGHLY suggested to help remove the cake without any sticking.)
-
In a large bowl, stir together sugar, flour, cocoa, baking powder, baking soda, and salt. Add eggs, milk, oil, and vanilla; beat on medium speed of an electric mixer for 2 minutes. Stir in the boiling water (the batter will be thin). Pour batter evenly into the prepared pans.
-
Bake for 30 to 35 minutes or until a wooden pick inserted in the center comes out clean. Cool for 10 minutes in the pans; then remove from pans to wire racks to cool completely. *OPTIONAL: Wrap cakes in plastic wrap & FREEZE OVERNIGHT with the cheesecake. You can leave the parchment circle on if desired, and peel it off when the cake is frozen. Having frozen cake really helps to eliminate the need for a crumb coat when frosting, and it thaws quickly.
-
FROSTING:
Place white chocolate in a double boiler over a pot of simmering water just until it begins to melt. Stir until fully melted, remove from heat, and set aside to cool slightly.
-
Meanwhile, cream butter until light and fluffy. Once the white chocolate has cooled to near room temperature, beat it into the creamed butter. Continue to mix at low to medium speed while adding vanilla. Gradually add in cream/milk and powdered sugar, alternating until the frosting reaches desired consistency (aim for smooth and spreadable, not too stiff).
-
ASSEMBLY:
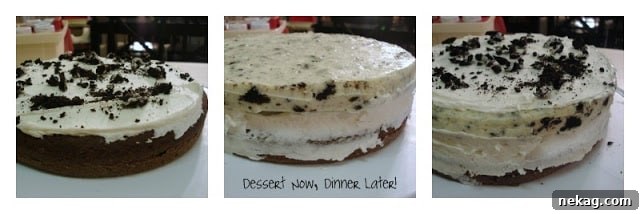
Place one layer of chocolate cake on your cake stand or serving plate. If desired, frost the top with a thin layer of frosting and a sprinkle of crushed Oreos.
-
Remove the cheesecake from the freezer, unwrap, and remove the metal bottom of the pan, then peel off the parchment paper. Carefully place the cheesecake layer on top of the first cake layer. If the cheesecake is wider than the cake and needs trimming, wait approximately 5-10 minutes for the cheesecake to soften slightly, then trim it with a sharp knife or kitchen shears.
-
Frost the top of the cheesecake with a thin layer of frosting and a sprinkle of crushed Oreos. Place the top layer of chocolate cake on top of the cheesecake.
-
Coat the entire cake with a thin layer of frosting to act as the crumb coat. Be careful not to get any crumbs into your main bowl of frosting! Refrigerate the cake for approximately 30 minutes to set the crumb coat.
-
After chilling, frost the cake with as much of the remaining frosting as necessary for a smooth finish. Top with mini Oreos, crushed Oreos, or any decoration of your choosing. Refrigerate until ready to serve. This allows the layers to set and the flavors to fully meld.
Notes
Remember that the success of this cake lies in patience and preparation. Each step, though seemingly simple, builds towards a truly spectacular dessert.
Sharing this recipe with a link is both encouraged and appreciated. Copying/pasting and/or screenshots of full recipes to any social media is strictly prohibited. Content and photographs are copyright protected.
Did you make this?
Don’t forget to leave a rating below and make sure to follow on Pinterest and Instagram for more!
Final Thoughts on a Magnificent Dessert
Creating this Oreo Cheesecake Cake is more than just baking; it’s an act of love and a rewarding experience for any home baker. The journey from separate ingredients to a towering, irresistible dessert is incredibly satisfying. Each forkful offers a delightful contrast—the smooth, tangy creaminess of the cheesecake, the deep, rich comfort of the chocolate cake, and the sweet, luxurious embrace of the white chocolate frosting, all punctuated by the familiar crunch of Oreo cookies.
While it might seem like a grand undertaking, remember that great things often require a little extra effort. The planning and the multi-step process are what elevate this from a simple cake to a memorable culinary event. So, gather your ingredients, clear your schedule for a dedicated baking adventure, and prepare to impress your loved ones (and yourself!) with this truly magnificent Oreo Cheesecake Cake. Happy baking, and more importantly, enjoy every single blissful bite!