
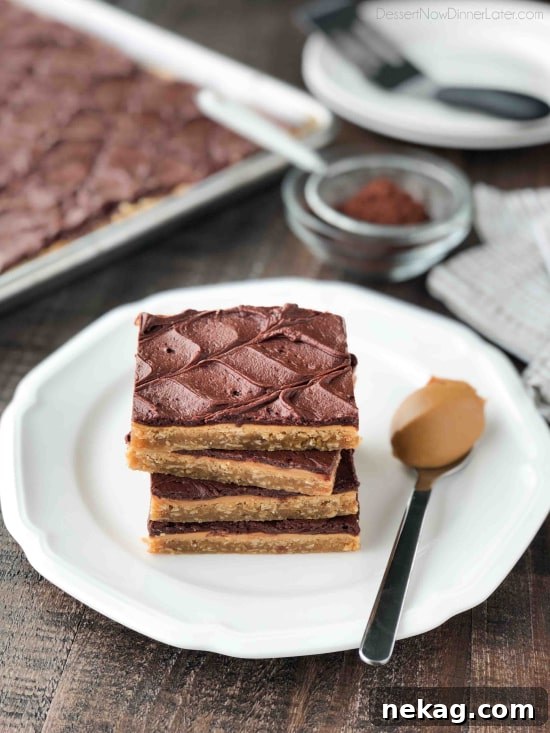
Indulge in a timeless treat with these incredibly soft and chewy Peanut Butter Bars with Oatmeal. This beloved baked cookie dessert features a rich, oatmeal-infused peanut butter base, an additional creamy layer of peanut butter, and is crowned with a decadent chocolate frosting. Perfect for any gathering, these bars are guaranteed to be a crowd-pleaser and evoke a sense of nostalgic comfort. (Serves a generous crowd.)
For many, this recipe isn’t just a dessert; it’s a delicious trip down memory lane. I fondly recall these delightful bars from my elementary school cafeteria, where they were affectionately known as Peanut Butter Fingers. The main difference was simply the cut – instead of the squares you see here, they were sliced into longer, thinner rectangles. Regardless of their shape, their irresistible flavor remains etched in my memory, and now you can recreate that same cherished taste in your own kitchen.
It’s no surprise why these bars were a staple in school cafeterias; they yield an impressive quantity, making them ideal for feeding a large group. More importantly, everyone adored them! I can confidently say that these peanut butter and chocolate bars captivate adults just as much as they do children. The classic pairing of creamy peanut butter and rich chocolate creates an undeniable harmony of flavors that is truly hard to resist – unless, of course, you have a food allergy, in which case there are many other delightful treats to explore!
Peanut Butter Bars with Oatmeal: A Recipe Elevated
What sets these apart from your average peanut butter cookie bars? The secret lies in the addition of old-fashioned oats. These wholesome oats are integrated directly into the bar base, creating an extraordinary soft and chewy texture that makes each bite incredibly satisfying. This isn’t merely a peanut butter cookie; it’s a substantial, comforting bar with a unique character all its own. Once baked and still warm, a thin, inviting layer of extra peanut butter is gently spread over the top, melting slightly into the warm base and intensifying that beloved peanut butter flavor. Finally, everything is generously smothered with a silky, rich chocolate frosting, completing this truly decadent dessert experience.
Crafting the Perfect Chocolate Frosting
The frosting is a crucial element that brings these Peanut Butter Bars to life. For a deep, rich chocolate flavor and a beautifully dark color, I personally love using Hershey’s Special Dark Cocoa. However, if you don’t have it on hand, regular unsweetened cocoa powder will work perfectly fine and still deliver a delicious chocolatey punch. The key is to achieve a smooth, creamy consistency that spreads effortlessly over the peanut butter layer. You can elevate the presentation by creating a charming bakery swirled design on top of the frosting. This simple technique is surprisingly easy to execute and adds a professional, inviting touch that makes these bars even more appealing.
When you bring a tray of these Peanut Butter Bars to a party or potluck, don’t be surprised if they vanish almost instantly. Their irresistible combination of soft, chewy texture and the classic peanut butter-chocolate pairing makes them an undeniable hit every single time. Beyond their amazing taste, they are also wonderfully easy to prepare, making them a fantastic choice for any occasion where you need a reliable and crowd-pleasing dessert. If you’re looking for a delightful alternative, especially during warmer months when you prefer to avoid turning on the oven, be sure to check out these No Bake Peanut Butter Bars. They offer a similarly satisfying flavor profile without the baking step, making them a perfect summer treat.
Tips for Baking Perfect Peanut Butter Oatmeal Bars
Achieving bakery-quality Peanut Butter Bars at home is simpler than you might think with a few key tips:
- Room Temperature Ingredients: Ensure your butter and eggs are at room temperature. This helps them cream together smoothly with the sugars, creating a more cohesive and tender dough.
- Measure Flour Correctly: For accurate baking, stir your all-purpose flour before spooning it into your measuring cup and leveling it off with a straight edge. This prevents compaction and ensures you don’t add too much flour, which can lead to dry bars.
- Don’t Overmix: Once you add the dry ingredients to the wet, mix only until just combined. Overmixing can develop the gluten in the flour too much, resulting in tough bars.
- Evenly Press Dough: For uniform baking, it’s crucial to press the dough evenly into your prepared pan. A lightly floured rolling pin can be a fantastic tool to achieve a smooth and consistent layer.
- Do Not Over-bake: These bars are meant to be soft and chewy. Over-baking will dry them out. Keep an eye on them and remove them from the oven as soon as the edges are lightly golden and the center is just set. They will continue to set as they cool.
- Warm Peanut Butter Layer: Spreading the extra cup of peanut butter over the bars while they are still warm helps it melt slightly, creating a smooth, even, and integrated layer that adheres beautifully to the base.
- Chill for Clean Slices: While it’s tempting to dig in immediately, allowing the bars to cool completely and even chill in the refrigerator will make for much cleaner cuts and a firmer frosting.
Variations and Customizations
While this classic recipe is perfect as is, don’t hesitate to get creative with variations:
- Crunchy Peanut Butter: Swap creamy peanut butter for crunchy in the base for an added textural dimension.
- Nutty Toppings: Sprinkle chopped peanuts or other nuts over the chocolate frosting before it sets.
- Mini Chocolate Chips: Fold in a half cup of mini chocolate chips into the bar dough for even more chocolatey goodness.
- White Chocolate Drizzle: After the chocolate frosting has set, drizzle melted white chocolate over the top for an elegant touch and extra flavor.
- Sea Salt Flakes: A light sprinkle of flaky sea salt on the chocolate frosting can enhance the flavors and provide a sophisticated contrast.
Storage and Make-Ahead Instructions
These Peanut Butter Bars are excellent for making ahead and storing:
- Room Temperature: Store leftover bars in an airtight container at room temperature for up to 3-4 days.
- Refrigeration: For longer freshness, especially in warmer climates or if your home is warm, refrigerate the bars in an airtight container for up to a week. Let them come to room temperature for optimal texture before serving.
- Freezing: These bars freeze beautifully! Cut them into individual servings, wrap each tightly in plastic wrap, and then place them in a freezer-safe bag or container. They can be frozen for up to 2-3 months. Thaw at room temperature for a few hours before enjoying.
Recipe for Chewy Peanut Butter Oatmeal Bars
Peanut Butter Bars
Pin
Rate
Save
Ingredients
- ½ cup (113 g) unsalted butter, (1 stick) softened
- 1 cup (200 g) granulated sugar
- 1 cup (200 g) brown sugar, gently packed
- 2 large eggs
- 2 tsp vanilla extract
- 1 cup (264 g) creamy peanut butter
- 1 ¾ cups (210 g) all-purpose flour, (stir, spoon, & level)
- 2 cups (160 g) old fashioned oats
- 1 tsp baking soda
- ½ tsp salt
Frosting:
- 1 cup (264 g) creamy peanut butter (separate)
- ½ cup (113 g) unsalted butter, (1 stick) very soft
- 3 cups (360 g) powdered sugar
- ¼ cup (20 g) unsweetened cocoa powder, (I use Hershey’s Special Dark)
- 1 tsp vanilla extract
- 3 Tbsp milk
Instructions
-
Preheat your oven to 350 degrees Fahrenheit. Lightly grease a 12×18-inch jelly roll pan or rimmed half sheet pan with cooking spray to prevent sticking.
-
For the bars: In the bowl of a stand mixer fitted with the paddle attachment, cream together the softened butter and both granulated and brown sugars until the mixture is light and fluffy, about 2-3 minutes. Beat in the large eggs one at a time, followed by the vanilla extract, ensuring each is fully incorporated before adding the next. Stir in the creamy peanut butter until thoroughly combined and smooth. Remember to scrape down the sides of the bowl as needed to ensure everything is well mixed.
-
In a separate medium bowl, whisk together the all-purpose flour (stirred, spooned, and leveled), old-fashioned oats, baking soda, and salt. Gradually add these dry ingredients to the wet ingredients in the mixer on low speed. Mix just until the dry ingredients are fully incorporated and no streaks of flour remain, being careful not to overmix. Scrape the bowl again to ensure uniformity.
-
Evenly press the prepared dough into your greased baking pan. For best results and a smooth, consistent base, use a lightly floured rolling pin to distribute and flatten the dough from edge to edge.
-
Bake in the preheated oven at 350 degrees Fahrenheit for 12-15 minutes. It’s crucial not to over-bake these bars, as they will lose their signature chewy texture. The edges should be lightly golden, and the center should appear set. Remove from the oven and let them rest in the pan for 3 minutes.
-
While the bars are still warm from the oven, dollop the additional 1 cup of creamy peanut butter over the top. Using an offset spatula or the back of a spoon, gently spread the peanut butter evenly across the warm bars. Allow this peanut butter layer to set and solidify, which can be sped up by placing the bars in the refrigerator or freezer for a short period.
-
To make the frosting: In a large bowl, using a hand mixer or stand mixer, beat the very soft unsalted butter until it’s light and fluffy. Gradually add the powdered sugar, unsweetened cocoa powder (especially if using Hershey’s Special Dark for a deeper color), vanilla extract, and milk. Beat until the frosting is smooth, creamy, and spreadable. Dollop the chocolate frosting over the set peanut butter layer, then gently spread it evenly. If desired, create a decorative bakery swirled design on top using your spatula. Once frosted, cut the bars into squares and serve.
Notes
Disclaimer: Nutritional values were calculated using a third-party tool and are provided as an estimation only.
Sharing this recipe with a link is both encouraged and appreciated. Copying/pasting and/or screenshots of full recipes to any social media is strictly prohibited. Content and photographs are copyright protected.
Did you make this?
Don’t forget to leave a rating below and make sure to follow on Pinterest and Instagram for more!