
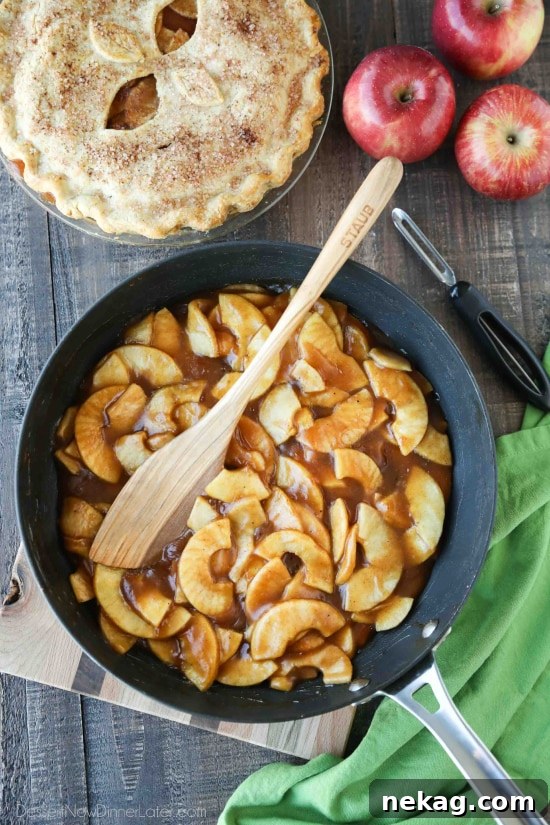
Homemade Apple Pie Filling is a culinary delight that transcends the ordinary, offering a fresh, vibrant flavor profile far superior to its canned counterparts. This incredibly easy-to-make filling is not only delicious but also wonderfully versatile and remarkably freezer-friendly, making it an ideal choice for preparing ahead. Whether you’re baking a classic apple pie, a rustic apple crisp, or creating any other dessert calling for apple filling, this homemade version promises an unparalleled taste and texture experience. Best of all, it stays freezer-fresh for up to 12 months, ensuring you always have a taste of autumn ready for any occasion.
The Undeniable Appeal of Homemade Apple Pie Filling
The allure of homemade apple pie filling lies in its simplicity and the boundless possibilities for customization. Unlike store-bought varieties, which often contain excessive sugars and artificial thickeners, crafting your own allows you complete control over the ingredients. You can tailor the sweetness to your preference, adjust the spice blend to suit your palate, and achieve the perfect texture for your apples, whether you prefer them firm and slightly crisp or wonderfully tender and melt-in-your-mouth. This hands-on approach guarantees a fresher, more authentic flavor that truly elevates any dessert.
One of the greatest advantages of making your own apple pie filling is its excellent freezer stability. This recipe is designed to be made in batches, allowing you to stock your freezer with this versatile ingredient. Imagine the convenience of having a ready-to-use apple filling that’s just as fresh and flavorful as the day you made it, available whenever the craving strikes. It’s a game-changer for busy bakers and anyone who appreciates the comfort of a homemade dessert without the last-minute fuss.
Mastering the Art of Apple Pie Filling: A Step-by-Step Guide
Creating your own apple pie filling from scratch is a surprisingly straightforward process that yields incredibly rewarding results. The core ingredients are simple and readily available: fresh apples, a touch of lemon juice, a blend of sugars, warm spices, cornstarch for thickening, water (or apple juice for an extra layer of flavor), and a hint of butter for richness. The beauty of this recipe is its adaptability, allowing you to use any apple variety you prefer, adjusting the sugar content based on the apple’s natural sweetness.
Choosing the Perfect Apples for Your Filling
The type of apple you select plays a crucial role in the final texture and flavor of your pie filling. For a robust and balanced flavor, consider using a mix of sweet and tart apples. Here are some popular choices:
- Granny Smith: A classic choice for pies due to their firm texture and tartness, which holds up well during cooking and balances the sweetness of the filling.
- Honeycrisp: Known for their crisp texture and balanced sweet-tart flavor, Honeycrisps maintain their shape beautifully.
- Fuji: Sweet and crisp, Fujis add a lovely sweetness without becoming overly mushy.
- Braeburn: Offer a fantastic balance of sweet and tart with a firm flesh, making them excellent for baking.
- Gala: Mildly sweet and crisp, Galas are a good all-purpose apple, though they can be softer when cooked.
- Golden Delicious: Sweet and tender, these apples break down more easily, contributing to a softer filling.
Experimenting with different combinations can lead to your signature apple pie filling. If you opt for sweeter apples, reduce the sugar in the recipe slightly. Conversely, if you’re using predominantly tart apples like Granny Smiths, you might want to add a bit more sugar.
Essential Ingredients and Their Roles
- Apples: The star of the show, providing flavor and texture. Peeled, cored, and sliced evenly for consistent cooking.
- Lemon Juice: Prevents apples from browning and adds a bright, fresh note that cuts through the sweetness.
- Brown Sugar & Granulated Sugar: A combination provides depth of flavor (brown sugar’s molasses notes) and pure sweetness. Adjust quantities based on apple variety and personal preference.
- Spices (Cinnamon & Nutmeg): The quintessential warming spices that define apple pie flavor. Adjust to your liking; a pinch of allspice or ground cloves can also be added.
- Salt: A small amount enhances all the other flavors, bringing them into harmony.
- Butter: Adds richness and a silky mouthfeel to the sauce.
- Cornstarch: The primary thickening agent, creating a luscious, glossy sauce.
- Water or Apple Juice: Forms the base of the sauce. Apple juice will intensify the apple flavor but remember to reduce sugar if using it, especially with already sweet apples.
Achieving the Perfect Apple Texture
The desired doneness of your apples is entirely up to you. Keep in mind that the apples will continue to cook when baked in your final dessert, whether it’s a pie, crisp, or tart. It’s often best to cook them slightly less than fully tender during the filling preparation to avoid overly mushy apples later. Some apples are naturally softer or crisper, so use your best judgment. For a firmer bite, cook for a shorter duration. For a softer, more yielding filling, extend the cooking time until they reach your preferred tenderness. Stirring frequently helps ensure even cooking and prevents sticking.
Freezing for Future Feasts: An Essential Guide
This homemade apple pie filling is an excellent candidate for freezing, offering incredible convenience for future baking projects. It’s crucial to note, however, that this specific recipe is **NOT safe for canning** due to the inclusion of cornstarch. Cornstarch can prevent heat from properly penetrating the center of the jar during the canning process, potentially affecting the destruction of bacterial spores that cause botulism. If you intend to can apple pie filling, you would need to substitute cornstarch with a canning-safe thickener like Clear Jel, using 1.5 times the amount of cornstarch specified in this recipe.
Fortunately, freezing is a perfectly safe and incredibly easy method to preserve this delicious filling. Once prepared and cooled, simply transfer the filling into freezer-safe containers or gallon-size zip-top freezer bags. When using bags, ensure you squeeze out any excess air and lay them flat in the freezer. This allows for quicker freezing and easier stacking. The filling will remain fresh and flavorful for 9 to 12 months. To use, simply thaw the frozen filling overnight in the refrigerator or gently in the microwave before incorporating it into your favorite apple desserts.
Homemade Apple Pie Filling
Pin
Rate
Save
Ingredients
- 5-6 medium apples, peeled, cored, and sliced (approx. 6 cups sliced)
- 1 Tbsp lemon juice
- ½ cup (100 g) brown sugar
- ¼ cup (50 g) granulated sugar
- 2 tsp ground cinnamon
- ¼-½ tsp ground nutmeg, to taste
- ½ tsp salt
- 2 Tbsp (28 g) butter
- 2 Tbsp cornstarch
- 1 ½ cups (355 ml) water or apple juice*, (see notes for optimal sweetness and apple juice adjustments)
Instructions
-
Prepare Apples: Begin by peeling, coring, and slicing your chosen apples into uniform pieces, about ¼ to ½ inch thick. In a large mixing bowl, gently toss the sliced apples with the lemon juice, brown sugar, granulated sugar, ground cinnamon, ground nutmeg, and salt. Ensure all apple slices are thoroughly coated with the spice and sugar mixture.
-
Cook Apples: In a large skillet or saucepan, melt the butter over medium heat. Add the coated apple slices to the pan. Cover the pan and cook for 3 minutes, allowing the apples to soften slightly and release their natural juices. This initial steaming helps tenderize the apples evenly.
-
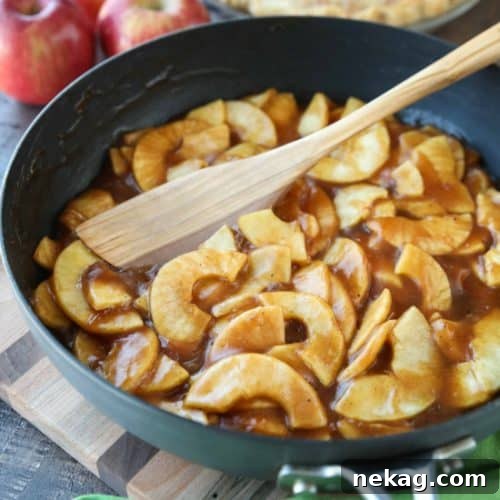
Thicken the Sauce: While the apples are cooking, prepare your cornstarch slurry. In a separate medium bowl, place the cornstarch. Slowly whisk in the water (or apple juice) until a smooth, lump-free mixture forms. Pour this cornstarch slurry into the apples in the skillet. Continue cooking for an additional 5 minutes, stirring frequently, until the apples are fork-tender to your desired consistency and the sauce has noticeably thickened to a glossy, rich consistency. If you desire a thicker sauce, you may simmer for an extra minute or two, or if it’s too thick, add a small splash of water or juice.
-
Cool and Store: Remove the apple pie filling from the heat and allow it to cool completely to at least room temperature before using in any dessert or storing. For short-term storage, transfer the cooled filling to an airtight container and keep it in the refrigerator for up to 2 weeks. For long-term preservation, spoon the cooled filling into gallon-size zip-top freezer bags. Press out any excess air, seal tightly, and lay flat in the freezer. It will maintain its quality for 9-12 months. To use frozen filling, simply thaw overnight in the refrigerator or gently warm in the microwave.
Notes
- Sugar Adjustment: The amount of sugars can be adjusted based on the natural sweetness of the apple variety you use. Taste your apples before adding all the sugar.
- Using Apple Juice: If opting for apple juice instead of water for a richer apple flavor, consider reducing the total sugar by about half, as apple juice is already sweet.
- Softer Apples: For apples that naturally soften quickly, you can adjust the thickening method. Mix only ¼ cup of the water with the cornstarch to create a slurry. Simmer the apples, covered, with the remaining water until they reach your desired tenderness. Then, stir in the cornstarch slurry and heat to boiling, stirring constantly, until the sauce thickens.
- Making an Apple Pie: To bake a classic apple pie, simply empty your cooled homemade pie filling into a prepared 9-inch pie shell. Add a top crust and crimp the edges to seal. For a golden finish, brush the top crust with an egg wash (one egg beaten with a tablespoon of water) and sprinkle with a mixture of cinnamon and sugar, if desired. Don’t forget to cut a few slits in the top crust for steam to escape. Bake at 350˚F (175˚C) for approximately 60 minutes, or until the filling is bubbling thickly in the center and the crust is beautifully browned and flaky.
- Adding Vanilla: A teaspoon of vanilla extract added at the end of cooking can enhance the overall flavor profile.
Sharing this recipe with a link is both encouraged and appreciated. Copying/pasting and/or screenshots of full recipes to any social media is strictly prohibited. Content and photographs are copyright protected.
Did you make this?
Don’t forget to leave a rating below and make sure to follow on Pinterest and Instagram for more!
Beyond the Pie: Creative Ways to Use Your Homemade Apple Filling
While the classic apple pie is undoubtedly a beloved choice, your homemade apple pie filling is far too versatile to be limited to just one dessert. Its rich, spiced apple flavor and luscious texture make it an incredible addition to a wide array of sweet treats. Here are some inspiring ideas to help you get the most out of your freshly made or perfectly frozen filling:
- Apple Crisp and Crumble: A timeless pairing, spoon the filling into an oven-safe dish, top with a buttery oat crumble, and bake until golden and bubbly. Serve warm with a scoop of vanilla ice cream.
- Apple Turnovers or Hand Pies: Encapsulate the filling in flaky puff pastry or pie crust dough for individual, portable delights. Perfect for breakfast or a sweet snack.
- Apple Bars or Squares: Spread the filling over a shortbread or oat crust, add a crumble topping, and bake for an easy-to-serve dessert that’s great for potlucks.
- Muffin or Scone Filling: Swirl a spoonful of apple filling into your muffin batter or fold it into scone dough before baking for a delightful fruit burst.
- Pancake and Waffle Topping: Warm up the filling and spoon it generously over a stack of fluffy pancakes or crispy waffles for an elevated breakfast or brunch.
- Ice Cream Sundae: Top vanilla bean ice cream with warm apple filling, a drizzle of caramel sauce, and a sprinkle of chopped nuts for an irresistible dessert.
- Yogurt Parfaits: Layer Greek yogurt, granola, and apple pie filling for a wholesome and satisfying breakfast or snack.
- Cheesecake Topping: A smooth cheesecake becomes even more decadent with a layer of spiced apple filling on top.
- Oatmeal or Porridge Mix-in: Stir a spoonful into your morning oatmeal for a cozy and flavorful start to your day.
- Apple Galette: A free-form tart that’s both elegant and simple. Spread the filling onto a rolled-out pie crust, fold the edges, and bake.
Troubleshooting Common Questions
Even with a simple recipe, questions can arise. Here are some common concerns and quick solutions:
- My filling is too runny: This usually means the cornstarch didn’t fully activate or there wasn’t enough of it. Continue simmering the mixture gently, stirring frequently, to allow the cornstarch to thicken further. If after several minutes it’s still too thin, you can mix another ½ to 1 tablespoon of cornstarch with an equal amount of cold water to form a slurry, then slowly whisk it into the hot filling and simmer until thickened.
- My filling is too thick: If your filling becomes too dense, simply stir in a tablespoon or two of water or apple juice until it reaches your desired consistency. Do this gradually to avoid making it too thin.
- Apples are too mushy: This typically happens if the apples are cooked for too long or if a softer variety was used. To prevent this, choose firmer apples and undercook them slightly during the initial preparation, remembering they will continue to cook when baked in your final dessert.
- Apples are too firm: If your apples are still too crunchy, you can continue to simmer the filling, covered, for a few more minutes until they reach your preferred tenderness. Adding a tiny bit more liquid might help if the sauce is already thick.
- Flavor isn’t quite right: Taste your filling as it cooks. If it’s too sweet, a splash more lemon juice can help. If it needs more spice, stir in a pinch more cinnamon or nutmeg. If it tastes bland, a tiny pinch more salt can awaken the flavors.
Embrace the Joy of Homemade
Making your own homemade apple pie filling is more than just a recipe; it’s an experience that connects you with the wholesome goodness of fresh ingredients and the satisfaction of creating something truly special. The rich aromas that fill your kitchen, the ability to customize every element, and the sheer delight of serving a dessert made with love are unparalleled. With its ease of preparation and freezer-friendly nature, you’ll find yourself reaching for this recipe time and time again, bringing comfort and joy to your table throughout the year. So gather your apples, embrace the simple process, and prepare to elevate your baking with the best homemade apple pie filling you’ll ever taste!