
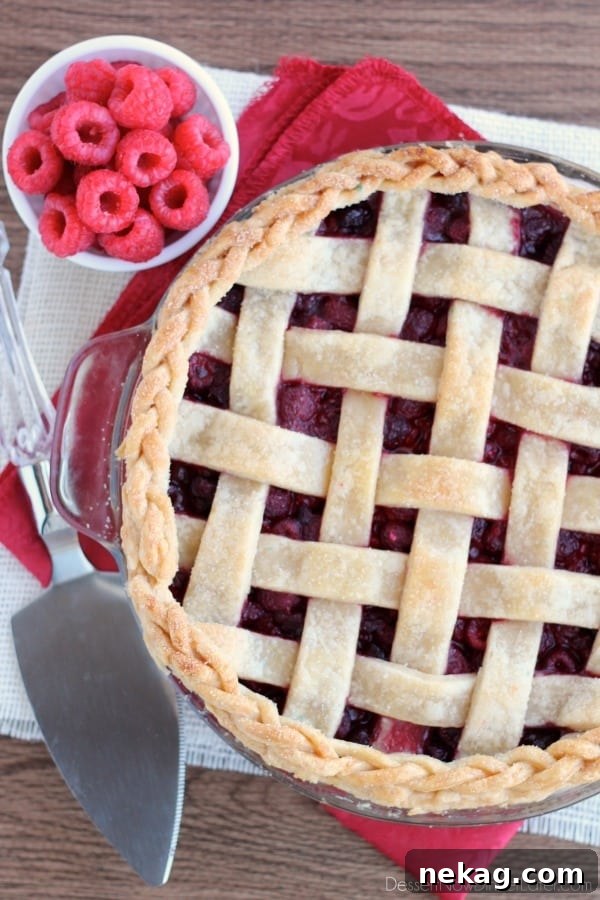
Mastering the Art of Lattice Pie Crust: A Step-by-Step Tutorial with Braided Edges
Transform your ordinary homemade pies into extraordinary masterpieces with a beautifully woven lattice crust complemented by an elegant braided edge. This detailed tutorial breaks down every step, making it simple for any home baker to create a stunning, professional-looking pie perfect for holidays, gatherings, or simply impressing your loved ones. Get ready to have fun with your pie dough and achieve that irresistible “wow” factor!
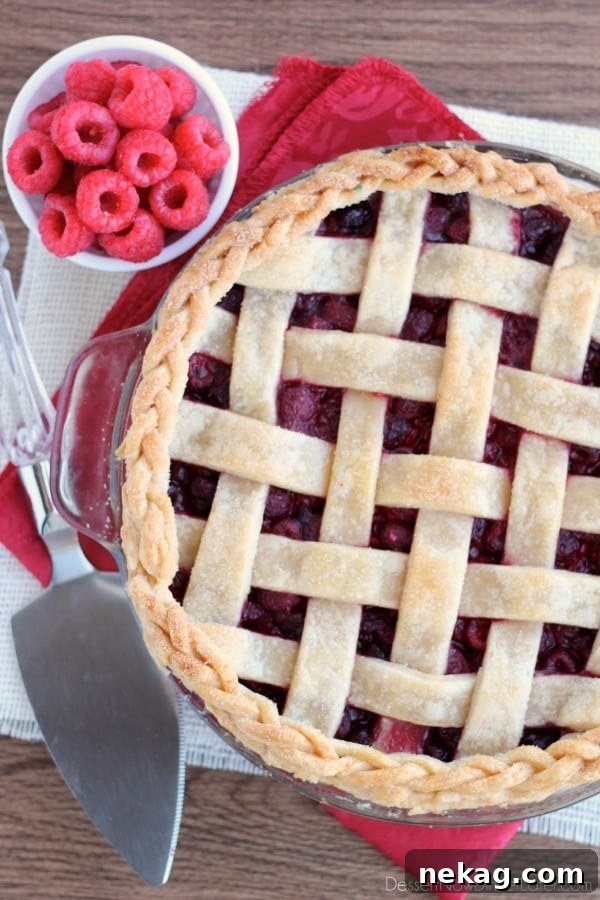
Why Choose a Lattice Pie Crust?
Beyond its undeniable aesthetic appeal, a lattice pie crust offers practical benefits that enhance the baking experience and the final product. The open weave allows steam to escape from the pie filling more efficiently, preventing the crust from becoming soggy and ensuring a perfectly flaky bottom crust. This ventilation also helps to thicken certain fruit fillings as the pie bakes, resulting in a more cohesive and delicious interior. Moreover, a lattice top provides a beautiful window to the vibrant filling beneath, adding to the visual delight of your dessert.
Gathering Your Tools and Preparing Your Dough
Before you begin the artistic process of weaving, ensure you have the right tools and a perfectly prepared pie dough. You’ll need a rolling pin, a sharp pizza cutter or pastry wheel, a ruler (optional, but helpful for even strips), a pastry brush, and a small bowl of water. The foundation of any great pie is a fantastic crust. Start with your favorite pie crust recipe that yields enough dough for both a bottom and a top crust. A reliable recipe ensures your dough is pliable for weaving and bakes up flaky and golden.
If you need a proven recipe, here’s my perfect pie crust recipe and tutorial, which provides detailed instructions for a consistently delicious and easy-to-handle dough.
Step 1: Preparing the Bottom Crust
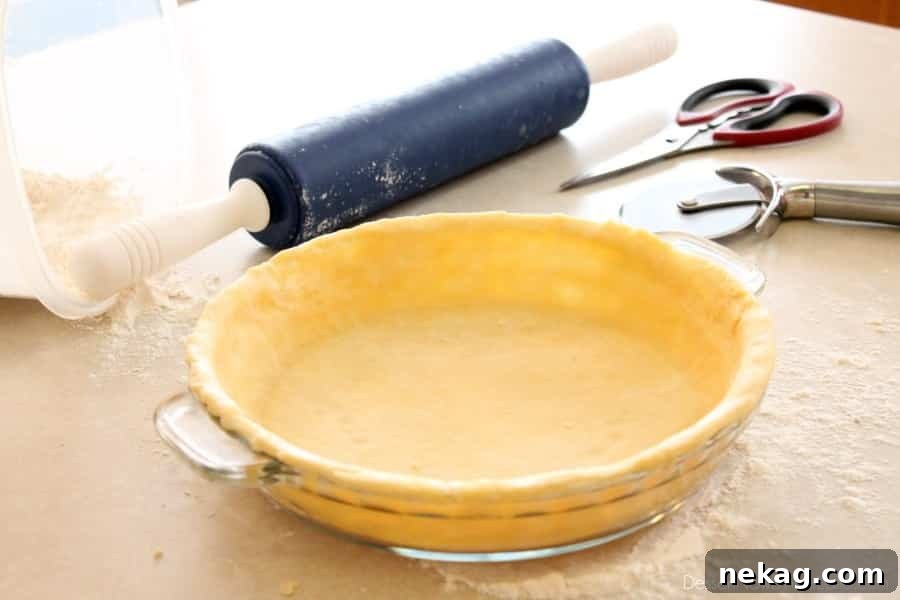
Once your pie dough is ready, divide it precisely in half. Take one half and roll it out on a lightly floured surface. Aim for an even thickness of about 1/8-inch, ensuring it’s large enough to comfortably fit into your pie dish with an overhang of at least 1/2 to 1 inch. Carefully transfer the rolled-out dough into your pie dish. Gently press it into the bottom and sides without stretching it, which can cause shrinkage during baking. Trim any excess crust around the edges, leaving a small overhang that will be used to seal the lattice top.
Step 2: Filling Your Pie
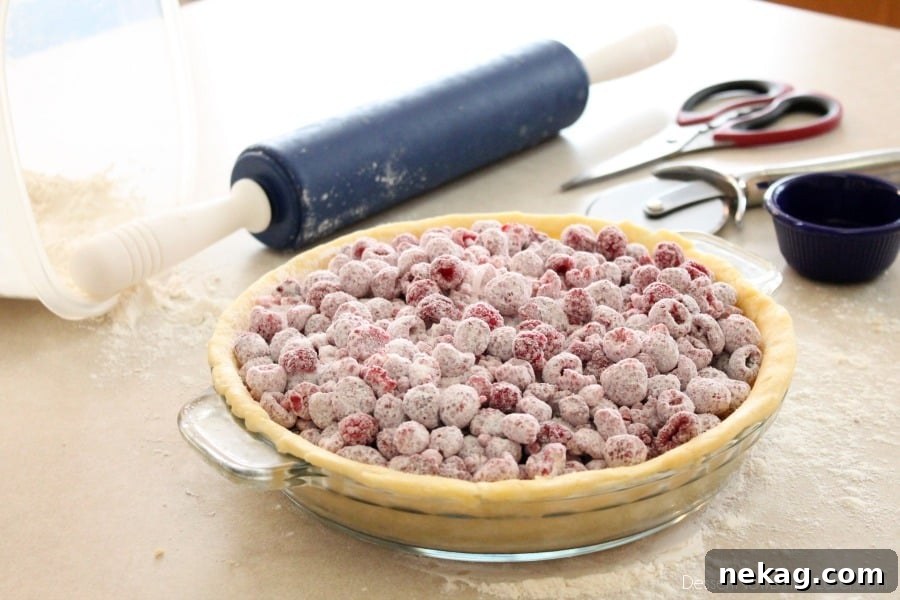
With your bottom crust in place, it’s time to add your delectable filling. Choose a filling that complements the rich, buttery flavor of your homemade crust. Fruit fillings like apple, cherry, blueberry, or the raspberry filling pictured here are excellent choices, as their vibrant colors shine through the lattice. Ensure the filling is evenly distributed in the pie shell, leaving a small border around the edge to accommodate the lattice crust.
For the luscious filling seen in the photos, grab the recipe for the Raspberry Filling.
Step 3: Rolling Out and Cutting Lattice Strips
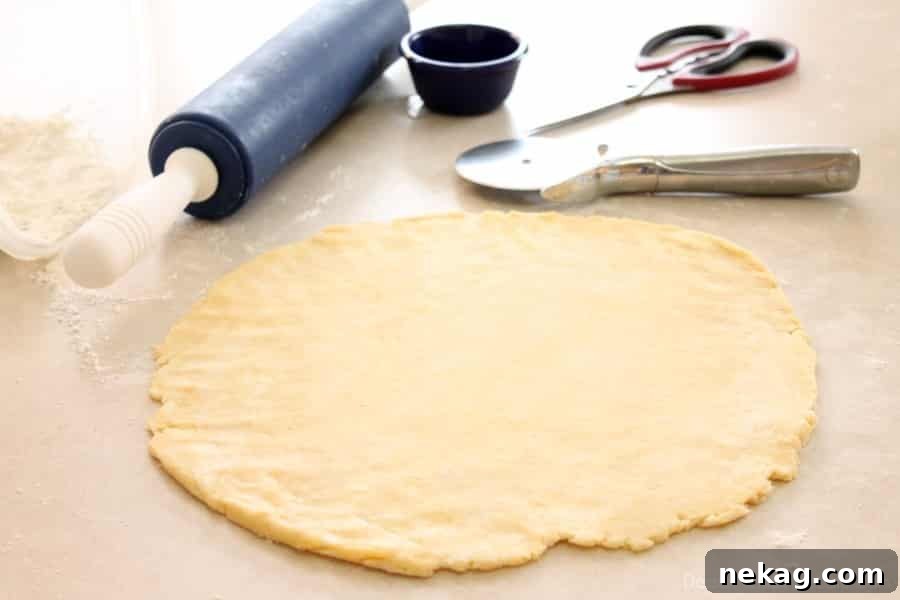
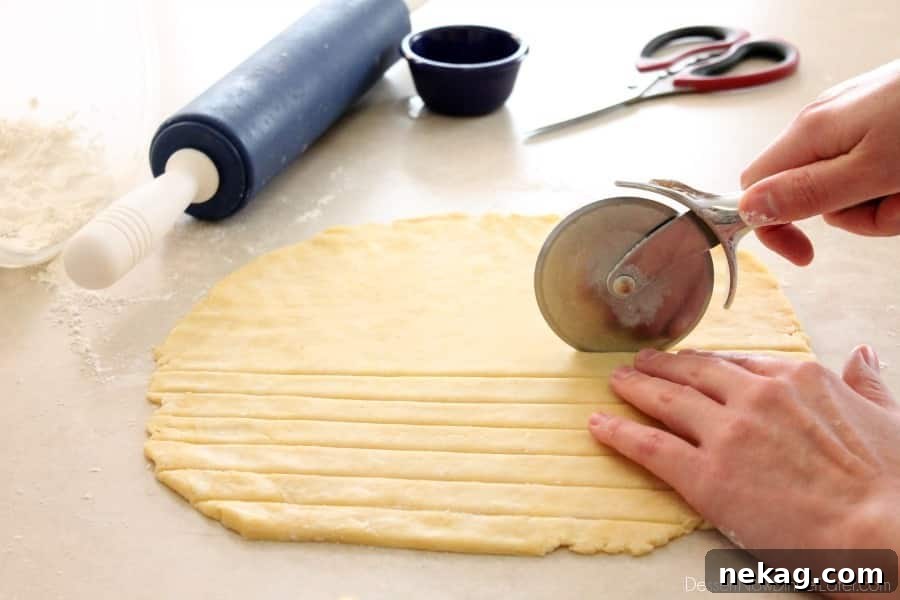
Now for the creative part! Take the other half of your pie crust dough and roll it out on a lightly floured surface into a circular or rectangular shape, about 1/4-inch thick. Aim for an even thickness to ensure uniform baking. Using a pizza cutter or a sharp knife and a ruler, cut the dough into 1-inch wide strips. For a standard 9-inch pie, you will need at least 10-12 strips, but it’s always wise to cut a few extra in case of breakage or for a denser lattice pattern. Importantly, save any remaining dough scraps – these will be used to create a beautiful braided edge later on.
Step 4: Beginning the Weave – The Center Cross
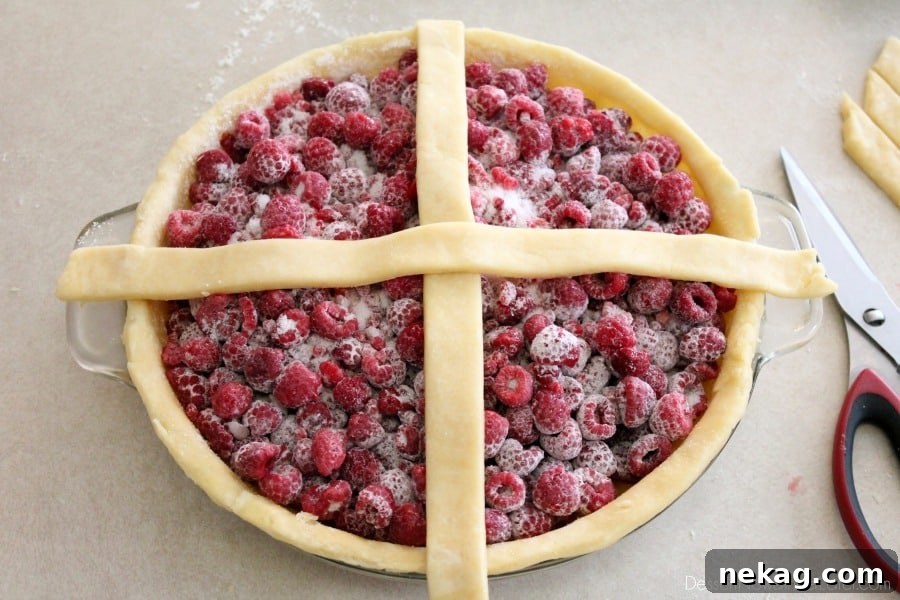
The weaving process starts at the very center of your pie. Select the two longest strips you have. Place the first strip vertically (running from top to bottom) directly over the center of your pie. Then, take the second long strip and place it horizontally (running from left to right) directly over the center of the first vertical strip. This forms a foundational cross in the middle of your pie, which will serve as the anchor for the rest of your lattice work. Ensure these central strips are as straight as possible for a neat pattern.
Step 5: Adding More Vertical Strips
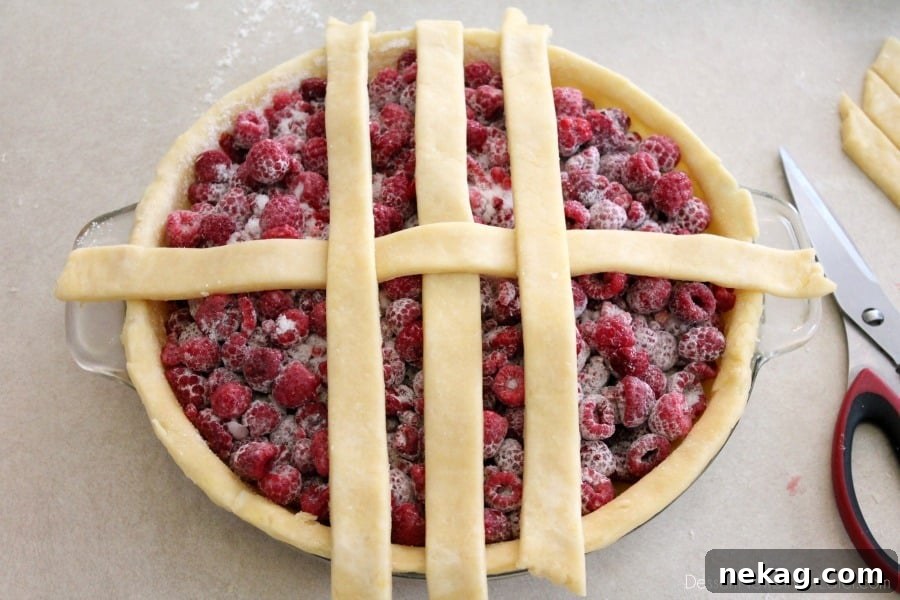
Now, let’s build upon our foundation. Take two more strips of pie crust. Lay them vertically on top of the horizontal strip, parallel to the first vertical strip you placed. Position one strip to the left of the central vertical strip and the other to its right, leaving a small, consistent gap between them. For a more traditional lattice, try to keep these gaps uniform. These strips are currently resting “over” the horizontal strip.
Step 6: First Horizontal Weave – Over, Under, Over
This is where the true weaving begins. Carefully fold back every other vertical strip that is currently lying on the horizontal strip. Now, take two fresh strips and place them horizontally across the pie, parallel to your central horizontal strip. These new strips should be woven through the vertical strips by going “over” one vertical strip, then “under” the next, and so on. Once these horizontal strips are in place, gently unfold the vertical strips you previously folded back, allowing them to rest back over the newly placed horizontal strips. This creates the classic woven pattern.
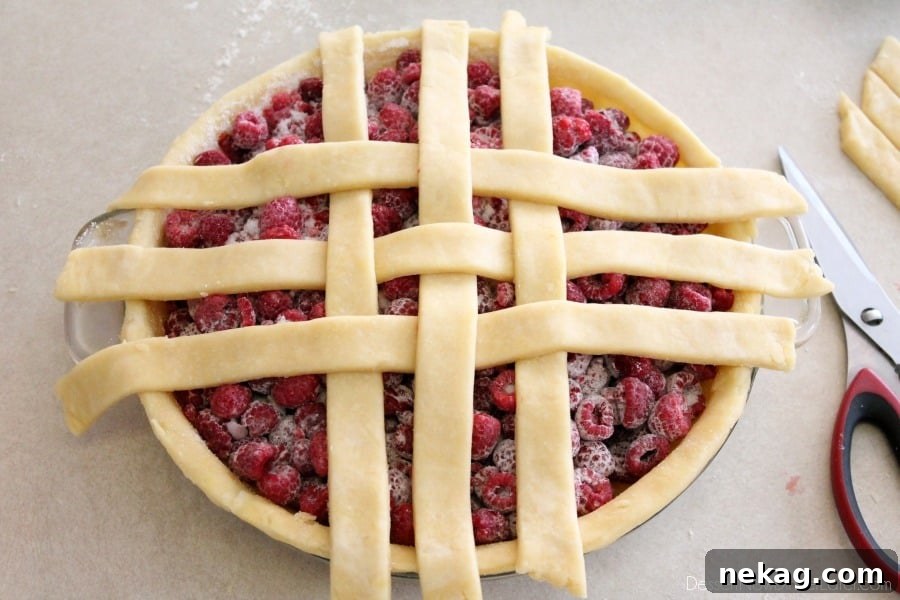
Step 7: Second Vertical Weave
Continue to build your lattice by reversing the pattern. Take two more strips and this time, weave them vertically. To do this, fold back every other horizontal strip (the ones that are currently “over” your vertical strips). Lay your new vertical strips over, under, and over the remaining horizontal pieces. Once positioned, carefully unfold the horizontal strips to complete this section of the weave. Maintain consistent spacing between your strips to ensure a symmetrical and appealing lattice.
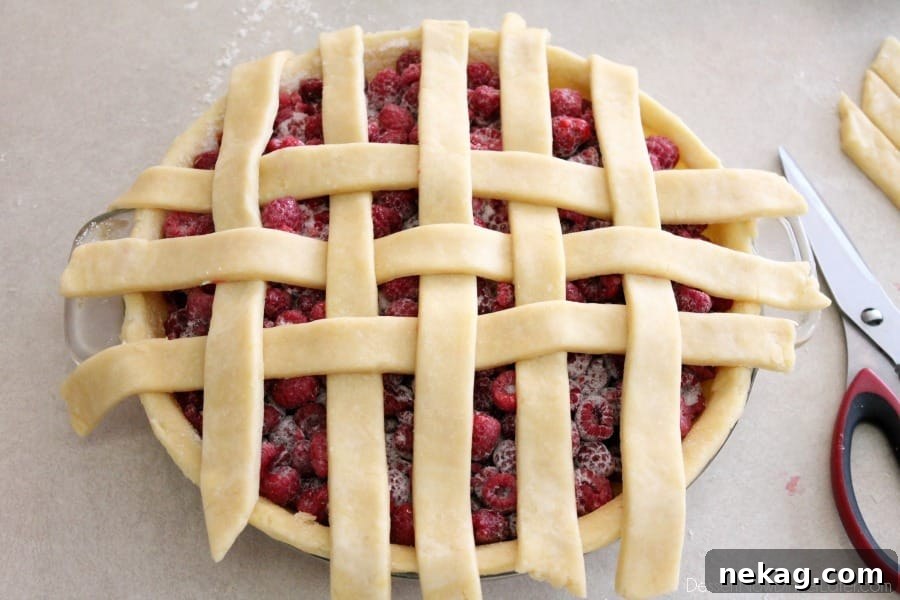
Step 8: Completing the Lattice Pattern
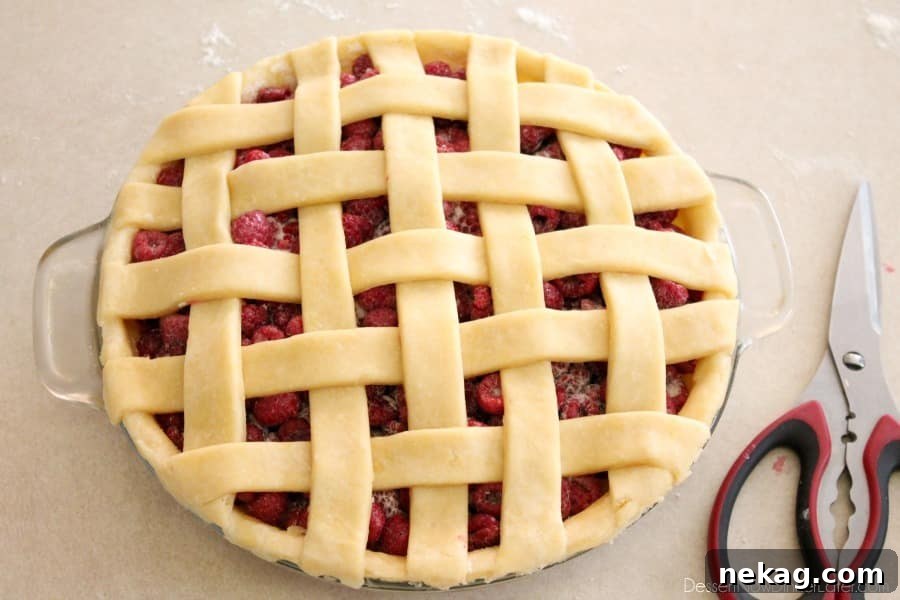
Repeat the weaving process, alternating between horizontal and vertical strips, until your entire pie is covered with the lattice pattern. For each new set of strips, remember to fold back the alternate strips from the previous layer to create the “over, under, over” effect. For instance, for the final horizontal weave pictured, you’ll grab two more strips and weave them horizontally over, under, over, under, and over the vertical pieces, ensuring they reach the edge of the pie. Don’t worry if the ends look a bit messy – they will be trimmed and sealed.
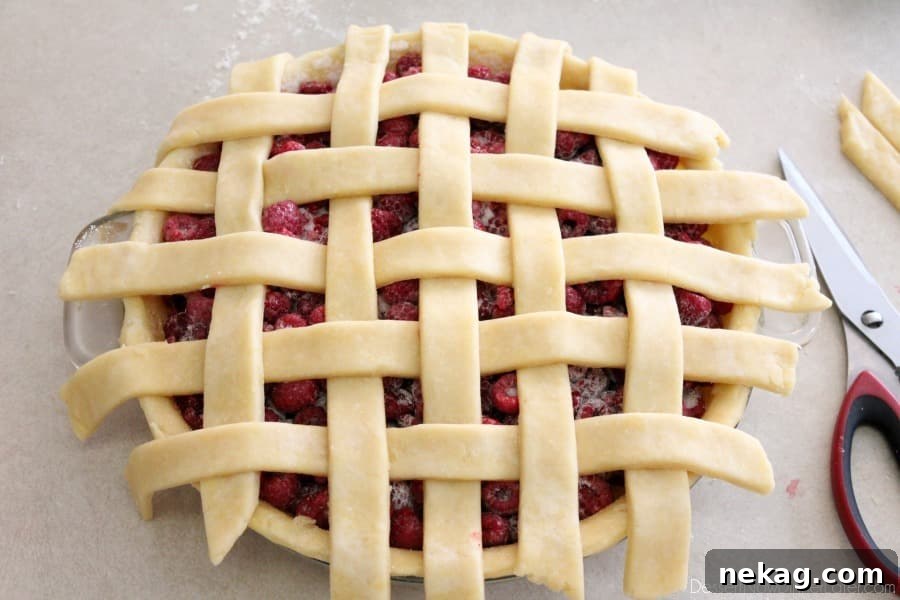
Step 9: Sealing the Lattice
To ensure your lattice crust stays perfectly in place during baking, you need to seal it to the bottom crust. Fill a small cup with water. Dip your fingers in the water and gently dab the entire edge of the bottom pie crust where it meets the lattice strips. This moisture acts as an adhesive. Now, carefully press the ends of the lattice strips onto this moistened edge. Once all strips are secured, use a knife or kitchen shears to cut off any excess dough hanging over the rim of the pie dish, creating a neat and even border.
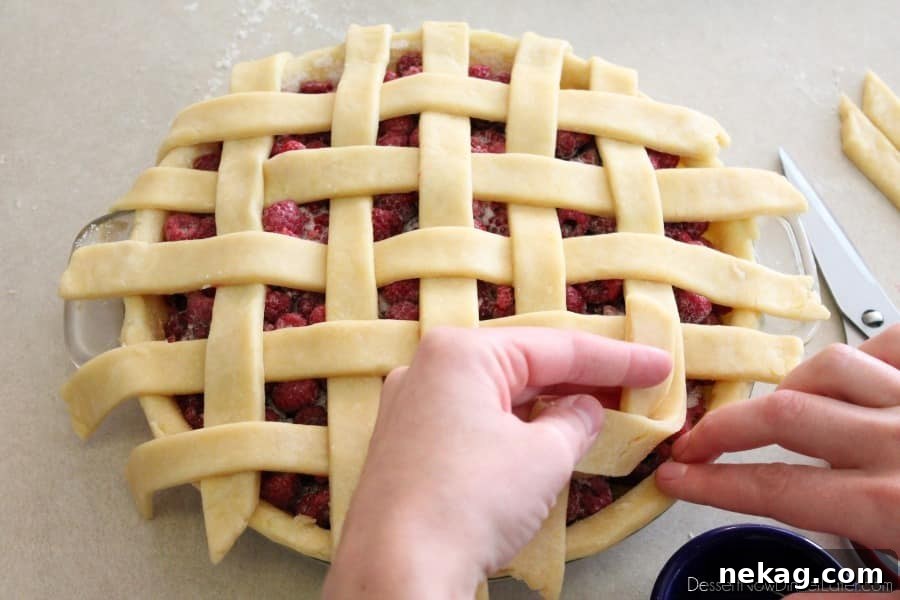
Step 10: Creating a Braided Edge (Optional but Recommended)
For an extra touch of elegance and a truly professional finish, use your leftover pie crust scraps to create a braided edge. This step isn’t just for looks; it helps to further seal the pie and prevent the edges from burning too quickly. Roll out the scraps thinly and cut them into 1/4-inch wide strips. Take three of these narrow strips and braid them together on your counter, just like you would braid hair. You simply alternate bringing the outer strips in towards the center. Continue braiding until you have enough length to go around the entire perimeter of your pie.
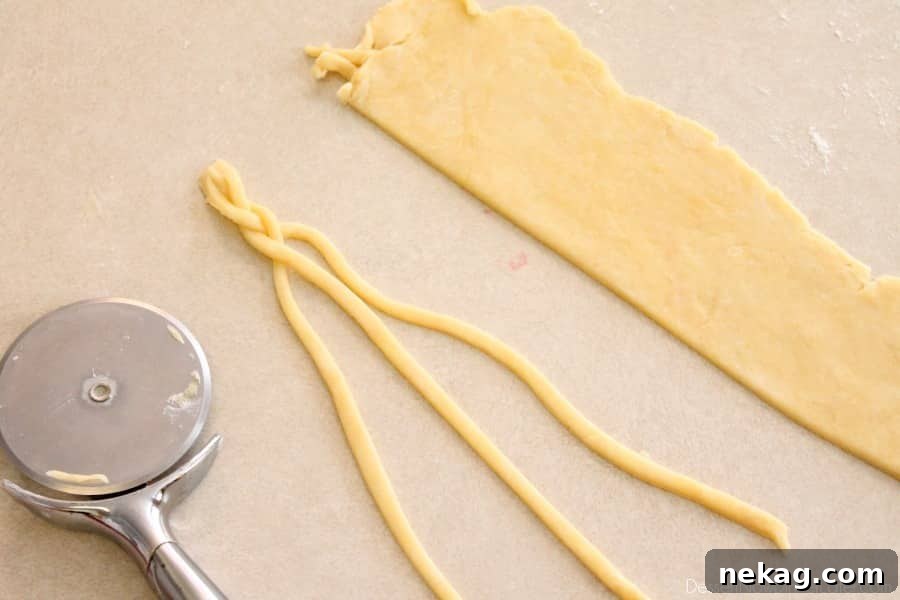
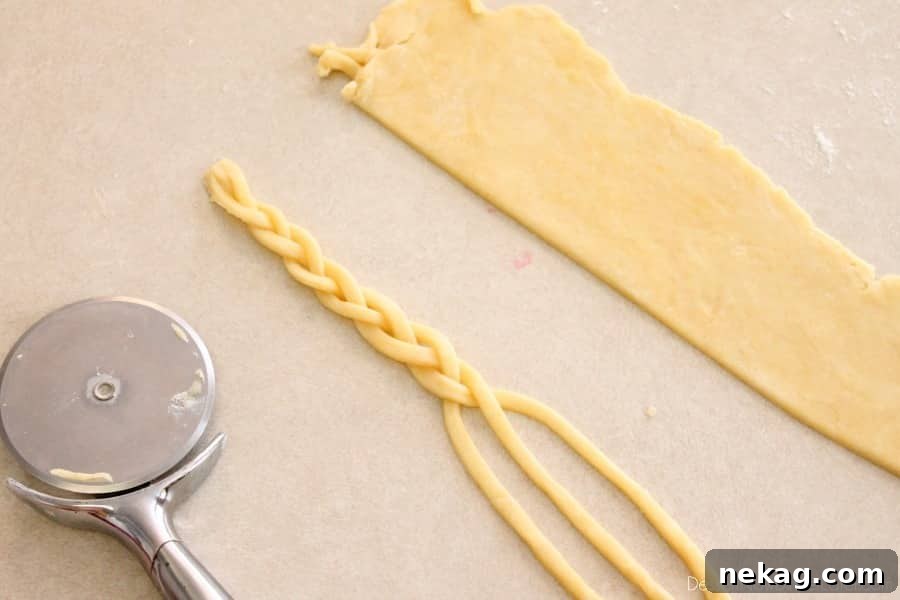
Depending on the size of your pie, it might take 2-3 braids to cover the entire edge. For the pie pictured here, three braids were used. Once your braids are ready, dab a little water along the sealed edges of your pie crust and gently press the braids into place. The water will help them adhere and bake together seamlessly, creating a strong and decorative border.
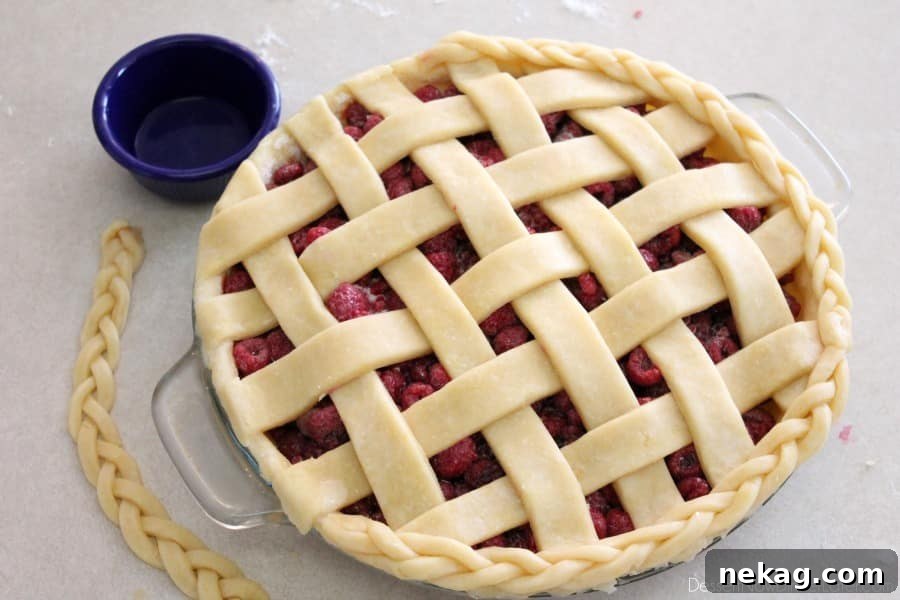
Step 11: Finishing Touches Before Baking
To achieve that beautiful golden-brown sheen and a slightly crisp texture, an egg wash is essential. Whisk one egg in a small bowl until smooth, then gently brush it over the entire lattice crust and the braided edge. Be careful not to use too much, as pooling egg wash can create an uneven finish. The egg wash not only aids in browning but also adds a subtle richness to the crust.
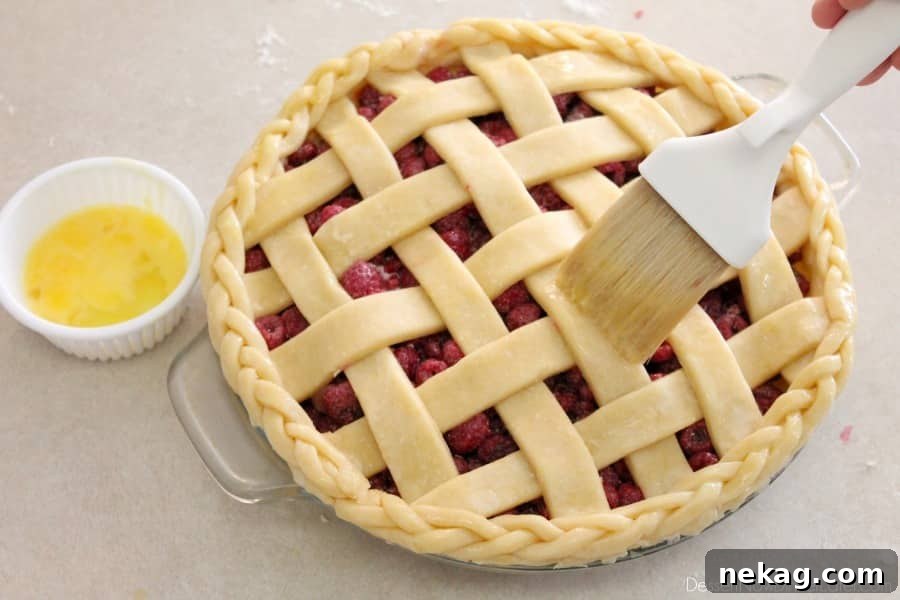
For an extra touch of sweetness and sparkle, consider sprinkling a bit of granulated sugar or cinnamon-sugar over the egg-washed crust. This is particularly delightful for fruit pies, adding another layer of flavor and a lovely caramelized crunch.
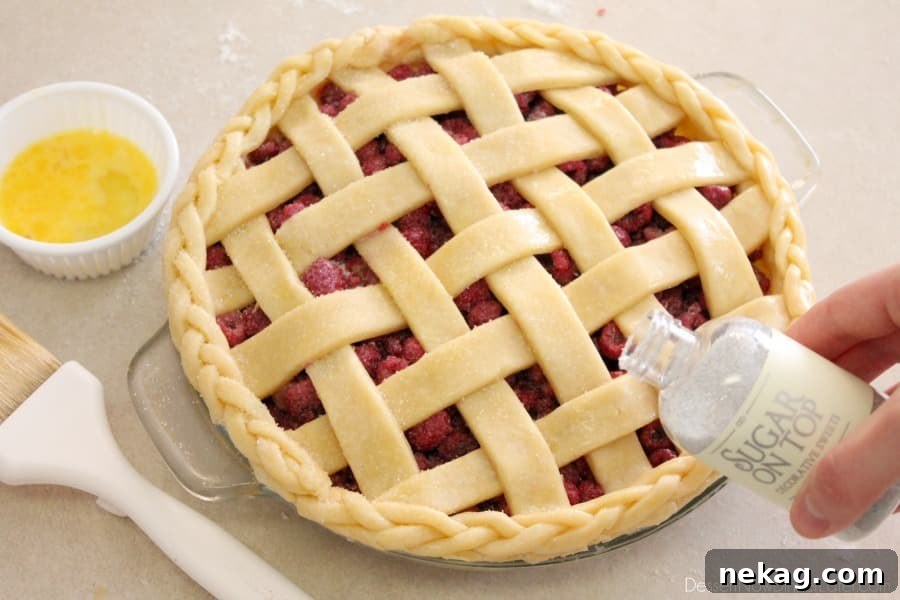
Step 12: Baking Your Masterpiece
Your stunning pie is now ready for the oven! Preheat your oven to 350 degrees Fahrenheit (175 degrees Celsius). Bake the pie for 60 to 75 minutes, or until the crust is a rich golden brown and the filling is visibly bubbling in the center. The bubbling filling indicates that it has thickened and is cooked through. If you notice the crust browning too quickly, especially the edges, you can gently cover the pie with aluminum foil during the last 20-30 minutes of baking to prevent over-browning. Once baked, remove the pie from the oven and let it cool completely on a wire rack before slicing and serving. This cooling time is crucial for the filling to set properly.
Tips for Pie-Making Success
- Keep everything cold: Cold butter, cold water, and a chilled dough are key to a flaky crust.
- Don’t overwork the dough: Over-mixing develops gluten, leading to a tough crust. Mix just until combined.
- Chill your dough: Chilling makes the dough easier to handle and prevents shrinkage. Don’t skip this step!
- Measure strips accurately: Consistency in strip width leads to a more professional-looking lattice. A ruler can be your best friend.
- Work quickly but gently: As you weave, the dough can warm up. Work efficiently, but be gentle to avoid tearing.
- Prevent burning: If pie edges are browning too fast, cover them with foil strips.
Serving and Enjoying Your Lattice Pie
After all your effort, the moment of truth arrives! Allow your pie to cool for at least 3-4 hours, or preferably longer, before slicing. This allows the filling to set and prevents it from spilling out when cut. A warm slice of lattice pie with a scoop of vanilla bean ice cream or a dollop of fresh whipped cream is an unbeatable dessert experience. Your beautifully decorated pie is sure to be the centerpiece of any dessert table and a testament to your baking prowess.
Lattice Pie Crust Tutorial – Recipe Summary
This section provides a concise summary of the ingredients and instructions, helping you quickly reference the steps.
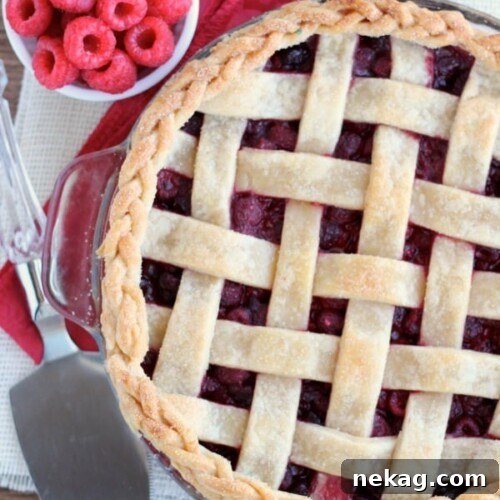
Lattice Pie Crust Tutorial
Amber Brady
Ingredients
- 1 recipe Perfect Pie Crust, (enough for a top and bottom)
- Pie filling of choice
- 1 egg, whisked
- Granulated sugar or cinnamon-sugar (optional, for sprinkling)
Instructions
-
Start with your favorite pie crust recipe. Ensure it yields enough dough for both a top and bottom crust.
-
Divide the pie dough in half. Roll out one half, fit it into your pie dish, and trim off any excess crust around the edges.
-
Fill your prepared crust with the pie filling of your choice.
-
Roll out the other half of the pie crust into a circle about ¼-inch thick.
-
Using a pizza cutter, cut the dough into 1-inch wide strips. You will need at least 10-12 strips. Save any extra crust for a braided edge.
-
Criss-cross two of the longest pie crust strips over the center of the pie: one vertically, the other horizontally.
-
Place two more strips vertically on top of the horizontal strip, parallel to the first vertical strip.
-
Fold back alternate vertical strips. Take two new strips and weave them horizontally over and under the remaining vertical strips. Unfold the previously folded strips.
-
Repeat the weaving process, alternating between vertical and horizontal strips (over, under, over) until the entire pie is covered.
-
Dab the edge of the bottom pie crust with water all the way around. Press the ends of the lattice pieces into the moistened edge and trim off any excess.
-
If desired, create a braided edge: Cut ¼-inch strips from leftover dough and braid them. Dab water along the pie’s edge and gently press the braids in place.
-
Whisk an egg and gently brush it over the entire lattice crust and braided edge for a golden finish.
-
Optionally, sprinkle granulated sugar or cinnamon-sugar on top for added sweetness and sparkle.
-
Bake at 350 degrees Fahrenheit for 60 to 75 minutes, or until the crust is golden brown and the filling is bubbling in the center. Allow to cool completely before serving.
Notes
For best results, ensure your pie dough is kept cold throughout the process. If the dough becomes too warm and sticky, chill it in the refrigerator for 10-15 minutes before continuing. For an even golden crust, lightly tent the pie with aluminum foil during the last 20-30 minutes of baking if the edges are browning too quickly.
Disclaimer: Nutritional values were calculated using a third-party tool and are provided as an estimation only.
Sharing this recipe with a link is both encouraged and appreciated. Copying/pasting and/or screenshots of full recipes to any social media is strictly prohibited. Content and photographs are copyright protected.
Did you make this stunning pie?
We’d love to see your creations! Share your beautiful lattice pies on social media and tag us. Don’t forget to follow us on Pinterest and Instagram for more delicious recipes and baking inspiration!