
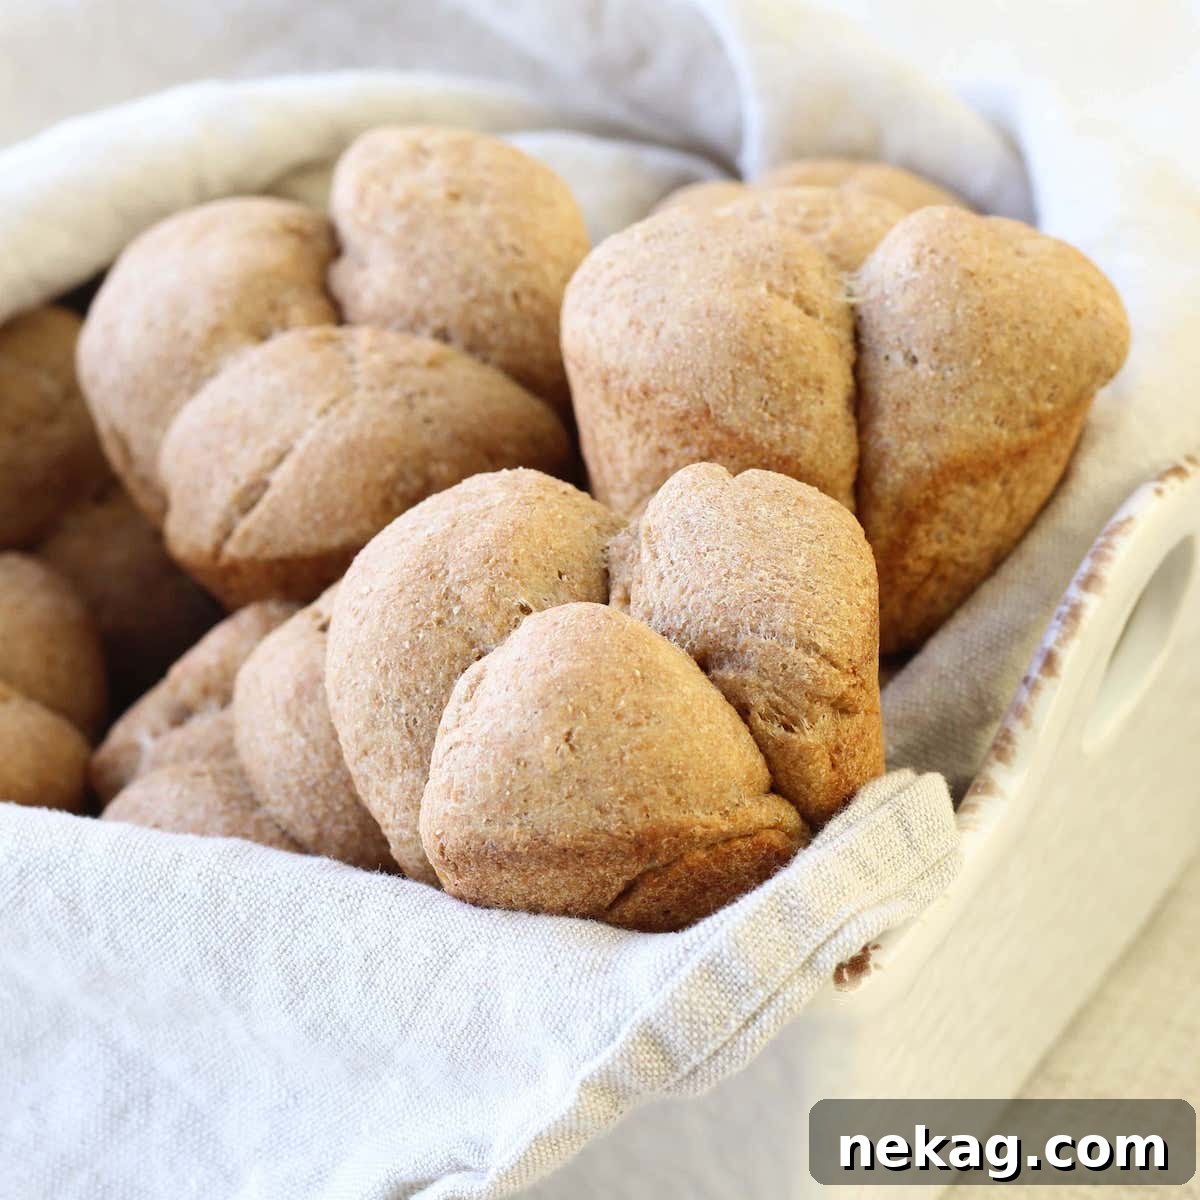
Welcome to a culinary journey celebrating both tradition and healthy living, perfectly embodied in these delightful **Graham Clover Rolls**. Imagine a bread that is not only incredibly hearty and filling but also remarkably low in calories, coming in at just 85 calories per roll. These rolls strike the perfect balance: not too dense to be heavy, yet not so airy that they lack substance. Each bite offers a crisp crust yielding to a moist, chewy interior—an absolute dream alongside any comforting stew, a robust pot roast, or a warm bowl of soup.
A Year of Culinary Growth: Celebrating My Bloggerversary with Heritage Bread
Today marks a significant milestone: my one-year bloggerversary! As I reflect on this past year, I initially considered baking a grand cake to celebrate. However, a bread recipe felt far more fitting, a symbolic return to my roots. Why bread, you ask? My very first post featured a classic Whole-Wheat Bread recipe from the venerable 1939 edition of the American Woman’s Cookbook. Looking back at those early photos, I can’t help but chuckle at how much has changed!
Revisiting the American Woman’s Cookbook for these Graham Clover Rolls feels like completing a full circle. It’s a wonderful way to acknowledge the tremendous strides I’ve made in cooking, food photography, and blogging over the last twelve months. This journey has been an intense, self-taught crash course in everything from meticulous food staging and plating to intricate photo editing, website building, and understanding the nuances of SEO. It often felt like I was learning everything “the hard way,” but every challenge has been a valuable lesson. To this day, I still wonder what possessed me to start a food blog last February, a month often associated with winter doldrums rather than ambitious new beginnings. But as they say, there’s no time like the present, and I’m incredibly grateful I seized the moment.
From Humble Beginnings to Flourishing Community
The growth of this blog has been nothing short of astonishing. Last February, my audience consisted primarily of my wonderful Mom and Aunt Susan, resulting in a modest 20 page views. Fast forward to this month, and I was thrilled to see over 8,000 views in just the first five days! It’s incredible how rarely we pause to appreciate how far we’ve come when we’re constantly striving for the next goal. This journey has been an absolute joy, filled with unexpected friendships, the mastery of daunting technical challenges, and significant personal growth as a cook and baker.
The most rewarding aspect, however, has been connecting with you, my readers. Your comments, feedback, and engagement mean the world to me and have taught me so much. There are countless ideas simmering for future changes, tweaks, and additions to AHC (my blog name, I assume). I eagerly anticipate what the next year will bring, but for now, let’s turn our attention back to these truly amazing Graham Clover Rolls!
The Undeniable Joy of Baking Bread from Scratch
There’s a deep, almost primal satisfaction that comes from making your own bread from scratch. It’s an incredibly gratifying experience, from the moment you combine simple ingredients to witnessing the dough magically rise as if by the hand of a benevolent bread fairy. I love the assurance of knowing exactly what goes into each loaf and being able to pronounce every single ingredient. And, of course, there’s nothing quite like the comforting, yeasty aroma that gently permeates the entire home, signaling that something delicious is in the making.
These Graham Clover Rolls exemplify everything I love about homemade bread. They are wholesome, incredibly filling, and maintain their impressive 85-calorie count per piece. The texture is simply ideal: resilient enough to provide a satisfying chew, yet tender and moist on the inside. The crisp outer crust provides a delightful contrast, making them an irresistible accompaniment to hearty stews, succulent pot roasts, or any soul-warming soup.
Why Graham Flour Makes These Rolls Exceptionally Healthy
Beyond their delicious taste and perfect texture, these Graham Clover Rolls are surprisingly healthy! The secret lies in Graham flour, a distinct type of whole wheat flour. Unlike conventionally milled whole wheat flour, Graham flour undergoes a unique roller-milling process where the three components of the wheat grain—the bran, germ, and endosperm—are ground separately and then recombined. This specific method is believed to result in flour that is not only more nutrient-rich but also boasts a higher protein content and significantly more dietary fiber compared to standard whole-wheat flour.
The development of Graham flour is credited to Sylvester Graham, a 19th-century American dietary reformer. He advocated for a diet rich in whole grains and vegetarian foods, believing it promoted health and moral purity. His ideas were groundbreaking for their time, emphasizing the importance of unprocessed foods. Using Graham flour in these rolls connects us to a long history of wholesome eating and offers a superior nutritional profile, making them an excellent choice for a health-conscious diet.
Simple Elegance: Shaping the Clover Rolls
While the elegant clover shape might seem daunting at first glance, I assure you it’s incredibly simple to achieve, and entirely optional if you prefer a more straightforward roll. But if you’re looking to add a touch of charm and make these rolls even more fun to eat, the clover shape is worth the minimal extra effort. Imagine them as an extremely healthy version of Monkey Bread: all the enjoyment of pulling apart warm, soft bread, but with a mere fraction of the calories and a wealth of nutritional benefits. It’s a win-win!
This wonderful recipe for Graham Clover Rolls comes from my absolute favorite bread cookbook, the American Woman’s Cookbook. It has never once let me down when it comes to baking bread. The original recipe was designed for a loaf, but I’ve adapted it for rolls, which I find much more practical. Baking rolls allows me to freeze the majority and simply pull them out as needed, ensuring fresh, warm bread whenever the craving strikes. I’ve included detailed instructions below for partially baking and then freezing them, so you can enjoy these delicious rolls at your convenience.
Graham Clover Rolls Recipe
Graham Clover Rolls
by Chef Lindsey
These Graham Clover Rolls are hearty, filling and under 100 calories each! The bread is the perfect consistency, not too dense and not too airy, and the crust is crisp while the inside is moist and chewy. They are the perfect accompaniment to any stew, pot roast, or soup.
Prep Time: 20 mins
Cook Time: 20 mins
Proof Time: 3 hrs
Total Time: 3 hrs 40 mins
Servings: 32 Rolls
Ingredients
- 2 cups whole milk, warm
- 1 ½ teaspoons salt
- 2 tablespoons molasses
- 2 ¼ teaspoons dried active yeast (1 packet)
- 1 cup whole-wheat flour
- 5 cups graham flour
Instructions
- Add molasses and salt to the hot milk and let it cool until it is lukewarm. For a quicker cool-down, place your mixer bowl in a larger bowl filled with cold (but not icy) water, stirring until the mixture reaches a temperature of 100° – 110° F. This temperature is crucial for activating the yeast without killing it.
- While your milk mixture is cooling, prepare your yeast. Add ¼ cup of warm water (again, 100° – 110° F) to the yeast and stir gently to combine. Then, add 1 teaspoon of sugar; this acts as food for the yeast, helping it proof. Wait approximately 10 minutes. If the mixture has tripled in size and appears frothy, your yeast is healthy and ready to use. If it doesn’t foam, your yeast may be old or the water temperature was incorrect, and you’ll need to start this step again with fresh yeast.
- Once the yeast is proofed, add it to the lukewarm milk mixture and stir thoroughly to ensure it’s evenly distributed.
- Add all the whole wheat flour and three cups of graham flour to the wet mixture. Using a bread hook attachment on your stand mixer or a sturdy wooden spoon, begin mixing. Gradually add the remaining graham flour, a little at a time, until a stiff dough forms. You will likely use about 4 ½ cups of graham flour in total, but adjust based on your dough’s consistency – it should be firm but pliable.
- If using a Kitchen Aid mixer with a bread-hook attachment, set it to speed 2 and let it knead until the dough climbs up the hook and the sides of the bowl are clean, which typically takes about two minutes. Continue kneading on speed 2 for an additional two minutes. With graham flour bread, it’s important not to over-knead, as it naturally produces a denser bread. Over-kneading can lead to a tough texture.
- If kneading by hand, Ruth (from the American Woman’s Cookbook) advises: “Press the dough away with the palms of your hand. Stretch the dough from the edge, folding the back edge over to the center. Press the dough away with the palms of your hands, exerting sufficient force to cause the part folded over to adhere to the mass under it, and repeat folding. Turn dough one-quarter around and repeat kneading. Continue turning, folding and kneading until dough is smooth and elastic and will not stick to an unfloured board.” This process develops the gluten, giving the bread its structure.
- FIRST RISING: Lightly grease a large bowl with vegetable oil. I find it easiest to pour a small amount of oil into my hands and then coat the inside of the bowl, almost like finger-painting! Place the dough in the bowl, turning it over once to ensure all sides are coated with oil. This prevents a crust from forming. Cover the bowl with a damp towel and place it in a warm, draft-free spot (ideally 80° – 85°F / 27° – 30°C) for about an hour, or until the dough has tripled in size. If your kitchen is cool, you can pre-heat your oven for 10 minutes, then turn it off and let it cool to a comfortable temperature for proofing. An oven thermometer can be very helpful here to maintain the ideal temperature.
- Sometime during the final proofing period, you’ll want to grease your baking pans. This recipe yields enough for two standard loaf pans or approximately 32 individual muffin tins for rolls.
- SHAPING THE LOAVES: If making loaves, separate the dough into two equal halves. Place each half into a well-greased loaf pan. Cover with a damp cloth and let rise again until doubled in volume.
- SHAPING CLOVER ROLLS: To create the signature clover shape, pinch off pieces of dough roughly the size of two large grapes. Shape each piece into a small ball, then press three of these balls into each greased muffin tin. Work quickly to prevent the dough from losing too much warmth. Once all the dough is shaped and placed in the tins, cover the pans with a damp cloth and set aside for their final rise until visibly puffy and doubled in size.
- BAKING LOAVES: Preheat your oven to 400°F (200°C). Bake the loaves for 15 minutes at this temperature, then reduce the heat to 350°F (175°C) for the remaining 45 minutes. The loaves are done when the sides pull away from the pan, the crust is a rich, golden brown, and they sound hollow when you firmly tap the top. You can also insert a wooden skewer or toothpick into the center; if it comes out clean, the bread is baked through. Immediately remove the loaves from their pans and place them on a wire rack to cool completely.
- BAKING ROLLS: Preheat your oven to 400°F (200°C). Bake the rolls for 8 minutes at this temperature, then reduce the heat to 350°F (175°C) for an additional 10-20 minutes. I recommend starting to check for doneness after 10 minutes. For rolls, the toothpick test (inserting a toothpick into the center and ensuring it comes out clean) is the most reliable method for checking if they are fully baked.
Notes
FREEZING INSTRUCTIONS: To enjoy these rolls fresh from the freezer, bake them for 8 minutes at 400°F (200°C). This is a partial bake. Remove them to a wire rack and allow them to cool completely. Once cooled, place them in a large freezer bag, ensuring as much air is removed as possible to prevent freezer burn. When you’re ready to finish baking, take the desired number of rolls directly from the freezer, place them on a baking sheet, and bake in a pre-heated 350°F (175°C) oven for 15-25 minutes, or until golden brown and thoroughly heated through. The toothpick test may not be reliable here due to the partial bake. A better method is to remove one roll from the oven and carefully try to pull it apart. If it separates easily and is warm throughout, it’s done. If it offers resistance and still feels doughy, pop it back into the oven for a few more minutes.
Nutrition
Calories: 97 kcal | Carbohydrates: 19g | Protein: 4g | Fat: 1g | Saturated Fat: 1g | Polyunsaturated Fat: 1g | Monounsaturated Fat: 1g | Cholesterol: 2mg | Sodium: 116mg | Potassium: 63mg | Fiber: 3g | Sugar: 2g | Vitamin A: 25IU | Vitamin C: 1mg | Calcium: 23mg | Iron: 1mg
Course: Bread
Cuisine: American
Calories: 97
Tips for Achieving Perfect Graham Clover Rolls Every Time
Baking bread, especially with ancient grains like graham flour, can be an incredibly rewarding experience. To help you achieve the best results with these Graham Clover Rolls, here are a few expert tips:
- Yeast Activation is Key: Ensure your milk and water are truly lukewarm (between 100°F and 110°F). Water that’s too cold won’t activate the yeast, and water that’s too hot will kill it. The sugar added during proofing provides the yeast with initial food, leading to a robust rise. Don’t skip the proofing step – it’s your assurance that your yeast is alive and ready to work its magic.
- Understanding Dough Consistency: Graham flour can absorb liquid differently than all-purpose or even standard whole wheat flour. The recipe provides a guideline for graham flour quantity, but trust your senses. You’re looking for a dough that is stiff but still slightly tacky, not dry and crumbly, nor overly sticky. Adding flour gradually allows you to adjust precisely.
- The Art of Kneading: Kneading develops the gluten structure, which gives bread its chewiness and ability to hold its shape. While a stand mixer makes it easy, hand-kneading is a meditative process. The key is consistent motion and applying enough pressure to stretch and fold the dough. For graham flour, remember not to over-knead, as its coarser texture means it doesn’t require as much gluten development as some other breads.
- Optimal Proofing Environment: A warm, draft-free environment is crucial for yeast activity. If your kitchen is cool, consider creating a makeshift proofing box. Turning off a pre-warmed oven or using a microwave as a proofing chamber (with the door ajar for ventilation if slightly warm) are common tricks. Covering the dough with a damp towel prevents it from drying out and forming a crust, which can inhibit rising.
- Even Heating in the Oven: Ovens can have hot spots. If you’re baking multiple trays of rolls, consider rotating them halfway through the baking time to ensure even browning.
- Knowing When They’re Done: The “hollow sound” test for loaves and the “toothpick test” for rolls are classic indicators. For the rolls, especially, don’t be afraid to take one out, let it cool slightly, and check its interior. A fully baked roll will have a uniform, fluffy crumb.
Serving Suggestions & Culinary Versatility
The beauty of these Graham Clover Rolls lies in their incredible versatility. While they are a perfect companion to hearty, warming dishes, their mild, wholesome flavor allows them to complement a wide range of meals. Here are some ideas to inspire your culinary creations:
- Classic Pairings: As mentioned, they shine alongside any robust stew, a slow-cooked pot roast, or a creamy, comforting soup. Their sturdy texture is ideal for soaking up flavorful broths and gravies.
- Breakfast & Brunch: Serve them warm with a pat of butter and a drizzle of honey or your favorite jam for a wholesome breakfast. They can also be a delightful addition to a brunch spread, perhaps alongside scrambled eggs and fresh fruit.
- Sandwich Rolls: Their size and hearty nature make them excellent small sandwich rolls. Fill them with sliced turkey, ham, cheese, or even a veggie spread for a nutritious lunch on the go.
- Accompaniment to Salads: Add a basket of these rolls to your next salad meal. Their earthy flavor provides a grounding counterpoint to crisp greens and vibrant vegetables.
- With Cheese & Charcuterie: The subtle sweetness from the molasses and the nutty flavor of graham flour pair beautifully with a variety of cheeses, making them a great addition to a cheese board.
Embrace the Goodness of Homemade Bread
Baking bread at home is more than just a culinary task; it’s an experience that nourishes both body and soul. The process encourages patience, creativity, and offers a tangible connection to traditional food preparation. These Graham Clover Rolls, with their historical roots in the American Woman’s Cookbook and their modern appeal as a healthy, delicious option, are a testament to the enduring power of simple, wholesome ingredients.
Whether you’re a seasoned baker or new to the world of yeast, I encourage you to try this recipe. The satisfaction of pulling warm, fragrant rolls from your oven is unparalleled, and the health benefits of using graham flour are an added bonus. Don’t be shy about experimenting with the clover shape; it’s a fun detail that adds a special touch. And remember, the freezer instructions make it incredibly easy to always have homemade bread on hand.
Thank you for joining me on this baking adventure and for being a part of my blogging journey. I hope these Graham Clover Rolls bring as much joy and comfort to your table as they do to mine.
Like this recipe? Leave a comment below!
Your feedback and comments are always welcome. Share your baking experience!