
Irresistible Peppermint Thumbprint Cookies: Your Ultimate Holiday Baking Companion
The holiday season ushers in a magical time of year, filled with warmth, cheer, and the delightful aroma of freshly baked cookies. If you’re searching for a festive treat that’s both stunning and remarkably simple to make, look no further than these enchanting Peppermint Thumbprint Cookies. Building on the beloved concept of classic thumbprint cookies, this recipe introduces a refreshing peppermint twist, perfect for those who adore the crisp, cool flavor of peppermint in their holiday desserts. While I’ve previously shared a recipe for Mint Truffle Thumbprint Cookies for fellow green mint enthusiasts, this rendition is dedicated to the legions of peppermint fans, promising a vibrant and delightful experience.
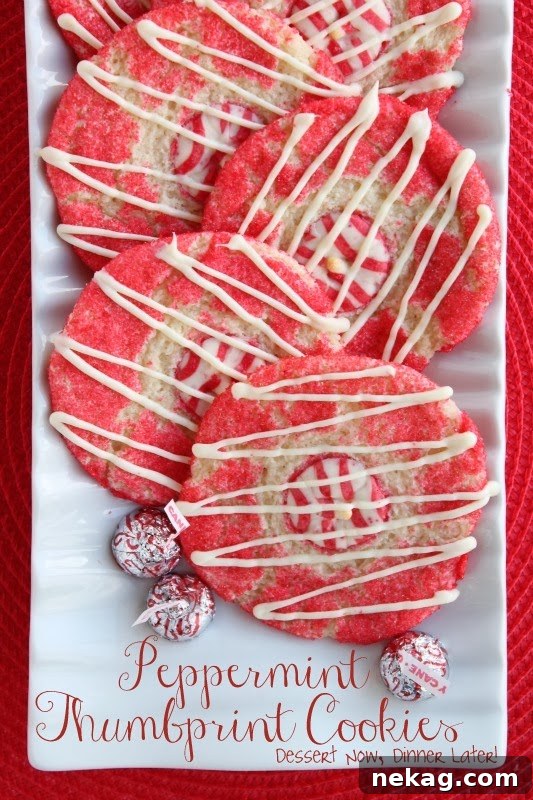
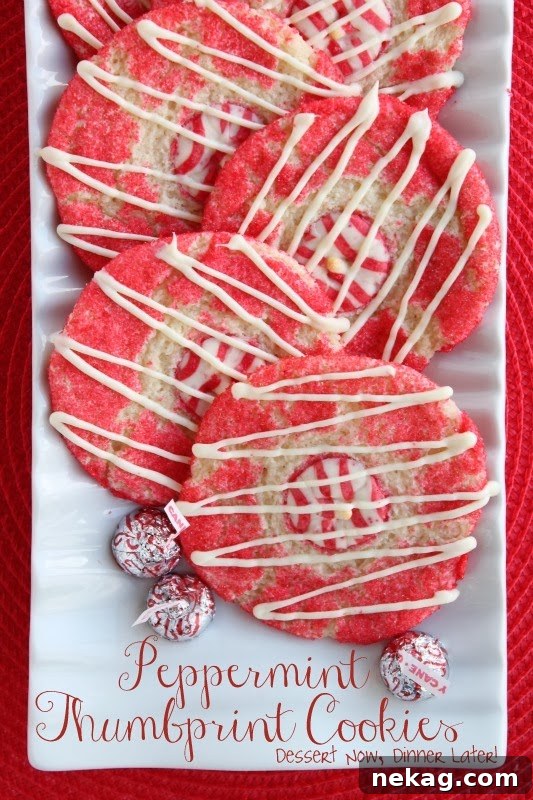
Thumbprint cookies are a nostalgic favorite for many, cherished for their tender texture and the delightful surprise tucked into their center. Our peppermint version takes this charm to a new level, infusing the dough with a bright peppermint extract and crowning each cookie with a festive Hershey’s Candy Cane Kiss. The vibrant red sugar crystals add an extra layer of visual appeal, making these cookies an instant showstopper on any holiday dessert platter. You might notice some of my cookies appearing a tad thin in the photos; that’s because I had to use parchment paper instead of my usual silicone baking mat, and perhaps I pressed them down a little too enthusiastically. But rest assured, whether thick or thin, their flavor is absolutely divine!
The Secret to Effortless Holiday Baking: Cake Mix Cookies

One of the best features of this recipe is its ingenious use of a white cake mix as the base. This simple hack significantly streamlines the baking process, saving you time and effort without compromising on taste or texture. Cake mix cookies are known for their soft, chewy, and slightly cake-like consistency, which perfectly complements the creamy chocolate kiss. This semi-homemade approach means less measuring of dry ingredients and fewer bowls to wash, making it an ideal choice for busy holiday schedules or for novice bakers. The result is a uniformly delicious cookie every time, giving you more time to enjoy the festivities.
Moreover, these cookies are a fantastic project to involve your little helpers in the kitchen. Children can delight in unwrapping the candy kisses, rolling the dough balls, and even helping to coat them in the sparkling red sugar crystals. It’s a wonderful way to create lasting family memories and instill a love for baking from a young age. These Peppermint Thumbprint Cookies are more than just a dessert; they’re a symbol of togetherness and holiday cheer. They make the perfect homemade gift for neighbors, friends, and teachers, spreading joy one delicious bite at a time. Imagine presenting a plate of these charming, festive cookies – they’re sure to bring smiles and warm hearts. So, gather your ingredients, turn on some holiday tunes, and prepare to create some magic in your kitchen!


Peppermint Thumbprint Cookies
Amber Brady
Pin
16
Large Cookies
Ingredients
-
15.25 oz
(432 g) box White Cake Mix -
8 oz
(226 g) tub Cool Whip - 1 large egg
- 1 tsp peppermint extract
-
2.25 oz
(64 g) bottle red sugar crystals - Hershey’s Candy Cane Kisses
-
⅓ cup
(57 g) white chocolate chips, for drizzle
Instructions
-
In a stand mixer, combine the cake mix, thawed Cool Whip, large egg, and peppermint extract. Mix on medium speed until all ingredients are well incorporated and no streaks of Cool Whip remain. Remember to scrape down the sides of the bowl occasionally to ensure an evenly mixed dough. It’s crucial to use a stand mixer for this recipe, as the dough will be quite thick and a hand mixer might struggle. A well-mixed dough ensures a consistent texture and flavor throughout your cookies.
-
Prepare your baking sheets by lining them with parchment paper. Scoop out uniform balls of cookie dough, approximately 1.5 to 2 tablespoons each. In a separate shallow bowl, pour the red sugar crystals. Gently roll each cookie dough ball in the sugar crystals until fully coated. This not only adds a beautiful festive sparkle but also a delightful crunch. Place the coated dough balls onto the prepared baking sheets, leaving a couple of inches between each. Slightly flatten each dough ball until it is about ¾ inch thick. Create a distinct indentation in the center of each cookie using your thumb or the back of a small spoon. Carefully place an unwrapped Hershey’s Candy Cane Kiss into each thumbprint. This central candy will melt slightly during baking, creating a soft, peppermint-chocolate heart. Repeat this process with the remaining cookie dough.
-
Preheat your oven to 350˚F (175˚C). Bake the cookies for 10-12 minutes. You’ll know they are done when they have spread slightly, the edges are lightly golden, and tiny cracks appear on the surface. For a slightly thicker cookie, aim for the full 12 minutes of baking time. A key tip: halfway through baking (around 5-6 minutes), carefully open the oven door and use the back of a spoon to gently smooth out the tip of each melting Candy Cane Kiss. This helps create a neater, more aesthetically pleasing finish, preventing the chocolate from becoming too pointy or uneven. Close the oven door and continue baking for the remaining time. This small step makes a big difference in the final presentation.
-
Once baked, remove the cookies from the oven and let them cool on the baking sheet for a few minutes before transferring them to a wire rack to cool completely. While the cookies are cooling, prepare your white chocolate drizzle. Place the white chocolate chips in a microwave-safe bowl and heat them in 30-second intervals, stirring well after each, until smooth and melted. Be careful not to overheat the chocolate, as it can seize. Once melted, spoon the chocolate into a small plastic bag and snip off a tiny corner. Drizzle the melted white chocolate over the cooled cookies in a zig-zag pattern. Allow the chocolate to set completely before removing the cookies from the pan. You can place the cookies in the refrigerator for about 10-15 minutes to speed up the setting process. Once the chocolate is firm, your delicious Peppermint Thumbprint Cookies are ready to be packaged as gifts for friends and neighbors, or simply enjoyed by your family!
Notes
For an extra boost of peppermint flavor, you can lightly crush a few candy canes and sprinkle them over the melted white chocolate drizzle before it sets. This adds both texture and a more intense peppermint kick. Store these festive cookies in an airtight container at room temperature for up to 3-4 days, or in the refrigerator for up to a week, especially if your home is warm. They also freeze beautifully for up to a month!
Disclaimer: Nutritional values were calculated using a third-party tool and are provided as an estimation only.
Sharing this recipe with a link is both encouraged and appreciated. Copying/pasting and/or screenshots of full recipes to any social media is strictly prohibited. Content and photographs are copyright protected.
Did you make this?
Don’t forget to leave a rating below and make sure to follow on Pinterest and Instagram for more!
Tips for Perfect Peppermint Thumbprint Cookies Every Time
Achieving bakery-quality Peppermint Thumbprint Cookies at home is easier than you think, especially with a few helpful tips. First, ensure your Cool Whip is thawed but still very cold when you mix the dough. This helps maintain the dough’s consistency, preventing it from becoming too sticky. If your dough feels too soft to handle, chill it in the refrigerator for 15-30 minutes before rolling. This will make it much easier to shape and coat in sugar crystals.
When making the thumbprint indentation, be gentle but firm. You want a clear well for the candy kiss, but avoid pressing so hard that you go all the way through the dough. If the edges crack too much, simply smooth them out with your fingers before placing the kiss. The choice of parchment paper versus a silicone mat can indeed affect the cookies’ spread and thickness. Parchment paper often allows for a slightly crisper edge and more spread, while silicone mats tend to yield thicker, chewier cookies with less spread. Experiment to find your preferred texture!
For the white chocolate drizzle, temperamental as it can be, patience is key. Heat it slowly and stir frequently to achieve a smooth, pourable consistency. If it’s too thick, add a tiny bit of coconut oil or vegetable shortening (about ¼ teaspoon at a time) to thin it out. If you don’t have red sugar crystals, you can use regular granulated sugar mixed with a drop or two of red food coloring, or even crushed candy canes for an extra peppermint kick in the coating itself.
Variations and Creative Twists
While the classic Peppermint Thumbprint Cookie is a star on its own, there are endless ways to customize this recipe to suit your taste or occasion. If you can’t find Hershey’s Candy Cane Kisses, regular milk chocolate Kisses or even white chocolate Kisses would be delightful. You could also use small squares of peppermint bark for an even richer chocolate-peppermint experience. For a different flavor profile, consider swapping the white cake mix for a chocolate cake mix to create a double chocolate peppermint cookie.
Instead of red sugar crystals, you could use green, silver, or even a mix of holiday sprinkles for a more whimsical look. After the cookies have cooled, consider a dusting of powdered sugar for a “snow-kissed” effect, or add a few crushed peppermints on top of the white chocolate drizzle before it sets. For those who enjoy a bit of spice with their sweetness, a pinch of ground ginger or cinnamon could be added to the cake mix dough, creating a warm and inviting flavor that beautifully contrasts with the cool peppermint.
These cookies are not just for Christmas! Adapt them for other holidays by changing the color of the sugar crystals and the type of candy kiss. For Valentine’s Day, use pink or red sugar and cherry cordial Kisses. For a birthday celebration, choose colors that match the party theme. The versatility of this cake mix cookie base makes it a fantastic starting point for all sorts of creative baking adventures throughout the year.
The Joy of Sharing: Perfect for Gifting and Gatherings
These Peppermint Thumbprint Cookies truly embody the spirit of giving. Their charming appearance and delightful flavor make them an ideal candidate for holiday cookie exchanges, festive potlucks, or simply as a thoughtful homemade gift. Arrange them beautifully in a decorative tin or cellophane bag, tied with a festive ribbon, and you have a gift that’s sure to be appreciated. The effortlessness of the recipe means you can bake large batches without feeling overwhelmed, perfect for spreading holiday cheer far and wide.
Imagine these cookies gracing your holiday dessert table, nestled amongst other seasonal treats. They pair wonderfully with a warm mug of hot cocoa, a cup of freshly brewed coffee, or a glass of cold milk. The combination of soft cookie, creamy chocolate, and refreshing peppermint creates a symphony of textures and flavors that will leave everyone reaching for more. Baking these cookies becomes a cherished tradition, a simple act of love that fills your home with incredible aromas and your loved ones with joy. So go ahead, embrace the festive season with these easy-to-make, utterly delicious, and perfectly pepperminty thumbprint cookies. Happy baking!