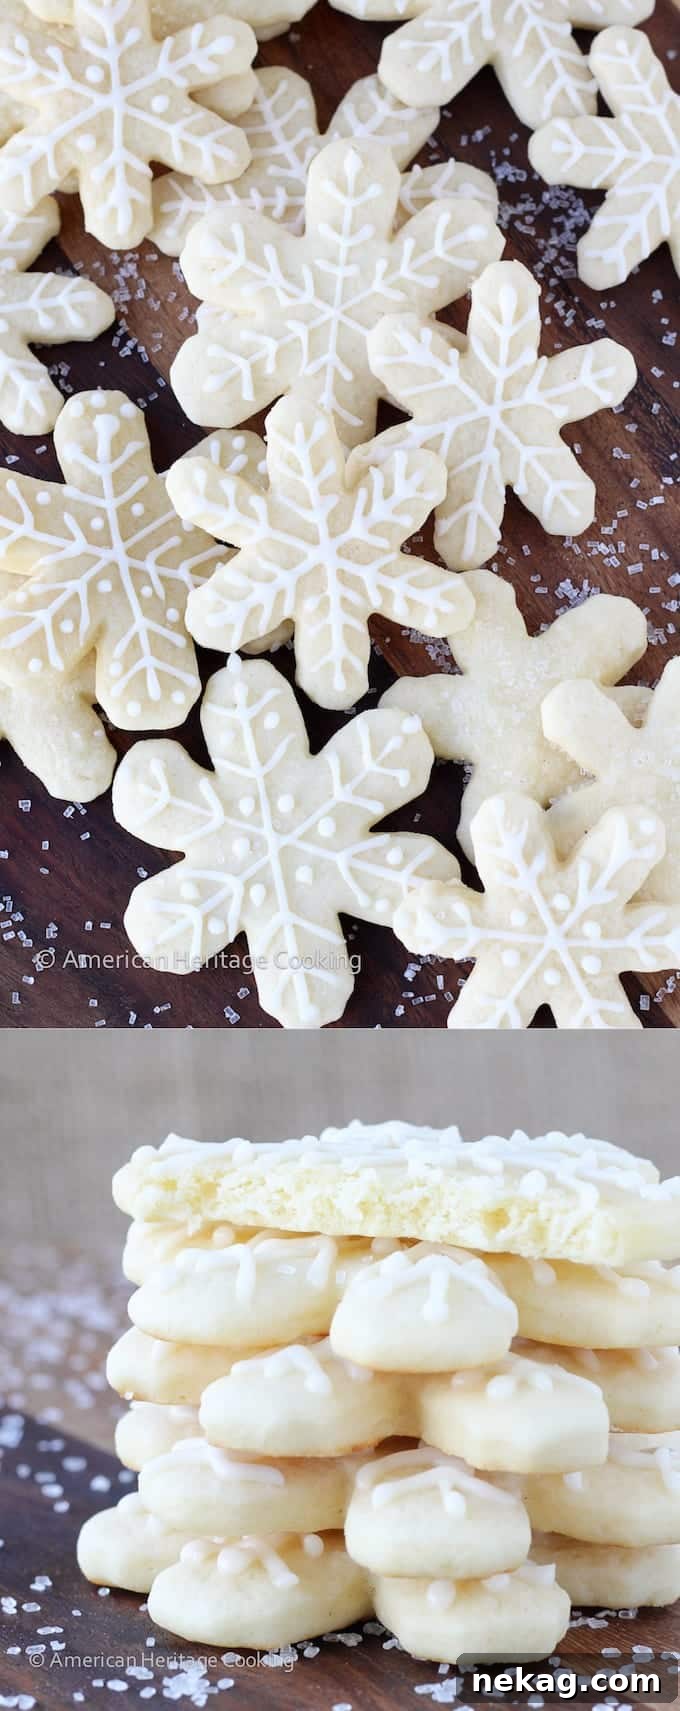
The Ultimate Soft Sugar Cookie Recipe: Easy, Chewy & Perfect for Decorating
Unleash your inner baker with this foolproof soft sugar cookie recipe. Crafted in a single bowl with just six essential ingredients, this recipe makes baking an absolute joy. The dough is wonderfully pliable and effortless to roll, ensuring your beautifully cut shapes maintain their integrity without spreading during baking. The result is a delightful cookie that is soft, slightly chewy, and bursting with a rich, comforting vanilla flavor. Whether you’re a seasoned pro or a beginner, these cookies are destined to become your go-to for every occasion.


A Quick Look At The Recipe
This is a brief summary of the recipe. Jump to the detailed recipe card below to get all the specifics.
Jump to Recipe
Prep Time
15 minutes
Cook Time
8 minutes
Decorating Time
30 minutes
Total Time
23 minutes (not including chilling and decorating)
Servings
40 Cookies
Difficulty
Easy
Calories *
121 kcal per serving
Technique
Prepare cookie dough, roll, chill, cut and bake. Make royal icing and decorate cooled cookies.
Flavor Profile
Classic vanilla sugar cookie complemented by a bright lemon royal icing.
* Based on nutrition panel
Summarize & Save this content on
google ai
perplexity
grok
“Perfect cookies! I made these in a stand mixer and they turned out great! Super easy to make, I cut them into rounds, hearts, and stars. I will be making these for Christmas to use in a cookie decorating session with my little niece and nephew; they will love it!⭐⭐⭐⭐⭐”
Mara
Why This is the Best Soft Sugar Cookie Recipe for All Occasions
There are countless sugar cookie recipes out there, but few truly deliver on all fronts: ease, deliciousness, and perfect decorability. This recipe stands out from the crowd for several compelling reasons, making it an indispensable addition to your baking repertoire, especially when you’re looking for the best soft sugar cookies that hold their shape beautifully.
- Effortless to Make & Roll: Forget complicated steps and multiple bowls! Our dough comes together easily in just one bowl using readily available pantry ingredients and melted butter. This simple preparation saves time and reduces cleanup. Plus, the dough is incredibly cooperative, making it a dream to roll out. With our special parchment paper technique, you won’t even need extra flour, which can often dry out your cookies and dull their flavor. This makes it an ideal easy sugar cookie recipe for beginners and busy bakers alike.
- Delicious Even Undecorated: Many cut-out sugar cookie recipes prioritize shape over flavor, leaving you with beautiful but bland cookies. Not this one! These cookies are perfectly sweetened, boasting a delightful vanilla flavor that shines through whether they’re adorned with icing or enjoyed plain. Each bite offers a wonderfully soft, slightly chewy texture that will have everyone reaching for more. This recipe proves that the best sugar cookies don’t have to sacrifice taste for aesthetics.
- The Perfect Foundation for Decorating: If you love decorating sugar cookies, this recipe is your new best friend. These soft cookies are specifically designed not to spread during baking, ensuring your intricate shapes and detailed designs remain crisp and well-defined. They also bake up consistently flat, providing an impeccably smooth canvas for your royal icing or other decorations. This flat surface prevents icing from running or pooling, making it easier to achieve professional-looking results every time. It’s truly the best no-spread sugar cookie recipe for decorators.
Table of Contents
- Why This is the Best Soft Sugar Cookie Recipe for All Occasions
- History and Evolution of This Beloved Recipe
- Essential Ingredients for Perfect Soft Sugar Cookies
- Creative Variations & Smart Substitutions
- Professional Tips for Flawless Cut-Out Sugar Cookies
- Step-by-Step: How to Make Soft Cut Out Sugar Cookies
- Chef Lindsey’s Expert Dough Pressing Technique
- Royal Icing Techniques for Beginners
- Recipe FAQs: Your Questions Answered
- More Delicious Cookie Recipes You’ll Love
- Soft Cut-Out Sugar Cookies Recipe Card
- Before You Go: Final Thoughts and More Inspiration
History and Evolution of This Beloved Recipe
This is a completely updated and perfected rolled sugar cookie recipe, inspired by the soft, slightly chewy sugar cookies we proudly sold in our bakery. Our goal was to create an easy cookie that consistently bakes flat for effortless decorating, resists spreading to hold intricate shapes, and boasts an outstanding flavor even without any icing.
In the accompanying photos, you’ll see these delightful cookies adorned with my trusted royal icing recipe. However, their versatility means you could opt for a simpler easy cookie icing, a sprinkle of sparkling sanding sugar, or simply leave them beautifully unadorned. These are truly the perfect cut-out sugar cookies to elevate any holiday tray, sitting proudly alongside other festive favorites like chewy molasses cookies, classic peanut butter blossoms, elegant snowball cookies, and aromatic pfeffernusse. They are a celebration of homemade baking at its finest.
Originally posted in 2014, the initial version of this recipe yielded a soft but slightly cakey rolled sugar cookie. While still phenomenal in its own right, it wasn’t quite the texture captured in the images for this updated guide. For those cherished readers returning for the original, fear not! We have thoughtfully preserved the original recipe in the Notes section of the Recipe Card below, ensuring you can recreate the cookies you first fell in love with.
Essential Ingredients for Perfect Soft Sugar Cookies
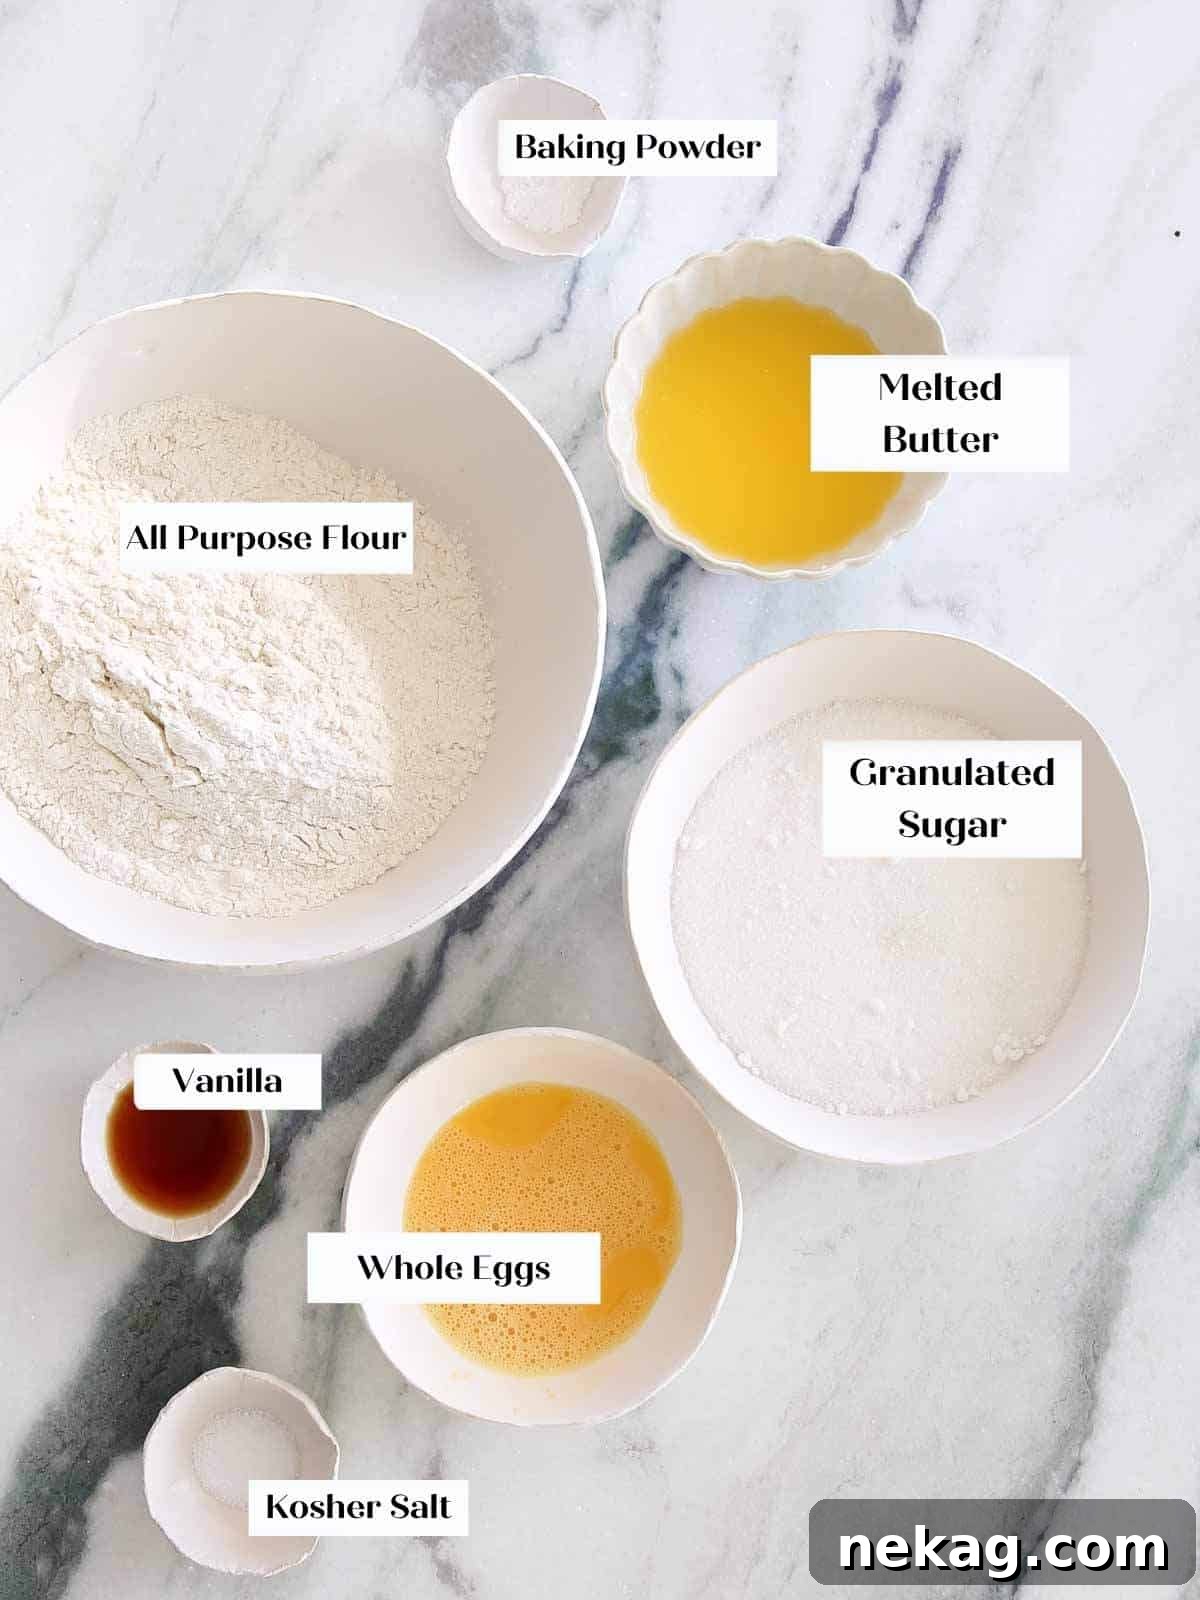
Creating the best soft sugar cookies requires a precise balance of common pantry staples. Each ingredient plays a crucial role in achieving that perfect texture and flavor. Here’s a closer look at what you’ll need and why:
- All-Purpose Flour: This is the backbone of our cookies. Both all-purpose flour or pastry flour will work beautifully, providing just enough gluten to create a stable structure without making the cookies tough or overly dense. It’s important to measure correctly, fluffing the flour before scooping to avoid a heavy hand. Resist the temptation to use bread flour, as its higher protein content would result in a much chewier, less tender cookie, which is not what we’re aiming for here.
- Baking Powder: Our leavening agent. A small amount of baking powder is used to give the cookies a slight lift, preventing them from being too dense. The key is just enough to achieve this without creating a dome on top, which would make decorating challenging. This careful balance ensures a flat, even surface crucial for intricate designs.
- Kosher Salt: Essential for balancing the sweetness and enhancing all the other flavors in the cookie. Don’t skip it!
- Butter (Melted): We opt for unsalted butter to give you full control over the salt content. Melting the butter before incorporating it adds crucial fat and moisture, contributing significantly to the soft and delightfully chewy texture of these simple cookies. It also makes the dough incredibly easy to mix and handle.
- Granulated Sugar: Beyond sweetness, sugar plays a vital role in the texture and spread of the cookie. There’s just the right amount to provide perfect flavor without causing the cookies to spread excessively during baking. Unlike some chewy sugar cookie recipes designed for spreading, our goal here is to maintain crisp, defined shapes.
- Whole Egg: The egg is a multitasker, adding fat and moisture, and acting as an emulsifier to bind the dough ingredients together smoothly. The yolk’s fat content contributes to the cookie’s richness and helps maintain that desirable chewy texture.
- Vanilla Extract: The soul of a classic sugar cookie. Use good quality vanilla extract for the best, most aromatic flavor. It truly elevates the entire cookie experience.
For precise measurements and detailed quantities, please refer to the comprehensive recipe card below.
Creative Variations & Smart Substitutions to Customize Your Cookies
While the classic vanilla soft sugar cookie is truly divine, this versatile base recipe is perfect for endless customization. Don’t be afraid to experiment and make these cookies uniquely yours! Here are some ideas to spark your creativity:
- Experiment with Icing Flavors & Styles:
- Cream Cheese Icing: For a tangier, richer topping, try this luscious cream cheese icing for cookies. Its creamy texture provides a wonderful contrast to the soft cookie.
- Simple Sugar & Sprinkles: If royal icing feels too daunting, a simple brush with beaten egg white followed by a dip in sanding sugar or sprinkles creates an instant festive look with minimal effort.
- Seasonal Themes: Adapt your decorations for any holiday! The same cookie recipe can transform into beautiful Valentine’s Day Cookies, spooky Halloween treats, or intricate Christmas designs simply by changing your cookie cutters and icing colors.
- Flavor the Dough Itself:
- Extracts Beyond Vanilla: Bored of plain vanilla? We understand! Infuse your dough with a different essence by swapping out some or all of the vanilla for almond, peppermint, lemon, or even a touch of coffee extract.
- Citrus Zest: For a bright, fresh flavor, finely zest a lemon, orange, or lime directly into the granulated sugar before mixing. The oils in the zest will infuse beautifully into the dough, creating an aromatic cookie.
- Chocolate or Spice: Transform these into soft chocolate sugar cookies with a cocoa powder addition, or create a cozy, spiced version like my favorite cinnamon sugar cookies.
- Incorporate Mix-ins:
- Fun with Sprinkles & Chips: Yes, you absolutely can (and should!) add delightful mix-ins directly into the dough! Try miniature chocolate chips, colorful sprinkles (jimmies are great!), finely chopped nuts, or other small confectionery additions. Just ensure they are small enough not to hinder the rolling and cutting process. This adds an extra layer of texture and visual appeal without compromising the cookie’s integrity.

Professional Tips for Flawless Cut-Out Sugar Cookies
Achieving perfectly shaped, tender cut-out sugar cookies requires a few insider tricks. These professional tips will elevate your baking and ensure your cookies are a cut above the rest, with crisp edges and a wonderfully soft texture, making them ideal no-spread sugar cookies for any design.
- Roll Dough Between Two Pieces of Parchment Paper: This technique is a game-changer! Rolling the dough between two sheets of parchment paper completely eliminates the need for additional flour on your work surface. Why is this important? Extra flour can be absorbed into the dough, leading to dry, crumbly, and tough cookies with a diminished flavor. It also makes for a mess-free cleanup, which every baker appreciates! This method guarantees a tender, consistent dough every time.
- Roll at Room Temperature: While chilling the dough is crucial at certain stages, the initial rolling process is best done when the dough is at a comfortable room temperature. This makes the dough more pliable and easier to work with, preventing cracks and uneven thickness. You have two options here: either roll it immediately after mixing, or if you’ve chilled it, let it sit out for about 15-20 minutes until it softens slightly before rolling. This ensures you can achieve that perfect ¼ inch thickness without struggling.
- Do Not Skip the Chilling Process: Chilling is paramount for achieving tender, no-spread sugar cookies. While it’s possible to mix, roll, cut, and then freeze for 15 minutes before baking to prevent spreading, this rushed method can result in cookies that are slightly tougher. For the most tender, melt-in-your-mouth soft sugar cookies, it is highly recommended to refrigerate the dough after rolling (ideally for 2 hours or even overnight) and then briefly chill the cut-out shapes again (for about 20 minutes) just before baking. This two-stage chilling process allows the gluten to relax fully, resulting in an exceptionally soft texture and ensuring your cookies retain their detailed shapes perfectly.
Step-by-Step: How to Make Soft Cut Out Sugar Cookies
Follow these detailed instructions to create the most exquisite soft sugar cookies. I’ve broken down each phase, from preparing the dough to expert decorating. If you’re keen on mastering royal icing, my comprehensive royal icing with meringue powder post provides an in-depth tutorial on everything you need to know about making and using this popular cookie decoration.
Make the Cookie Dough:
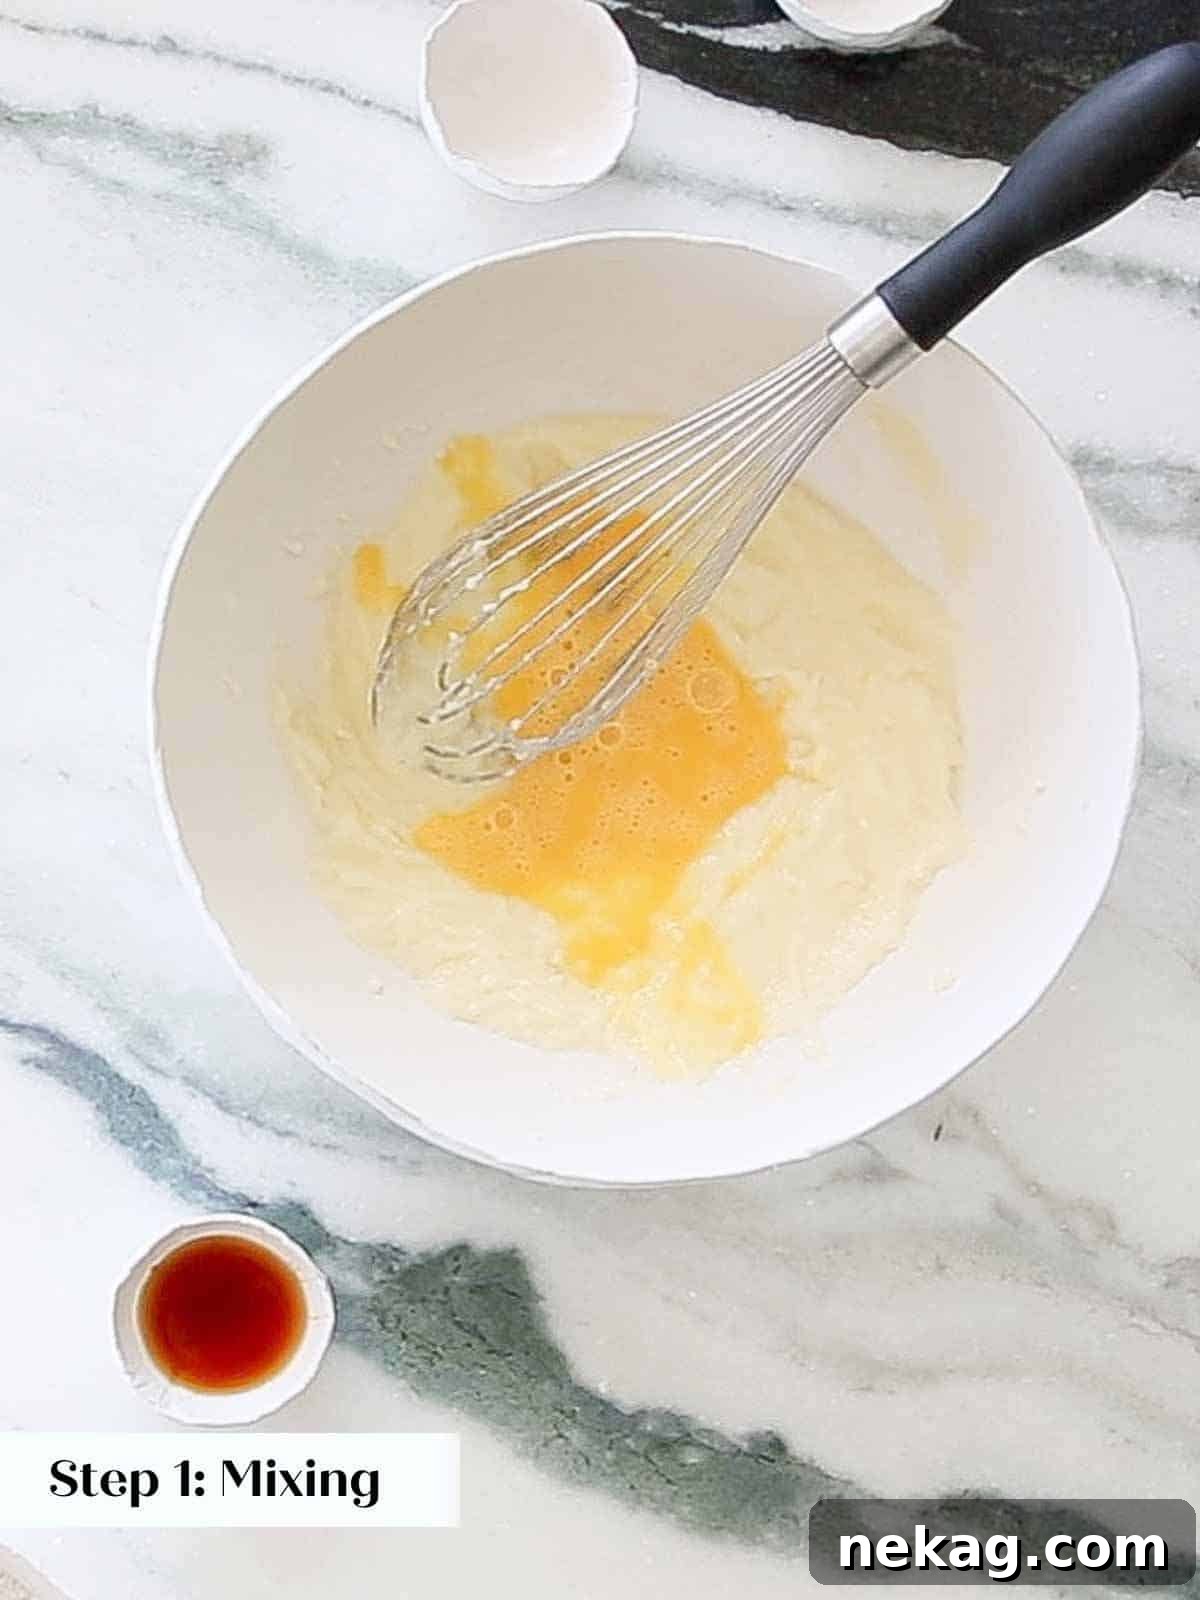
- Prepare Dry Ingredients: In a large mixing bowl, thoroughly whisk together the all-purpose flour, baking powder, and kosher salt. Ensure these dry ingredients are well combined to guarantee even distribution throughout the dough. Set this bowl aside for later.
- Combine Wet Ingredients: In a separate large bowl, melt the butter. You can do this gently in the microwave, ensuring it’s just melted and not hot. Whisk in the granulated sugar until combined, then add the whole egg and vanilla extract. Whisk vigorously for about 1-2 minutes until the mixture is fully emulsified and appears smooth and creamy. You should not see any visible streaks of butter or egg, indicating a homogenous mixture.
- Integrate Dry and Wet Mixtures: Gradually add the flour mixture into the wet ingredients, stirring slowly. Continue mixing until the dry ingredients are mostly incorporated.
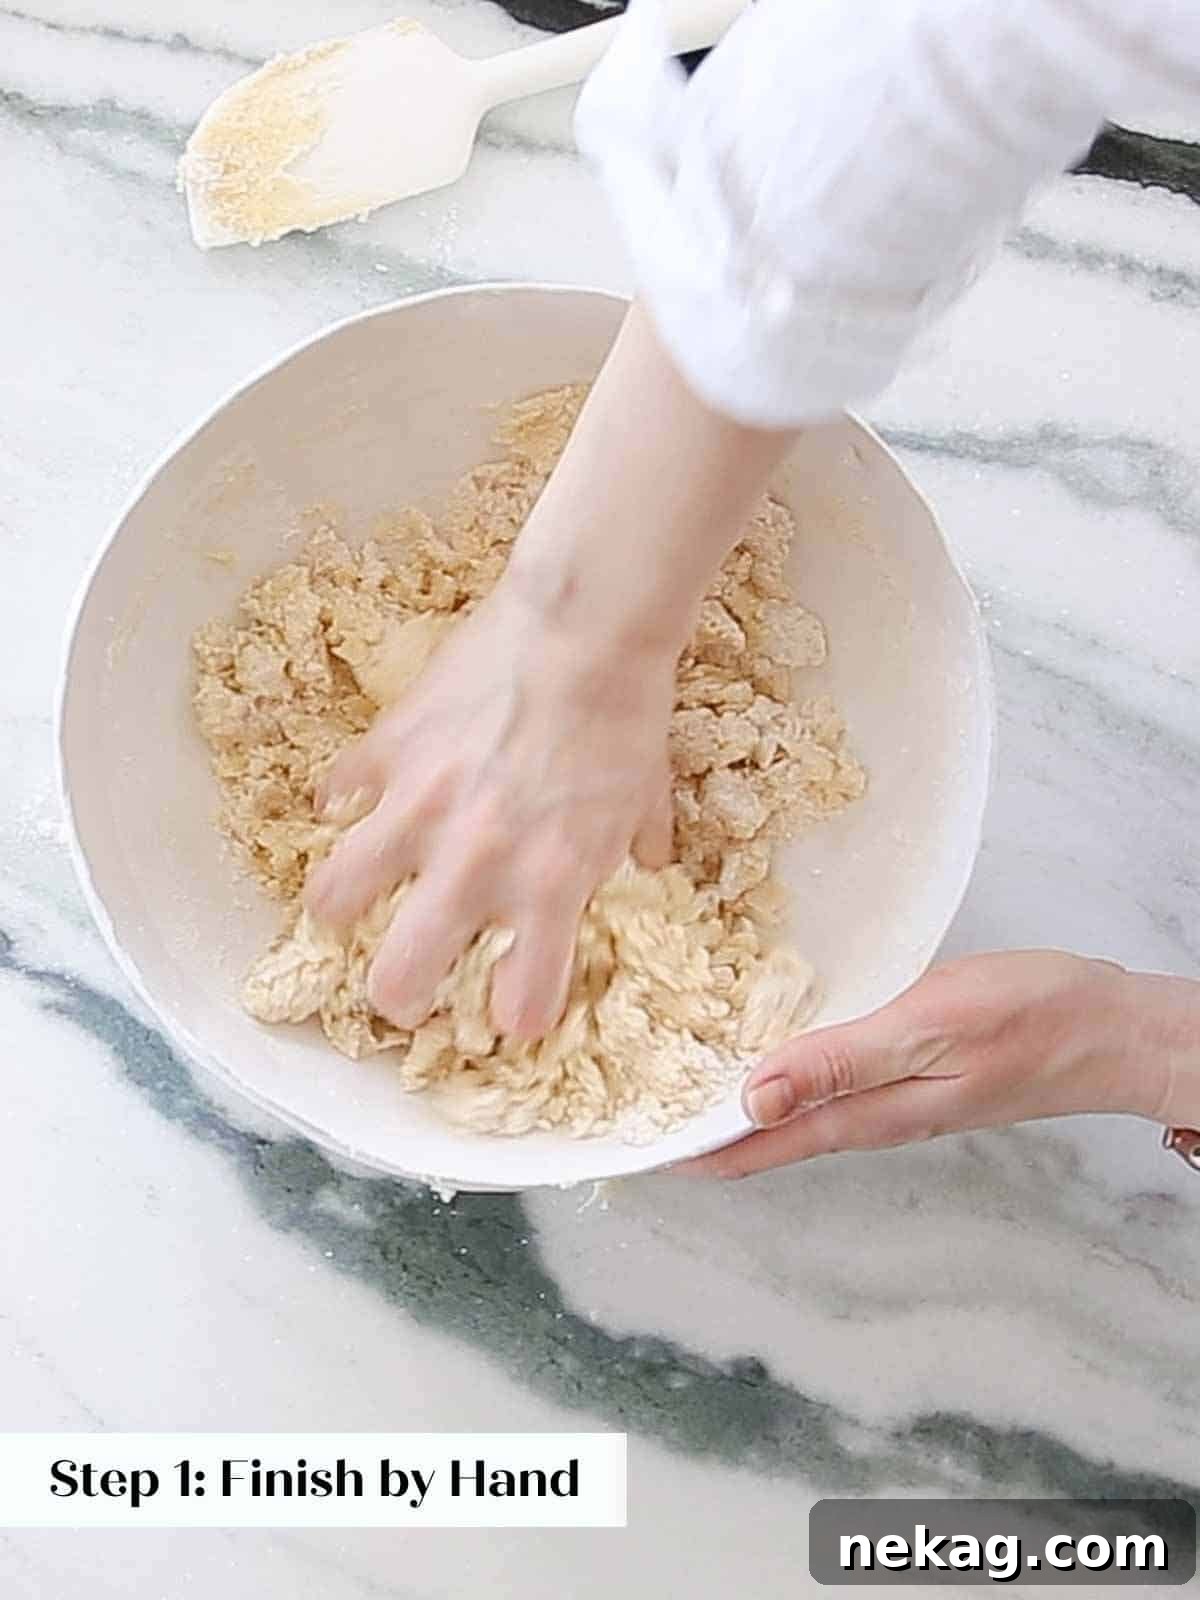
- Finish Mixing by Hand: At this stage, the dough may appear a bit dry and crumbly. To avoid overmixing with a utensil and developing too much gluten (which can lead to tough cookies), I recommend finishing the mixing by hand. Gently squeeze and press the dough together until it forms a cohesive ball. This method quickly and efficiently incorporates the remaining flour without making the dough tough.
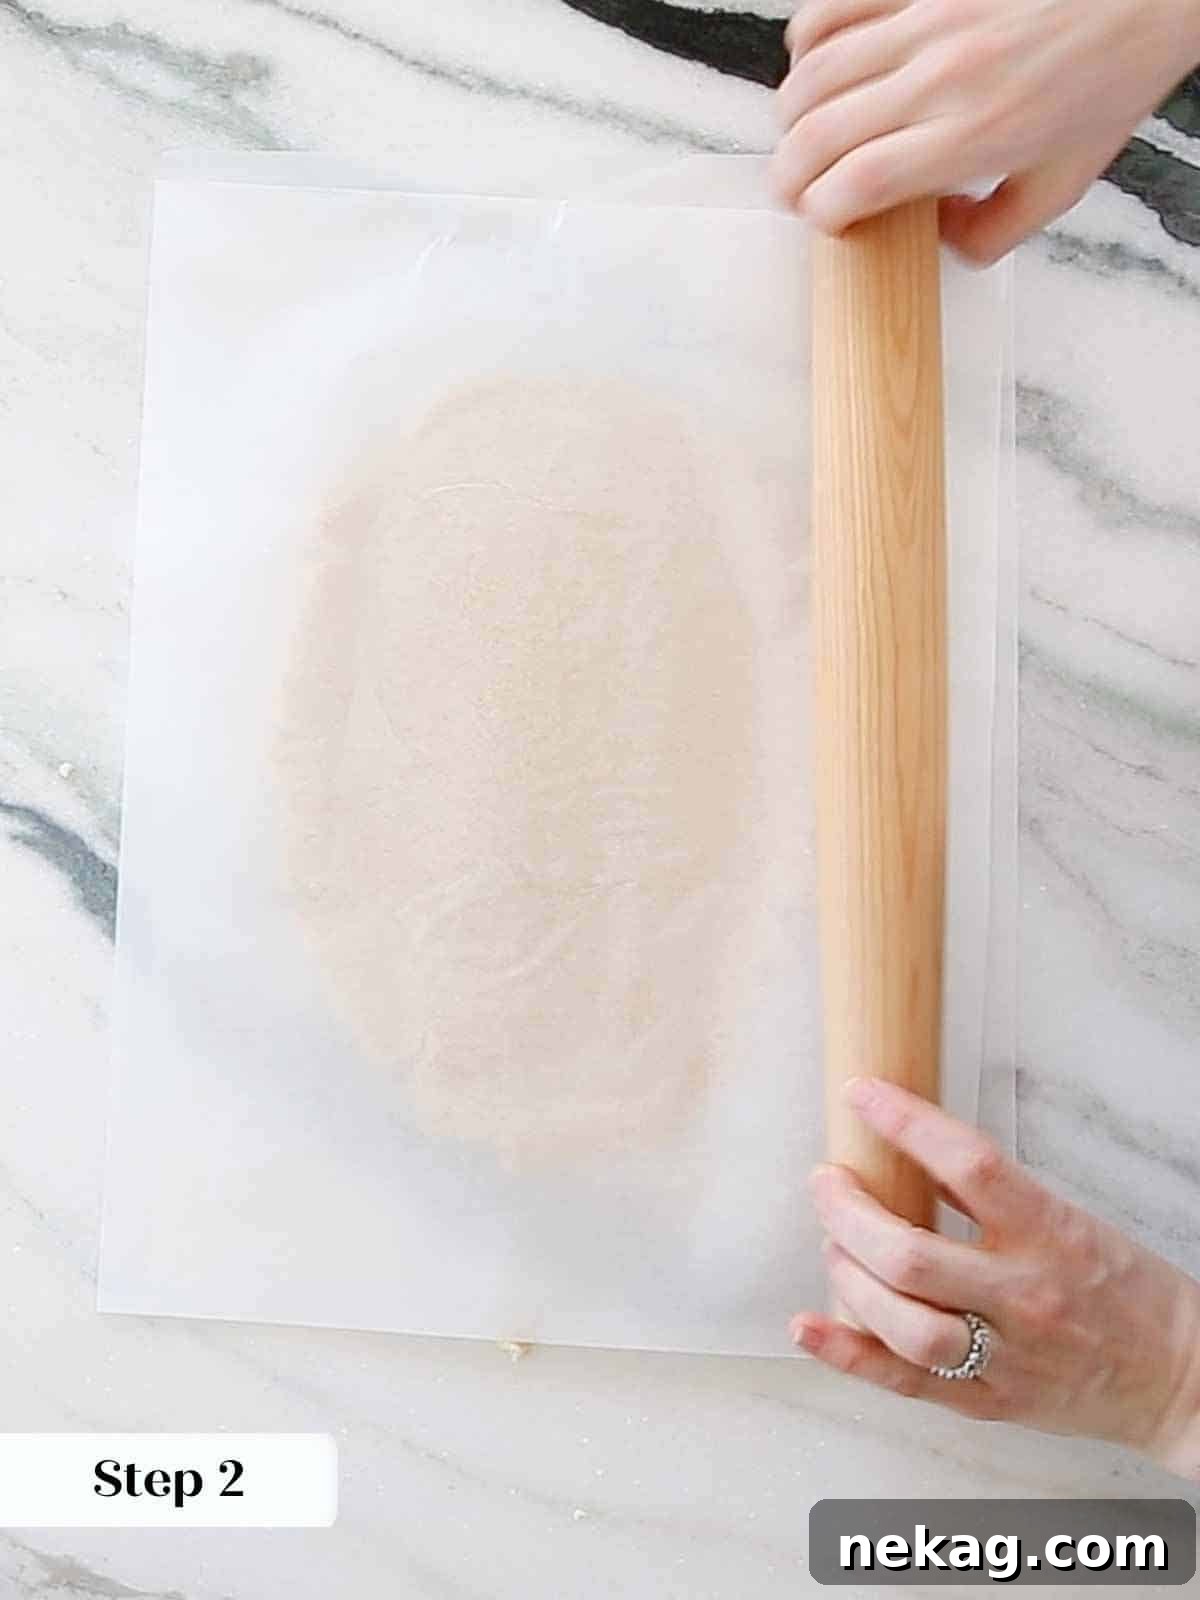
- Roll the Dough to Uniform Thickness: While the dough is at room temperature, it will be most pliable for rolling. Roll the dough to an even thickness of approximately ¼ inch. For the best results and a mess-free process, roll the dough between two pieces of parchment paper. This technique also prevents the need for additional flour, which keeps your cookies tender. If parchment isn’t available, you can lightly flour your work surface, but be sparse with the flour.
- Chill the Rolled Dough: Once rolled, carefully transfer the parchment-enclosed dough to a flat baking sheet or cutting board and refrigerate until thoroughly chilled. While it will set in about 30 minutes, I highly recommend allowing it to chill for a full 2 hours, or even overnight. This extended chilling time allows the gluten in the flour to completely relax, resulting in cookies that are incredibly tender and hold their shape flawlessly during baking.
Chef Lindsey’s Expert Dough Pressing Technique
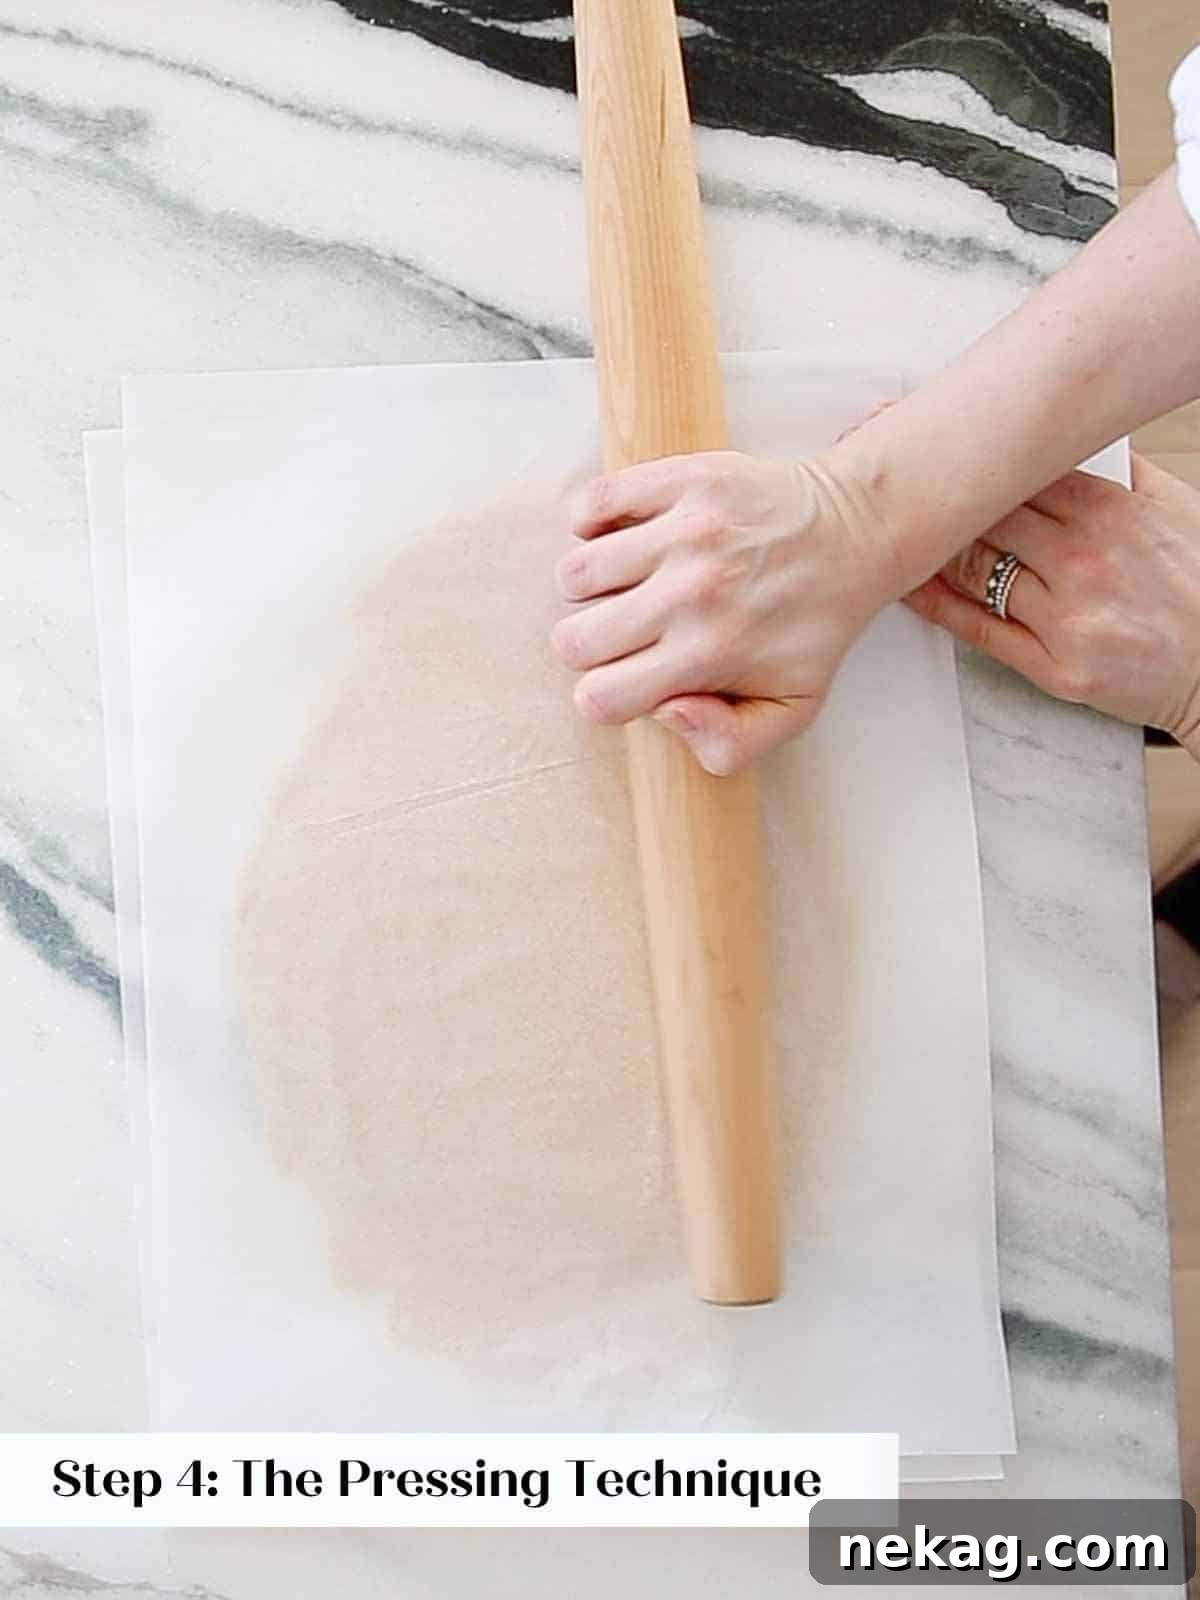
Chef Lindsey’s Dough Pressing Technique: To effortlessly smooth and flatten your cookie dough between pieces of parchment paper, I employ a simple yet effective method. With one hand, gently press the rolling pin away from your body, applying even pressure across the dough. Simultaneously, use your other hand to securely hold down both pieces of parchment paper. This technique essentially mimics a homemade, human-powered dough sheeter, ensuring a uniform thickness and a perfectly smooth surface without any tearing or sticking. While a flat-ended rolling pin works best for this, you can certainly achieve excellent results with a tapered French rolling pin, as demonstrated in the photos.
Cut & Bake Cookies:
- Prepare for Baking: When you’re ready to bake, preheat your oven. If you have a convection oven, set it to 325°F (160°C). For a conventional oven, preheat to 350°F (175°C). Line two large baking sheets with fresh parchment paper. If you rolled your dough between parchment sheets, you can reuse those to line your pans, reducing waste.
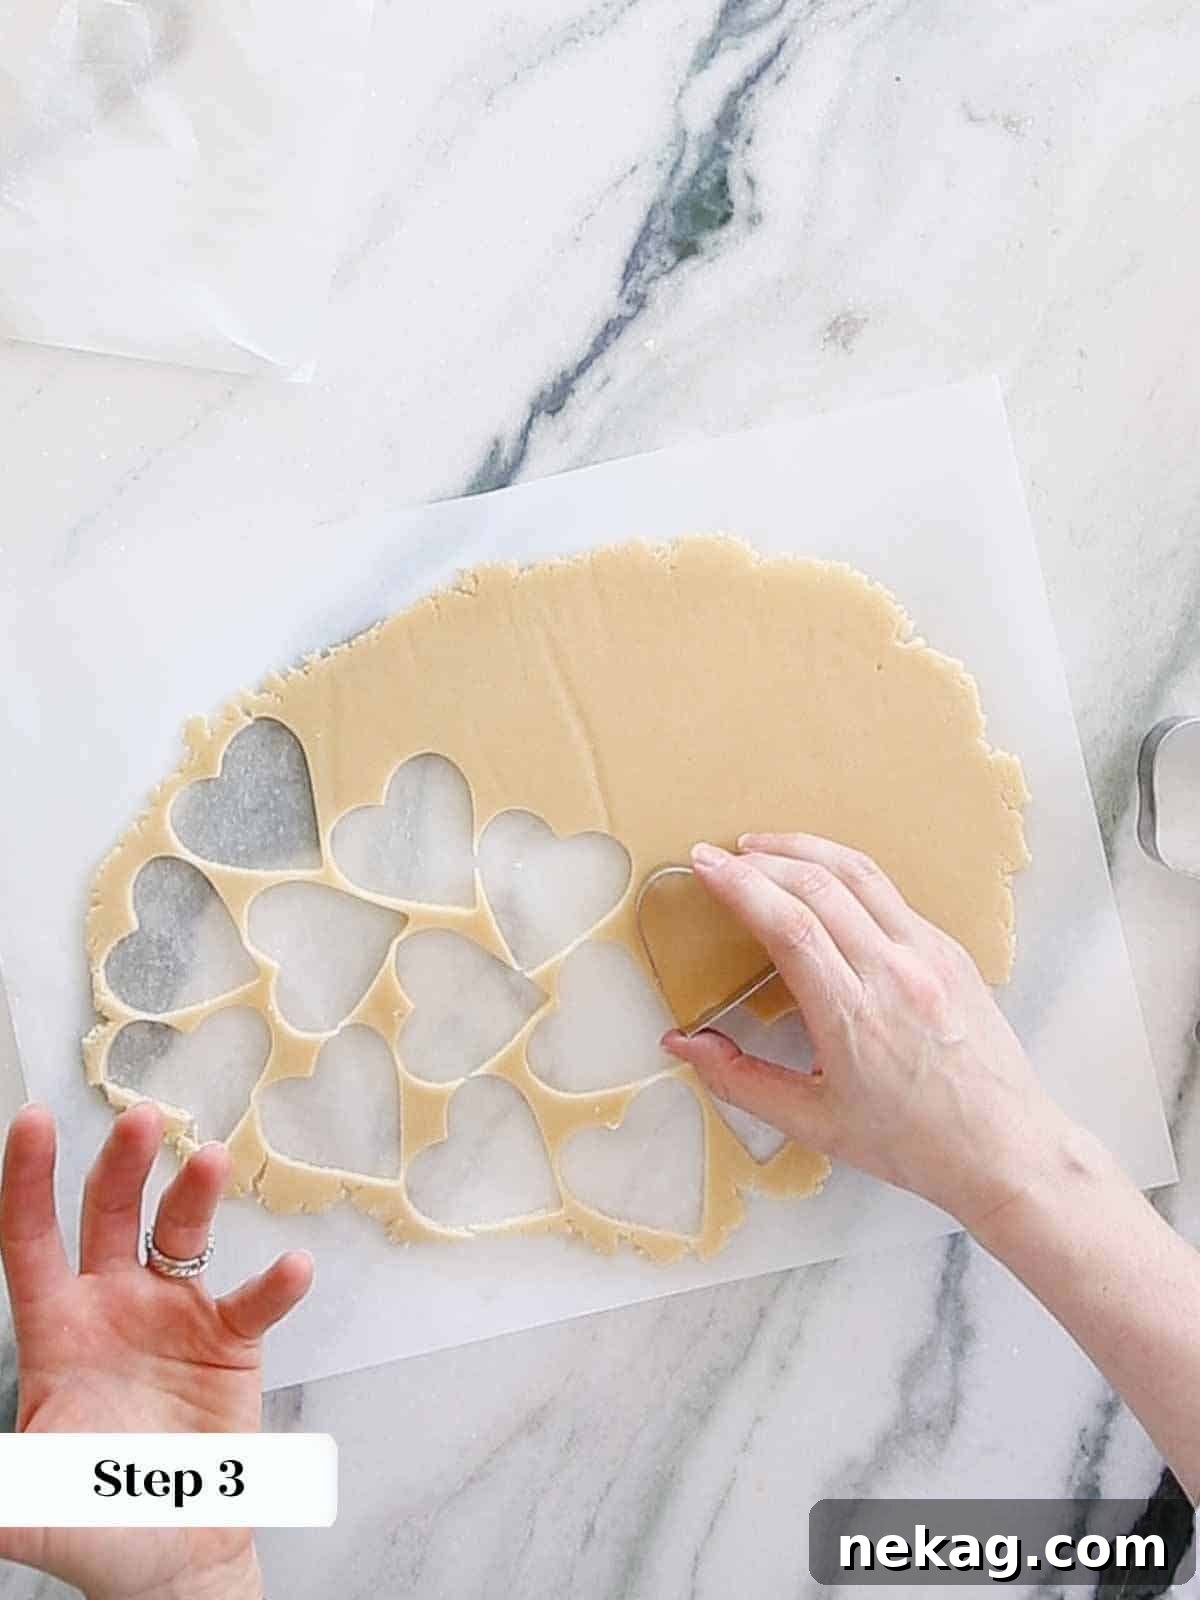
- Cut Out Shapes: Gently unstick the parchment from both sides of your chilled dough. Using your desired cookie cutters, cut out shapes. For best results and to prevent sticking, lightly flour your cookie cutters as needed.
- Chill Cut Cookies: Carefully transfer the cut cookie shapes to the prepared baking sheets. It is crucial to chill these cut-out cookies once more before baking. Place the baking sheets with the cut cookies into the refrigerator for approximately 20 minutes. This final chill is vital to ensure the cookies hold their detailed shape perfectly and do not spread in the oven.
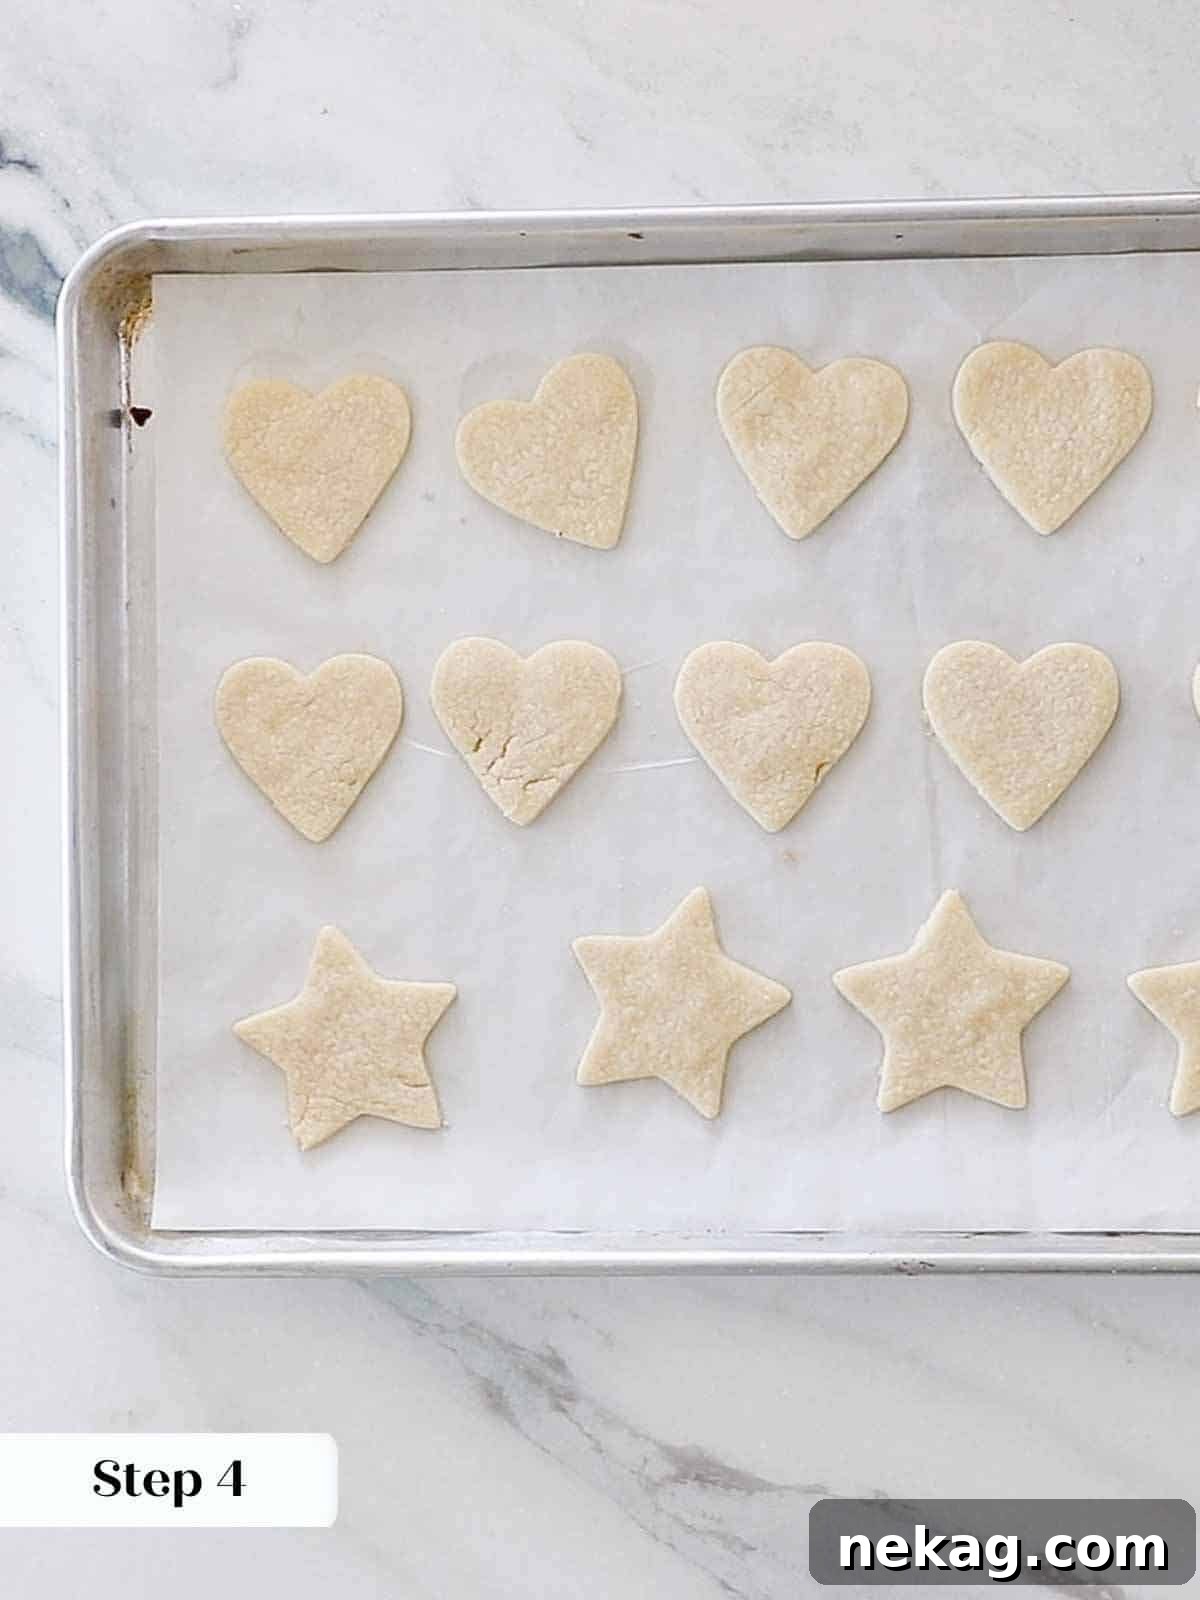
- Bake to Perfection: Place the chilled cookie sheets into your preheated oven. Bake for 7-9 minutes. The baking time can vary slightly depending on your oven and the size of your cookies. Look for visual cues: the cookies should appear matte in the center with a few small cracks, and some edges might just begin to turn a very light golden brown. It’s a good practice to bake cookies of the same shape and size on a single sheet to ensure uniform baking.
- Cool Completely: Once baked, remove the cookies from the oven and allow them to cool on the baking sheets for a few minutes before transferring them to a wire rack to cool completely. They must be entirely cool before any icing is applied to prevent melting or smudging.
Royal Icing Techniques for Beginners
Royal icing is a classic choice for decorating sugar cookies due to its smooth finish and ability to hold intricate designs. Here’s how to prepare and apply it for stunning results. For those looking for a more simple cookie icing, a basic powdered sugar and milk glaze recipe is also provided in the recipe card below.
Make Royal Icing:
- Prepare the Base: In a large bowl, or in the bowl of a stand mixer fitted with the whisk attachment, combine the dried egg whites (or meringue powder) and lemon juice. Whisk on medium-high speed until soft peaks begin to form. This can take a few minutes.
- Add Powdered Sugar: Gradually add all the powdered sugar to the mixture. Start on low speed to avoid a sugar cloud, then increase speed and whisk until fully combined and smooth.
- Adjust Consistency and Color: Separate the icing into different bowls for various colors. Add food dye as desired. While adding color, be mindful of the icing’s consistency; adding too much liquid (even from gel food coloring) can thin it out. You can adjust the consistency for outlining and flooding by adding tiny amounts of water (or lemon juice) or more powdered sugar.
- Outline Consistency (Ribbon Test): For outlining, the icing needs to be firm enough to hold a distinct line but still flow smoothly. Perform the “ribbon test”: lift your spatula from the icing, and the stream of icing should cascade slowly off, remaining visible on the surface for about 5-6 seconds before slowly reabsorbing into the rest of the icing. This indicates the perfect thickness for creating borders.
- Flooding Consistency (Ribbon Test): For flooding (filling in your outlines), the icing should be thinner than the outline consistency, allowing it to spread easily and smoothly. Using the same ribbon test, the icing should cascade off your spatula and almost instantly disappear into the rest of the icing. This consistency allows for a smooth, even fill.
A Note on Icing Consistency: It’s easy to make royal icing too thin, which can prevent it from setting hard and may lead to colors bleeding. Achieving the perfect consistency requires a little practice: thin enough to spread effortlessly, but thick enough to set firmly and be opaque. Don’t be discouraged if it takes a few tries!
A Quick Royal Icing Tutorial:
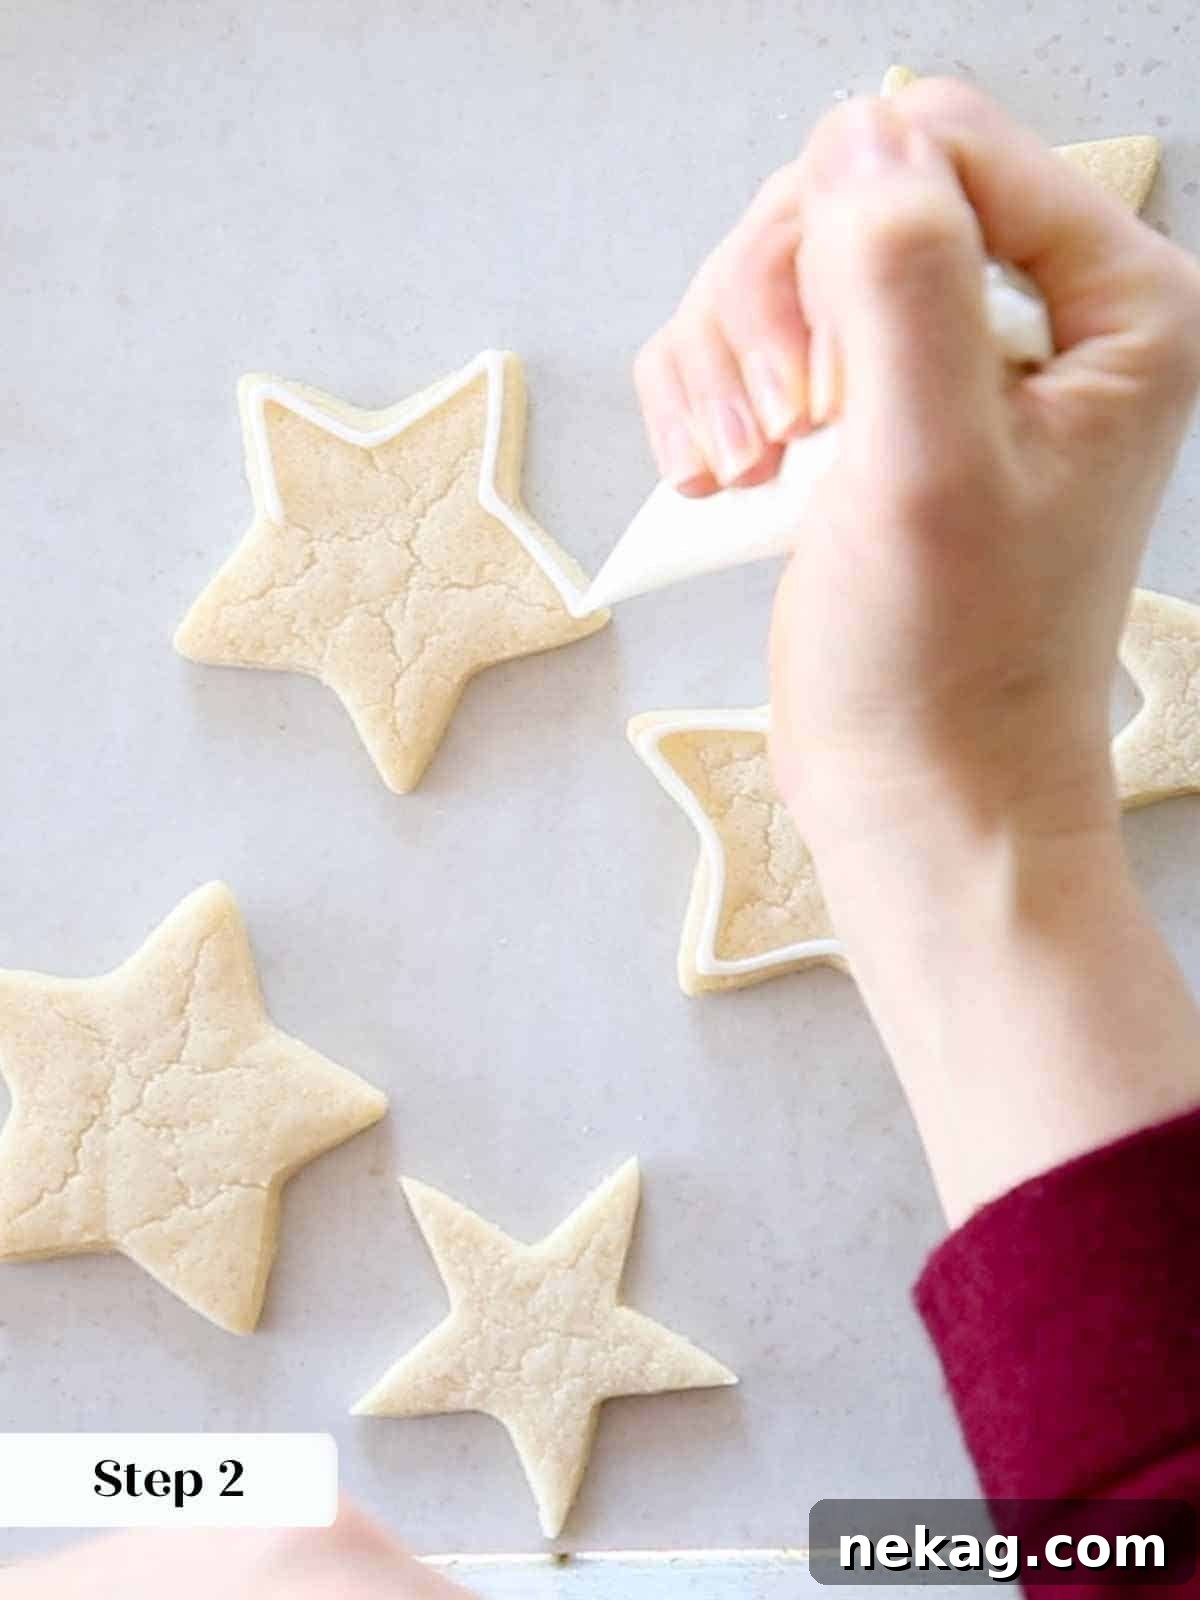
- Prepare Piping Bags: Transfer your outline icing and flooding icing into separate piping bags. Begin by cutting a very small tip off the outline piping bag—smaller than you think you need. Test a line on a piece of parchment paper. If the line squiggles or breaks, cut the opening just a tiny bit larger. Repeat this process until you achieve a thin, straight, consistent line. Do the same for the flooding bag, but cut the opening larger to allow a nice, steady flow of icing without excessive squeezing.
- Outline Your Cookies: Work with 1-3 cookies at a time. Using the outline bag, carefully trace the desired border on each cookie. Remember to leave a tiny 1/16th-inch gap from the very edge of the cookie; this prevents the icing from potentially running off the side.
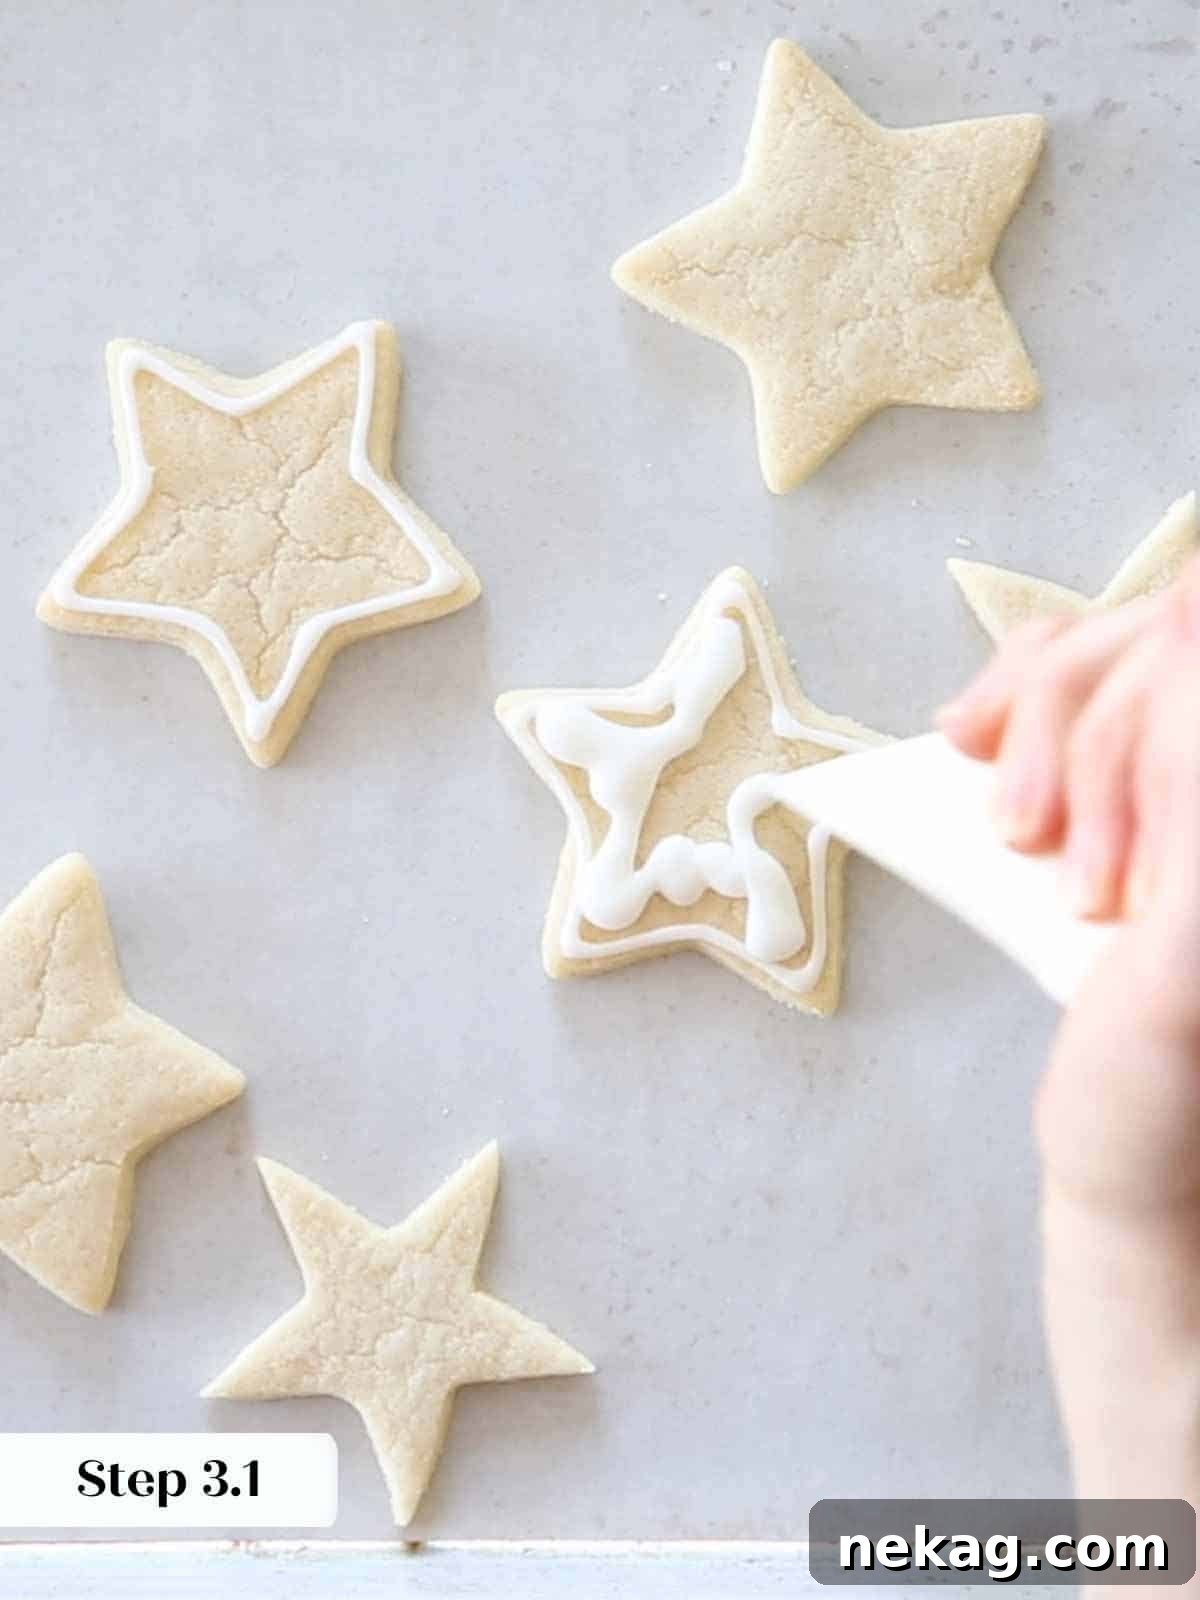
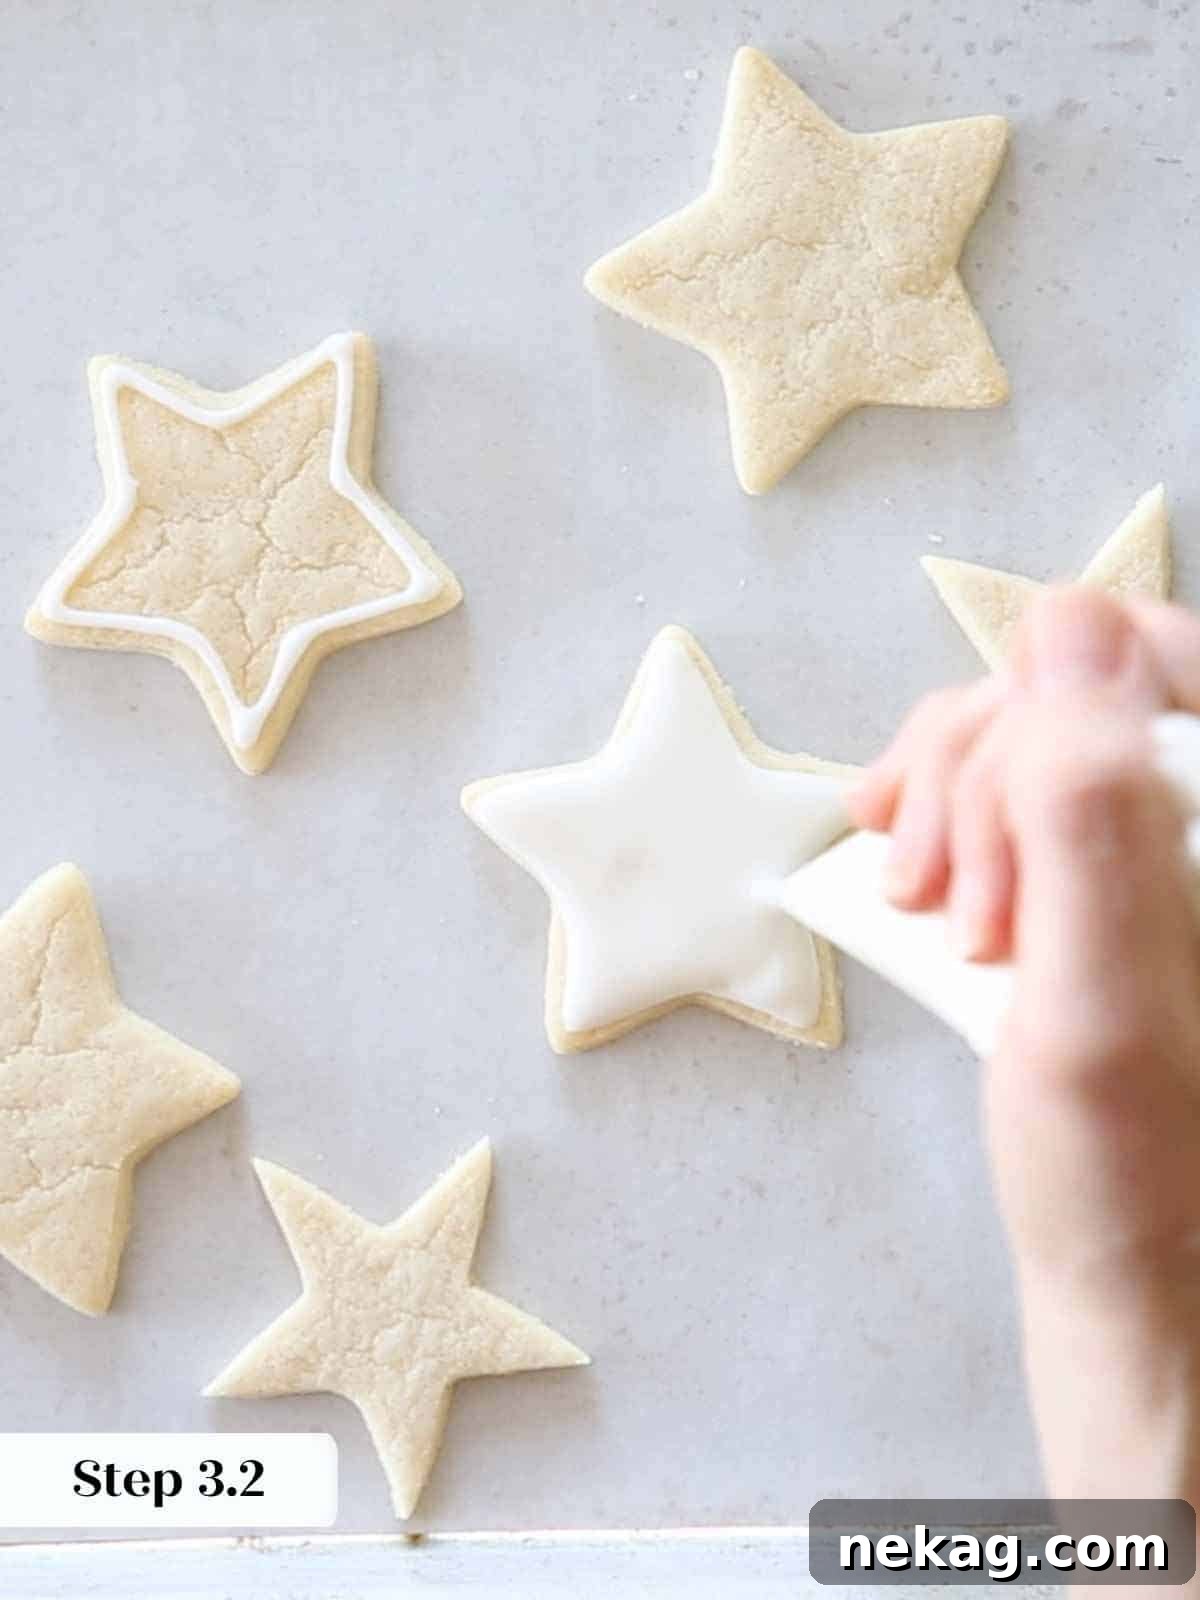
- Flood the Interior: Immediately switch to your flooding bag. Squeeze a zigzag or squiggle of flooding icing inside the outlined border, covering the cookie’s surface. Use a clean cake tester, a wooden skewer, or even the tip of your flooding piping bag to gently spread the icing around, ensuring it fills the outlined area in one smooth, even layer. The goal is an opaque coverage where you cannot see the cookie beneath the icing, but it shouldn’t be so thick that it spills over your outline. Ideally, the outline should seamlessly blend with the flood. If you notice a visible line, try outlining fewer cookies before flooding the next time, allowing less time for the outline to set.
Pro Tip for Spreading Icing: One of the advantages of using the piping bag tip to spread your flooding icing is the ability to easily add more icing as you go, ensuring full and even coverage without needing to switch tools.
- Layering Decorations (Allow Drying Time): Patience is key when layering royal icing. If you plan to add details like buttons on a Santa’s coat or different colored sections side-by-side (e.g., Santa’s red cap and white trim), allow each layer of icing to set for at least 30 minutes before applying the next. If you apply a wet layer over another wet layer, the colors will sink into each other and won’t create crisp, defined lines.
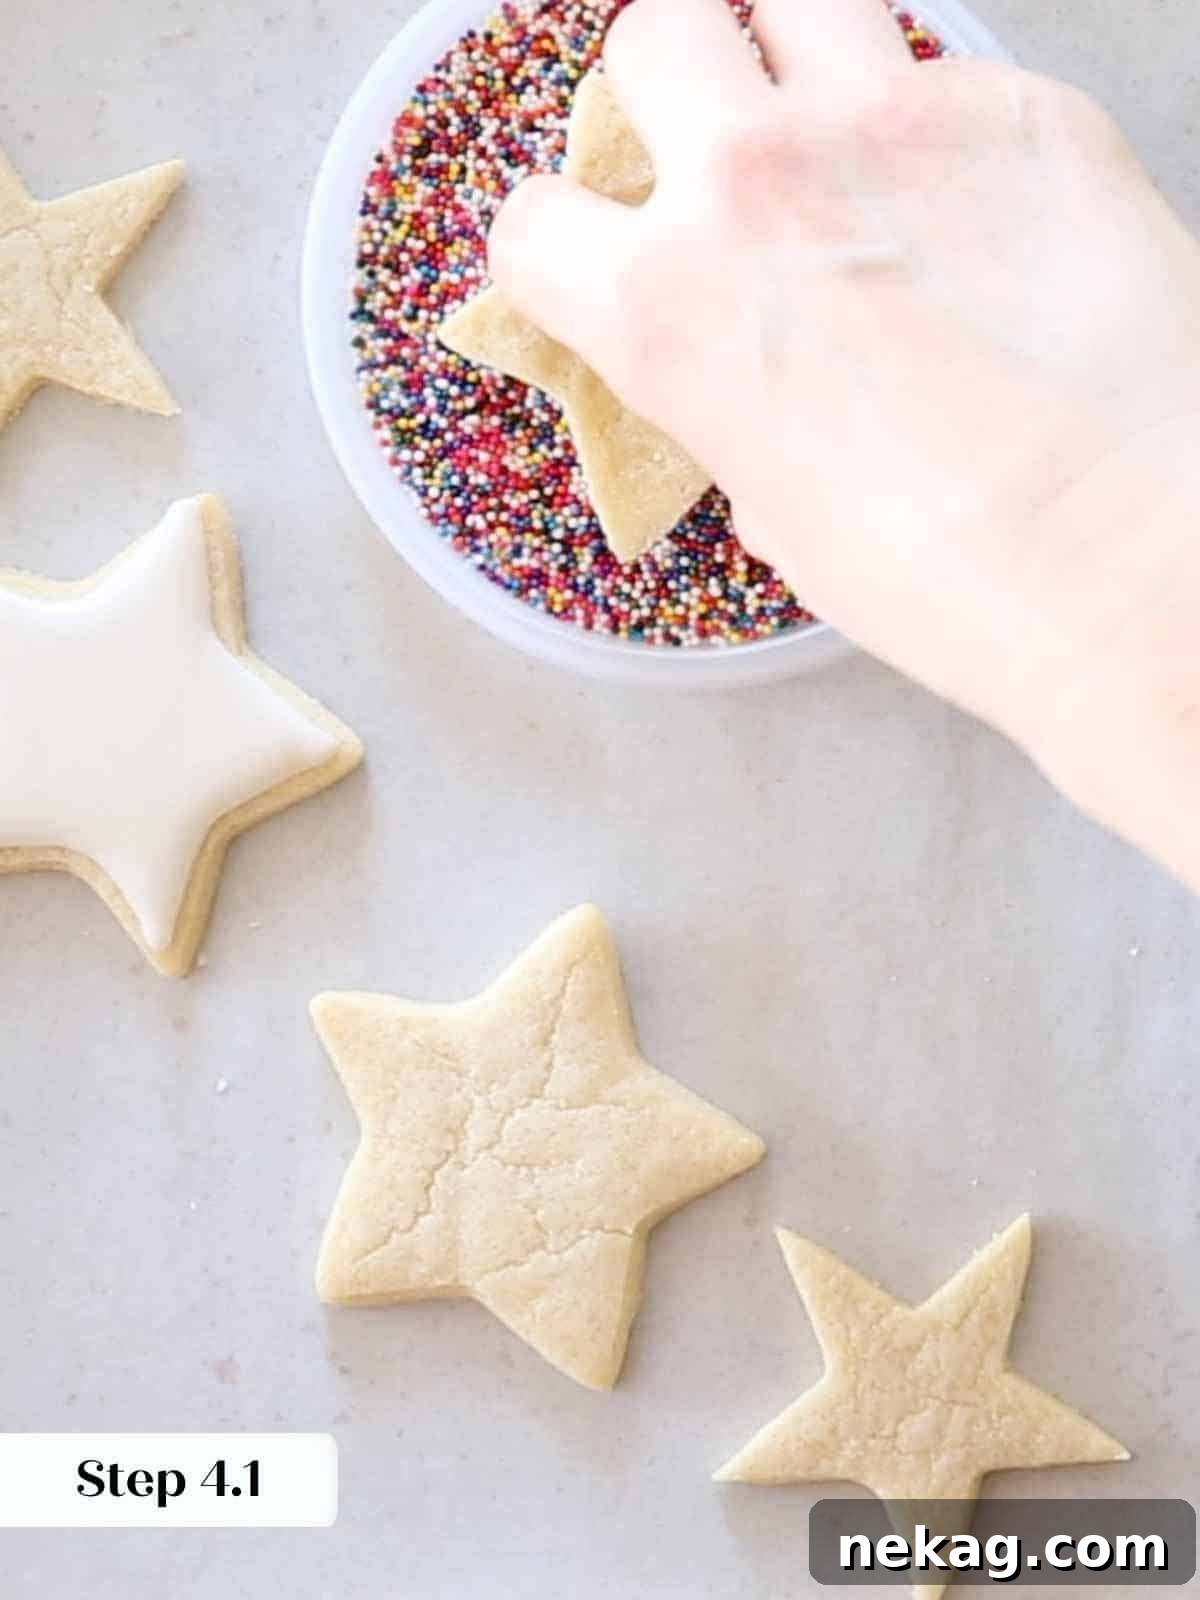
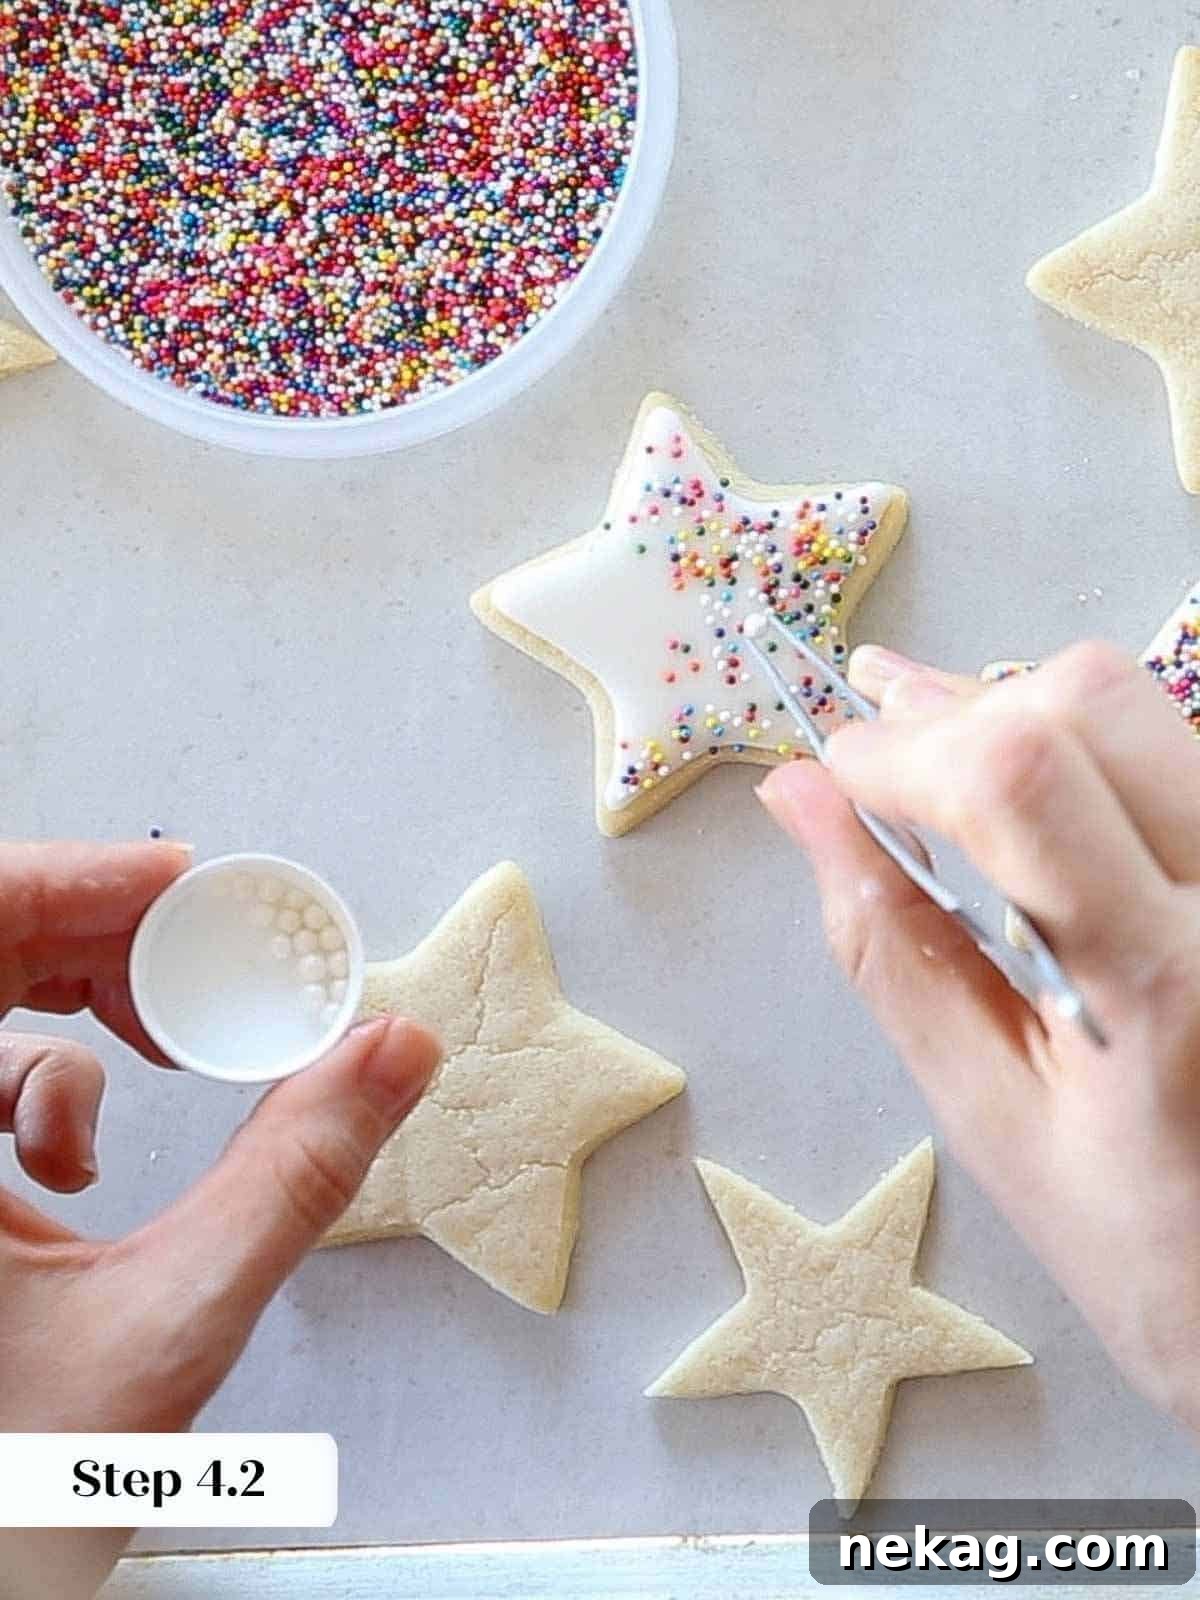
- Adding Sprinkles and Embellishments: To cover an entire cookie with sprinkles or jimmies, flood the cookie as described, then immediately, after about 3 minutes (the time it takes to flood 2-3 outlined cookies), gently but confidently dip the entire cookie into your bowl of sprinkles. Flip it quickly to coat, then flip it back upright before the icing has a chance to set too much or run. Alternatively, you can sprinkle jimmies or add other decorative elements like sugar pearls or gold balls by hand. I often use tweezers for precise placement, but feel free to apply them in whatever way works best for you!

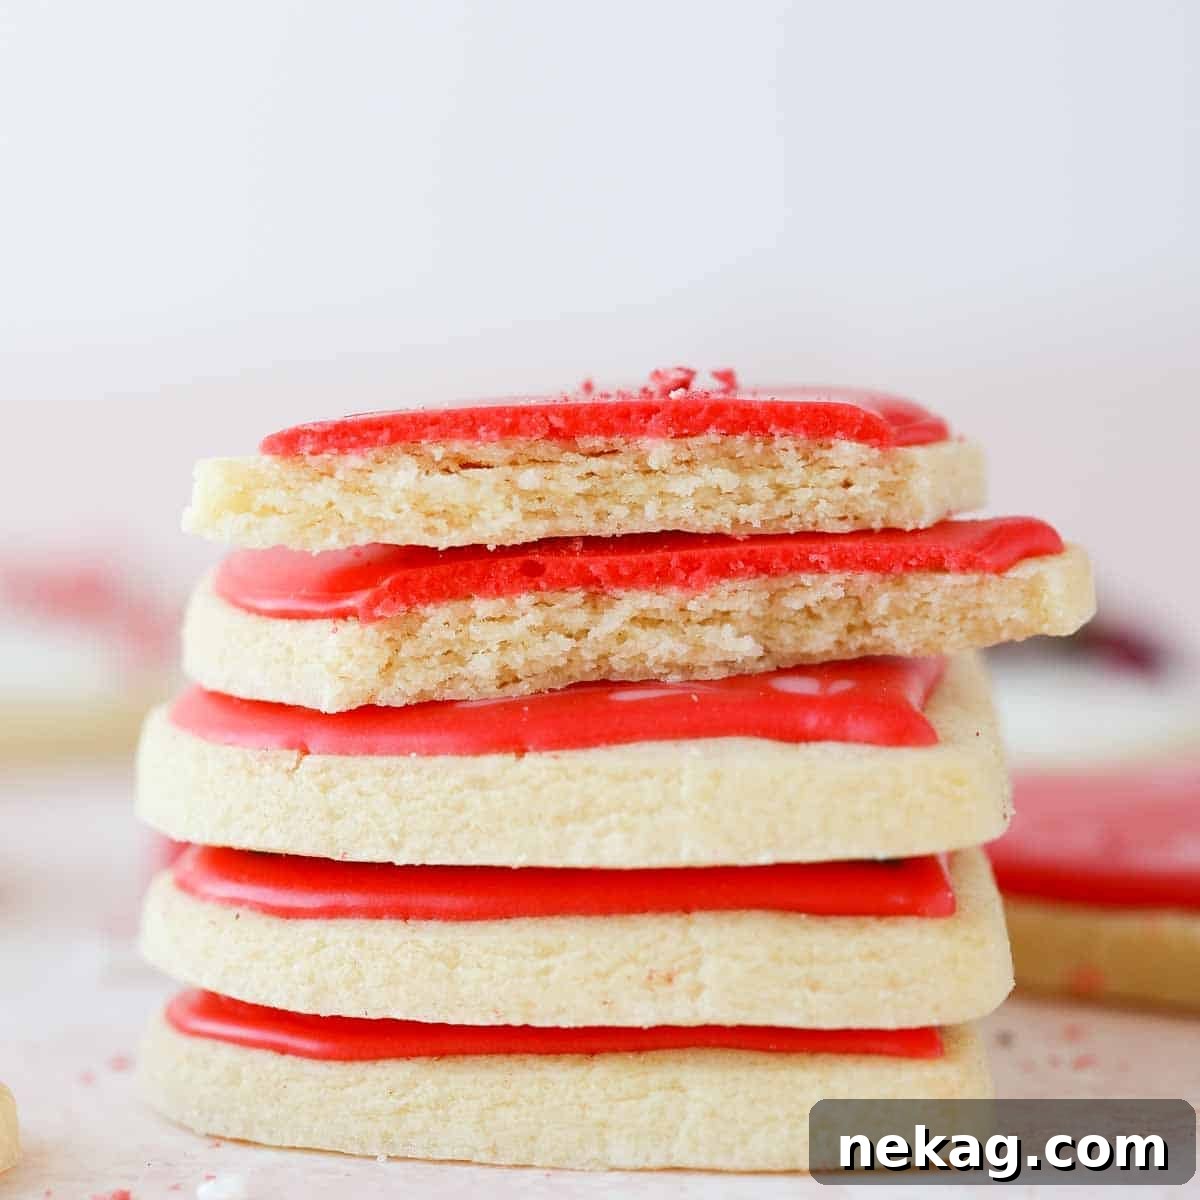
Important Note on Royal Icing Drying: Royal icing requires time to dry properly. For best results, allow decorated cookies to dry uncovered at room temperature overnight, or for a minimum of 3 hours before attempting to wrap them. Never let plastic wrap or any covering touch the surface of the iced cookies during this drying phase. It is also crucial to avoid refrigerating or freezing royal-iced cookies. The moisture from cold environments will be absorbed by the icing, causing it to soften, lose its crispness, and potentially bleed colors. You’ve worked too hard for that to happen!
Recipe FAQs: Your Questions Answered About Soft Sugar Cookies
Store your beautiful soft sugar cookies decorated with royal icing at room temperature in an airtight container for up to 10 days. For optimal results, ensure the icing has fully set for 24 hours before stacking them. If you need to wrap them individually or in layers, allow the icing to dry for at least 3 hours before plastic wrap lightly touches the surface. Avoid refrigeration or freezing, as the moisture can ruin the icing’s texture and appearance.
Absolutely! These sugar cookies bake wonderfully from frozen dough. There’s no need to adjust your oven temperature, but you may need to add an additional 1-2 minutes to the baking time, depending on the size and thickness of your cookies. Baking from frozen is a fantastic way to enjoy freshly baked cookies with minimal fuss.
This recipe is incredibly versatile for make-ahead preparations, allowing you to easily break down the process into several steps. You can prepare the dough (either rolled or unrolled), wrap it tightly, and freeze it before cutting. Even better, you can proceed through the cutting step, then freeze the cut cookies between two layers of parchment paper. When you’re ready to bake, simply transfer them directly from the freezer to the oven!
I have successfully scaled this recipe to make very large batches, even using an 80-quart stand mixer! For larger quantities, you may find it helpful to add a small amount of milk (a tablespoon or two at a time) to help the dough come together more easily in the mixer, reducing the need for extensive hand-mixing. When making large batches, always weigh your ingredients for precision, as even a slight excess of flour might not incorporate correctly and can significantly impact the final texture.
These soft sugar cookies are absolutely excellent for shipping, making them the perfect edible gift! When properly iced, they remain delicious for up to 10 days. Their firm yet tender texture allows them to stack nicely without crumbling, and they are generally not too fragile for travel. For an extra special gift package, consider adding the best snickerdoodle cookies to your box, as they also ship exceptionally well!
More Delicious Cookie Recipes You’ll Love
If you’re a fan of these delightful soft sugar cookies, you’ll be thrilled to explore more of our expertly crafted cookie recipes. Expand your baking horizons with these highly recommended treats:
Cookie Recipes
Cinnamon Sugar Cookies: A Warm, Spiced Delight
Experience the comforting warmth of cinnamon in these perfectly balanced sugar cookies, offering a delightful twist on a classic favorite.
Cookie Recipes
Chewy Molasses Cookies: A Timeless Holiday Treat
Indulge in the rich, deep flavors of these old-fashioned chewy molasses cookies, a quintessential part of any holiday spread.
Cookie Recipes
Chai Sugar Cookies: An Aromatic and Chewy Experience
Explore the exotic spices of chai blended into a soft, chewy sugar cookie, offering a unique and comforting flavor profile.
Cookie Recipes
Funfetti Cookies: Celebrate with Colorful Chewy Goodness
Bring joy to any celebration with these vibrant funfetti cookies, packed with sprinkles and a wonderfully chewy interior.
If you tried this recipe and loved it, please leave a 🌟 star rating and let me know how it goes in the comments below. I love hearing from you; your comments make my day!

4.84 from 54 ratings
Soft Cut-Out Sugar Cookies
Chef Lindsey
15
8
30
23
40 Cookies
Comment
Print Recipe
Ingredients
For the Cookies:
- 2 ½ cups all-purpose flour *see note
- ½ teaspoon baking powder
- ½ teaspoon kosher salt
- ½ cup melted unsalted butter
- 1 cup granulated sugar
- 1 large whole egg
- 2 teaspoons vanilla extract
For Royal Icing:
- 1 box powdered sugar (1 lb / 454g)
- 6 ½ tablespoons fresh lemon juice (from approximately 2 medium lemons, 85g)
- ¼ cup dried egg whites or meringue powder (22g)
- Milk as needed (approximately 20g, for thinning)
For a simple cookie icing (optional):
- 3/4 cup powdered sugar
- 1/4 teaspoon vanilla extract
- 3-5 teaspoons milk
Instructions
Make the cookie dough:
- In a large bowl, whisk together flour, baking powder, and kosher salt. Set aside.
- In another large bowl, melt the butter (I used the microwave) just until melted but not hot. Whisk in the sugar followed by the egg and vanilla. Whisk vigorously until the mixture is emulsified. You shouldn’t see any streaks of butter or egg.
- Slowly stir in the flour mixture.
- It does look like a dry dough, so I like to finish by hand, squeezing the dough together. This incorporates the flour faster without developing too much gluten.
- Roll your dough while it is at room temperature. Roll the dough to approximately ¼ inch. You will have the best results if rolled between two pieces of parchment, but you can also roll out on a lightly floured surface.
- Refrigerate the dough until chilled. This will only take 30 minutes, but I like to give it a full 2 hours or overnight to let the gluten relax.
Cut & bake cookies:
- When you are ready to bake, preheat your oven to 325° F convection or 350° F conventional, and line two baking sheets with parchment paper.
- Unstick the parchment from both sides of the dough, then cut shapes with a lightly floured cookie cutter. Chill the cookies before baking. It will only take about 20 minutes.
- Bake in preheated oven for 7-9 minutes or until the cookies look matte in the center and have a few small cracks. Some of the edges might have begun to brown. I bake all the same shapes on one sheet to ensure even baking.
- Cool completely before icing.
Make Royal Icing:
- In a large bowl or in the bowl of a stand mixer fitted with the whisk attachment, combine the dried egg whites and lemon juice. Whisk until soft peaks form.
- Add all the powdered sugar and whisk to combine.
- Separate the icing into different bowls and add food dye. Be sure to keep an eye on the consistency and stop adding if it gets too thin.
- For outlining using the ribbon test. The icing should cascade slowly off your spatula and remaining clearly visible on the surface for a few moments (about 5-6 seconds) before slowly disappearing.
- For flooding using the same ribbon test, the icing should cascade off your spatula and almost disappear instantly into the rest of the icing.
For the simple cookie icing (optional):
- Simply whisk all the ingredients together, adding a little milk at a time until it flows from the whisk but briefly holds a line on top of the icing in the bowl.
Video
Notes
*Volume conversion rounds up to 2 ½ cups, but flour must be fluffed and not compressed for accurate measurement.
Yield – This recipe makes approximately 40, 2-inch cookies when rolled ¼ inch thick.
Technique – The process involves making the cookie dough, rolling it between parchment, chilling, cutting shapes, baking, and finally, decorating cooled cookies with royal icing.
Variations – Get creative with your cookies! Try incorporating lemon or orange zest into the sugar for a bright citrus note, experiment with different extracts like almond or peppermint, or add small mix-ins such as mini chocolate chips or sprinkles directly into the dough.
Storage – Store iced soft sugar cookies at room temperature for up to 10 days in an airtight container. Allow the royal icing to set completely for 24 hours before stacking. If wrapping with plastic wrap, ensure the icing has dried for at least 3 hours and the plastic does not touch the cookie surface. Avoid refrigerating or freezing iced cookies, as moisture can soften and cause the icing to bleed.
The 2014 Original Recipe – For those seeking the original version, add an additional ½ teaspoon of baking powder to the dry ingredients. During Step 3 (integrating the flour mixture), incorporate ½ cup of buttermilk by alternating additions with the dry ingredients, beginning and ending with flour. Regular milk can be used as a substitute for buttermilk. This version requires the dough to be chilled before rolling. Generously flour your workbench before rolling and cutting the dough.
Nutrition
Carbohydrates: 23g |
Protein: 2g |
Fat: 3g |
Saturated Fat: 2g |
Polyunsaturated Fat: 0.1g |
Monounsaturated Fat: 1g |
Trans Fat: 0.1g |
Cholesterol: 10mg |
Sodium: 74mg |
Potassium: 30mg |
Fiber: 0.2g |
Sugar: 16g |
Vitamin A: 77IU |
Vitamin C: 1mg |
Calcium: 7mg |
Iron: 0.4mg
Dessert
American
121
Like this? Leave a comment below!
Before You Go: Final Thoughts and More Inspiration
I genuinely hope you enjoyed baking and decorating with this professional chef-tested soft sugar cookie recipe. My aim is always to provide reliable, delicious recipes that make your time in the kitchen enjoyable and rewarding. These cookies are truly a labor of love, designed to bring joy to both the baker and everyone who gets to savor them.
Whether you’re making them for a special holiday, a birthday, or just a treat for yourself, the simple elegance and delicious flavor of these cut-out sugar cookies are sure to impress. Don’t forget to share your creations and any tips you discover in the comments section below—I always love hearing from my fellow bakers!
Ready to explore more delightful baking adventures? Be sure to check out our other incredible cookie recipes. For a festive treat that’s equally fun to make, try our classic spritz cookie recipe. Happy baking!