
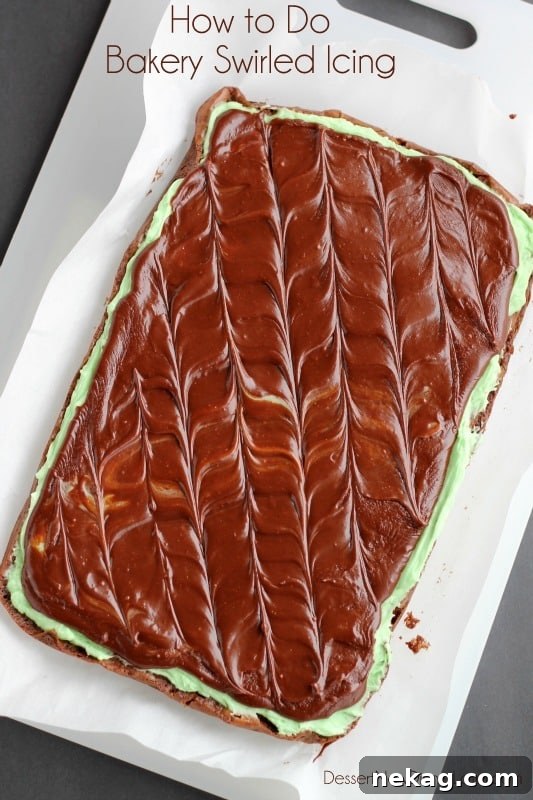
Elevate your homemade baked goods to professional bakery standards with a deceptively simple yet stunning decorating technique: bakery swirled frosting. All you need is an offset spatula and a little know-how to transform ordinary sheet cakes, decadent dessert bars, and fudgy brownies into eye-catching masterpieces. This easy method promises a sophisticated finish that looks far more intricate than it actually is, making it perfect for both novice bakers and seasoned pros looking for a quick, elegant touch.
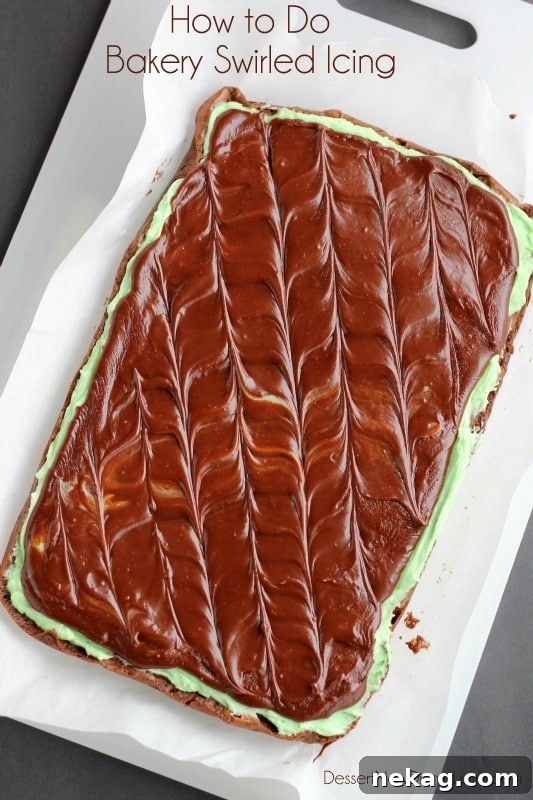
For years, I’ve cherished this decorating secret, honed during my time as a culinary graduate interning in bustling bakeries. It was a consistent method we employed for everything from large sheet cakes destined for celebrations to trays of rich brownies. The technique, seemingly complex to the untrained eye, always garnered compliments and inquiries about its execution. Its simplicity yet undeniable elegance made it a go-to. This tutorial is designed to demystify the process, empowering you to replicate that coveted bakery look right in your own kitchen. Prepare to impress your friends and family with beautifully adorned desserts, all thanks to this straightforward, fancy swirled frosting pattern.
Master the Art of Bakery Swirled Frosting: An Easy Decorating Tutorial
Are you ready to give your baked creations that sought-after professional touch? The bakery swirled frosting technique is a timeless method that elevates the visual appeal of any dessert. Forget complicated piping bags and intricate tips; this method relies on the humble offset spatula and a few strategic movements to achieve a textured, artisanal finish. Whether you’re decorating for a special occasion or simply want to add a touch of flair to your everyday treats, learning this skill will quickly become your favorite way to frost.
Why Choose Bakery Swirled Frosting?
Beyond its aesthetic appeal, there are several practical reasons why this swirled frosting technique is a baker’s best friend:
- Effortless Elegance: It creates a professional, handcrafted look with minimal effort, making your desserts appear expertly finished.
- Hides Imperfections: The textured surface is excellent at camouflaging any minor bumps or uneven spots on your cake or brownie layers.
- Adds Visual Interest: The ripples and swirls catch the light beautifully, adding depth and dimension to an otherwise flat surface.
- Versatility: It works wonderfully on a wide range of smooth frostings and bases, from dense fudgy brownies to light, airy sheet cakes and even various dessert dips.
- Time-Saving: Once mastered, this technique is incredibly fast, allowing you to decorate large batches of desserts efficiently.
Essential Tools for Achieving the Perfect Swirl
While the technique itself is simple, having the right tools makes all the difference in achieving that flawless bakery swirl. Fortunately, you likely already own most of these or can easily acquire them:
- Offset Spatula: This is your primary tool. An offset spatula (sometimes called a palette knife) has a blade that is “offset” or bent slightly below the handle. This design keeps your knuckles clear of the frosting and allows for smoother, more even application and spreading. A medium-sized offset spatula (around 6-8 inches) is ideal for most sheet cakes and brownies.
- Butter Knife or Thin Spatula: For creating the distinctive ripple effect in the second step, a standard butter knife or the very tip of your offset spatula works perfectly. Some prefer the sharp edge of a butter knife for crisper lines, while others find the spatula tip easier to control.
- Your Chosen Frosting: The success of this technique heavily relies on the right frosting consistency. We’ll delve into this more below, but generally, a smooth, spreadable frosting like buttercream, cream cheese frosting, ganache, or even certain dessert spreads will yield the best results.
- The Dessert Base: Ensure your sheet cake, brownies, or dessert bars are completely cooled before you begin frosting. A warm base will melt your frosting and make the swirling process messy and ineffective.
Preparing Your Dessert and Frosting for Swirling Success
Before you even pick up your spatula, a little preparation goes a long way in ensuring a smooth and beautiful swirled finish.
- Chill Your Dessert: Your cake or brownies must be completely cool, preferably even slightly chilled. A warm surface will cause your frosting to melt, slide, and refuse to hold its shape, making the swirling process impossible. If you’ve just baked, allow ample time for cooling, or even place the dessert in the refrigerator for 20-30 minutes once it’s cool enough not to cause condensation.
- Achieve Optimal Frosting Consistency: This is arguably the most crucial step. Your frosting should be smooth, spreadable, but not too stiff and definitely not too runny.
- Too Stiff: If your frosting is too firm, it will tear the cake or brownie, create crumbly textures, and be difficult to spread evenly. You might need to add a tiny amount of milk, cream, or water (half a teaspoon at a time) and mix well until it loosens slightly.
- Too Runny/Wet: If your frosting is too thin, it won’t hold the zig-zag pattern or the subsequent swirls. It will simply flatten out. This is a common issue if the frosting is too warm. You can try chilling the frosting for 10-15 minutes, or if it’s genuinely too thin, add a tablespoon of powdered sugar (for buttercream/cream cheese frosting) or a bit more butter and beat it in.
- Ideal Consistency: It should be like a thick, creamy peanut butter – easily spreadable but firm enough to hold its shape when you lift the spatula.
- Consider a Crumb Coat (Optional but Recommended for Cakes): For cakes, a thin layer of frosting applied first (the crumb coat) and then chilled can seal in any loose crumbs. This prevents them from mixing into your final decorative layer, ensuring a clean finish for your beautiful swirls. For brownies or denser bars, a crumb coat is usually not necessary.
Step-by-Step Guide: How to Create Bakery Swirled Frosting
Now that your dessert and frosting are perfectly prepped, let’s dive into the two simple steps that will transform your baked goods.
Step 1: The Zig-Zag Base Layer
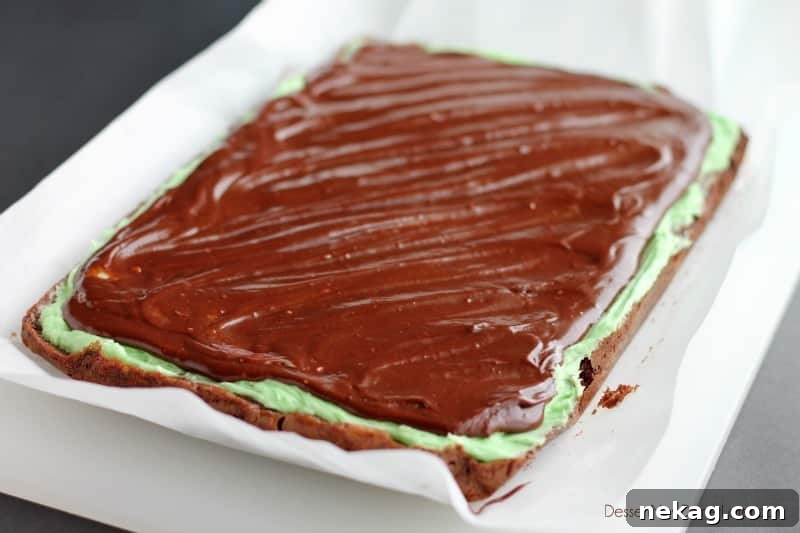
This initial layer sets the foundation for your elegant swirls. The key here is an even, continuous application of frosting.
- Load Your Spatula: Dollop a generous amount of your prepared frosting onto one corner of your sheet cake, brownies, or dessert bars. You want enough frosting so that you won’t run out during the zig-zag motion.
- Initiate the Zig-Zag: Place the edge of your offset spatula into the frosting at one corner (e.g., top left). With gentle, even pressure, drag the spatula in a straight line towards the opposite corner (bottom right).
- Maintain Contact: Crucially, once you start this zig-zag motion, **do not lift your spatula off the surface** until you reach the opposing corner. This continuous contact is vital for creating the distinct zig-zag pattern without gaps or interruptions.
- Full Width Coverage: Ensure your zig-zag covers the full width of the sheet cake or brownie as you move. As you drag the spatula, the frosting will naturally spread into a thick line.
- Back and Forth: Once you reach the bottom right corner, immediately change direction and drag the spatula back across the width of the dessert, moving upwards towards the top right corner. Continue this zig-zag motion, going from one side to the other, creating parallel zig-zag lines of frosting until the entire surface is covered. The lines should be relatively close together, creating a thick, corrugated-like layer of frosting. The aim is to have a consistent, slightly wavy surface of frosting covering the entire dessert.
Step 2: Crafting the Swirls and Ripples
Now for the magical part – transforming your zig-zags into elegant swirls and ripples. This is where the bakery “wow” factor comes in.
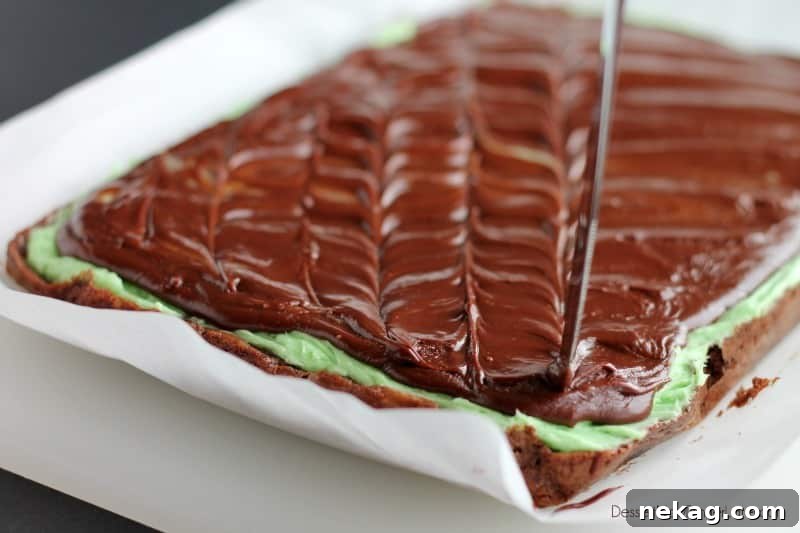
- Choose Your Tool: You can use the very tip of your offset spatula or, for a slightly sharper line, a butter knife. Hold your chosen tool firmly but comfortably.
- Start at One Edge: Begin at one edge of your frosted dessert, placing the tip of your spatula or knife gently into the frosting.
- Drag and Alternate Directions:
- Drag your tool in a straight line from top to bottom (or left to right, depending on your preferred orientation) through the zig-zag pattern you’ve created. This creates a distinct line, disturbing the peaks and valleys of the zig-zags.
- Lift your tool, move it over about 1 inch (or your desired spacing) from your first line, and then drag it back in the opposite direction (bottom to top, or right to left).
- Continue this process across the entire surface of the dessert, always switching directions with each new line you create. One line goes down, the next goes up, the next goes down, and so on. This alternating direction is key to achieving the beautiful rippled, marbled effect.
- Consistent Spacing and Pressure: Aim for consistent spacing between your lines. I typically find that lines approximately 1-inch apart yield a lovely visual effect, but feel free to experiment with closer or wider spacing to suit your aesthetic. Maintain light, even pressure to avoid digging too deep into the cake. The goal is to gently disturb the frosting, not scrape it off.
- Observe the Transformation: As you drag and switch directions, you’ll see the distinct rippled or marbled pattern emerge. The alternating motion pulls the frosting in different directions, creating those lovely waves and swirls that are characteristic of bakery-style finishes.
- Cover the Entire Surface: Continue until you have created these swirling lines across the entire sheet cake, brownies, or dessert bars.
Expert Tips for Perfect Swirled Icing Every Time
Achieving consistently beautiful swirled frosting becomes easier with practice, but these expert tips can help you avoid common pitfalls and ensure stunning results:
- Frosting Temperature is Key: As mentioned, consistency is paramount. If your kitchen is warm, your frosting might soften quickly. If this happens, pop your bowl of frosting (or even the dessert itself briefly) into the refrigerator for 5-10 minutes to firm it up slightly. Conversely, if it’s too stiff from being cold, let it sit at room temperature for a bit, or gently beat it with a paddle attachment on a stand mixer to soften.
- Clean Your Spatula: Especially during Step 2, if frosting starts to build up excessively on your spatula or butter knife, wipe it clean with a paper towel. A clean edge ensures crisper, more defined lines for your swirls.
- Practice Makes Perfect: Don’t be discouraged if your first attempt isn’t flawless. Try practicing on a piece of parchment paper or a plate to get a feel for the pressure and motion before tackling your main dessert.
- Work Quickly but Deliberately: Once you start frosting, work efficiently but without rushing. This prevents the frosting from setting too much before you complete your swirls.
- Troubleshooting – If Frosting Tears: If your spatula is tearing the cake or pulling up crumbs during the zig-zag, your frosting might be too stiff, or your pressure too heavy. Adjust accordingly. If your swirls aren’t smooth, your frosting might be too thin or you’re applying uneven pressure.
- Allow Frosting to Set Before Slicing: If your icing is wet, warm, or particularly drippy, wait until it hardens slightly before attempting to slice your dessert. Chilling the frosted dessert in the refrigerator for 20-30 minutes will help firm up the frosting, resulting in cleaner cuts and less mess.
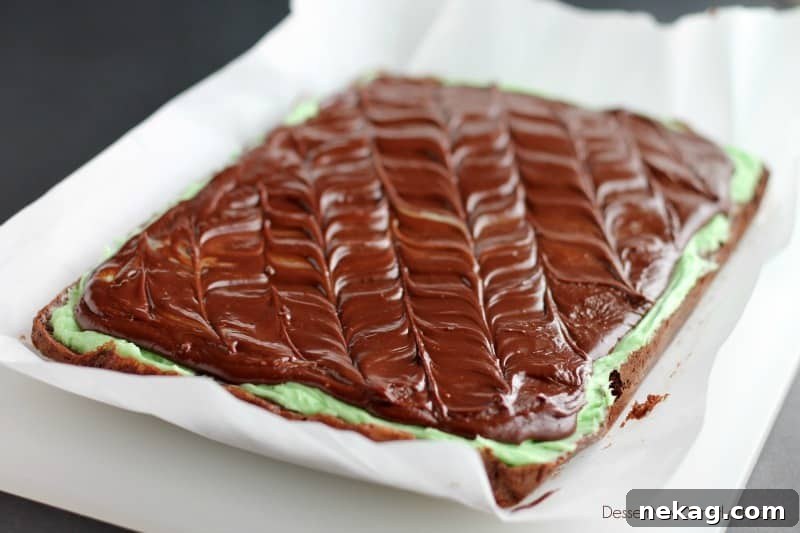
Beyond Sheet Cakes: Versatility of the Swirl Technique
The beauty of this design lies in its adaptability. You can use this impressive swirled finish for any smooth frosting, icing, spread, or even some dips that you want to make look exceptionally fancy. Its versatility makes it a fantastic technique to have in your decorating arsenal, applicable to more than just the traditional sheet cake or brownie.
- Cupcakes: Instead of piping, try a single, large swirl on top of each cupcake for a unique, artisanal look.
- Cookies: For larger, flatter cookies, this swirl can add a delightful texture to your royal icing or glaze.
- Tarts: A smooth fruit tart topping or ganache can be beautifully swirled before chilling.
- Dessert Dips: Present your dessert dips, like a creamy fruit dip, with a swirled top for an inviting and elegant presentation.
Here are some delicious recipes where this swirled frosting technique would shine:
- Mint Brownies
- Peanut Butter Fingers
- Coconut Cream Fruit Dip
- Eclair Icebox Cake
- Scotcharoos
Frequently Asked Questions (FAQs) About Bakery Swirled Frosting
- Q: What types of frosting work best for this technique?
- A: Smooth, stable frostings like American buttercream, cream cheese frosting, chocolate ganache (cooled to a spreadable consistency), and even some thicker glazes are ideal. Avoid very thin glazes or extremely stiff frostings.
- Q: Can I use a regular knife instead of an offset spatula?
- A: For the zig-zag base (Step 1), an offset spatula is highly recommended for its ergonomic design, which prevents your knuckles from dragging in the frosting. For the swirling lines (Step 2), a regular butter knife or the tip of a smaller offset spatula works well.
- Q: My swirls aren’t clean, what am I doing wrong?
- A: Several factors could be at play:
- Frosting consistency: If it’s too soft, the lines will merge. If it’s too stiff, it might tear.
- Pressure: Too much pressure can dig into the cake. Too little might not create enough definition.
- Cleanliness: Wipe your spatula or knife clean after every few lines if frosting builds up.
- Speed: Work at a steady pace. Rushing can lead to uneven lines.
- Q: How do I store desserts decorated with swirled frosting?
- A: Store them as you would any frosted dessert. Most frosted cakes and brownies do well covered at room temperature for a day or two, or refrigerated for up to a week. If refrigerating, allow them to come closer to room temperature before serving for the best texture and flavor.
Conclusion: Your New Favorite Decorating Trick
And there you have it! The secret to achieving that professional, bakery-style swirled frosting is now yours. This simple, two-step technique transforms ordinary desserts into extraordinary showpieces, proving that you don’t need complex tools or advanced skills to create stunning results. From humble brownies to elegant sheet cakes, this method adds a beautiful texture and a touch of artisanal flair that will surely impress. So grab your offset spatula, prepare your favorite frosting, and get ready to swirl your way to perfectly decorated treats. Enjoy the process, and most importantly, enjoy the delicious, beautiful desserts you create!