


Happy Valentine’s Day! I hope you have someone special to share the day with—a partner, a close friend, or family. One of my friends asked me to make high-heel sugar cookies for an event she was organizing. Even though I’m not a fan of cut-out sugar cookies (I’ve explained why on my blog), I agreed. I also wanted to try royal icing again after several months away. To my surprise, these cookies turned out better than I expected. The dough was easy to work with, re-rolled nicely, and produced soft cookies that hold their shape—an ideal base for decorating. I used a slightly different royal icing recipe this time, which yielded a lot of icing. Next time I’ll likely halve the recipe, even if I’m decorating many cookies.

If you want a soft sugar cookie that still keeps its cut-out shape, this sour cream recipe is a great choice. The royal icing was straightforward to prepare, though I’m still experimenting with thinning it to get the different consistencies needed for piping and flooding. I plan to try clear squeeze bottles next time instead of pastry bags; they should make filling and controlling the icing easier and keep it from leaking out the top of the bag. But enough planning—check out the shoe cookies! By the last tray I found a rhythm and sped up, and now I can share tips that should help you have success decorating your own.

Cut-Out Sour Cream Sugar Cookies
Pin
Rate
SaveSaved!
Ingredients
- 5 ½ cups (660 g) all-purpose flour, (stir, spoon & level)
- 1 tsp baking soda
- ½ tsp salt
- 1 cup (226 g) butter, softened
- 2 cups (400 g) granulated sugar
- 1 cup (240 g) sour cream
- 2 large eggs
- 2 tsp vanilla extract
Instructions
-
In a large bowl, whisk together the flour, baking soda, and salt. Set aside.
-
Cream the butter and sugar until light and fluffy. Add the sour cream, eggs, and vanilla, mixing until combined. Scrape the bowl as needed.
-
Gradually add the flour mixture until incorporated. Divide the dough in half, place each half on plastic wrap, flatten, wrap tightly, and refrigerate until chilled, 1–2 hours. The dough can be refrigerated up to 3 days or frozen up to 1 month at this point.
-
Preheat the oven to 350°F. Line baking sheets with parchment paper and set aside.
-
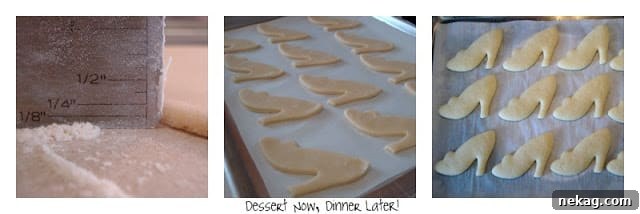
Generously flour your work surface and rolling pin. Unwrap one chilled piece of dough, place it on the floured surface, and sprinkle extra flour on top. Roll from the center to about 1/4″ thickness, adding flour as needed to prevent sticking. Dip the cookie cutter in flour and cut shapes, transferring them to the prepared baking sheets.
-
Bake 8–10 minutes until just set but before the bottoms brown. Do NOT over-bake if you want soft cookies. Cool completely on a wire rack. Cooled, unfrosted cookies can be stored in a sealed container at room temperature for up to 3 days or frozen for up to 2 weeks.
Notes
- 1 cup water
- 6 Tbsp meringue powder
- ½ tsp vanilla extract (use clear vanilla for a bright white icing)
- 1 (2 lb) bag powdered sugar
- In a stand mixer with the paddle attachment, combine the water and meringue powder until slightly foamy.
- Add the vanilla extract and mix briefly.
- Add the powdered sugar and mix on low until incorporated, then increase speed and mix until the icing is smooth, glossy, and forms peaks.
- Divide, thin, and color the icing as needed for piping and flooding.
NOTE: Halve this royal icing recipe if you are decorating the cookie batch above; it makes a large amount.
Sharing this recipe with a link is encouraged. Copying full recipes or screenshots to social media without proper credit is prohibited. Content and photographs are copyright protected.
Did you make this?
Don’t forget to leave a rating below and follow for more recipes and decorating ideas.
Recipe from The Yummy Life & re-written in my own words.
Royal Icing

*Use the icing as-is for piping, details, and writing.
**Divide icing into bowls for each color. Cover unused bowls with a damp towel to prevent crusting. Mix in gel color until you reach the desired shade.
***Thin icing one teaspoon of water at a time until you reach the consistency you need for flooding or outline.
****Store unused icing in clear pastry bags sealed with a rubber band, or in squeeze bottles to keep tips from drying out. Place bags upright in a cup with a damp paper towel to keep the tip moist when not in use.
Have fun decorating!

- For the shoe cookies I used a Wilton #3 tip for the white, pink, and purple details. I thinned the pink and purple slightly so they would spread, but not so much that they ran off the edge.
- I piped the outline first, then filled with a zig-zag of thinner icing and smoothed it—using my finger to help spread the icing when needed. Ideally you should use two consistencies:
- Stiff icing (no thinning) for clean edges
- Slightly thinned icing for filling the center
- Use a toothpick to pop any air bubbles before the icing sets.
- I allowed the base colors to dry for about an hour, then piped the white trim and bows with the icing at its original stiffness.
The process is simple, but time-consuming when decorating many cookies. I found using my finger to smooth the flood icing was much faster than using a toothpick. Tip: work in small batches so you can pop any air bubbles before the icing dries.
Next time I’ll be more diligent about having dedicated bags for outlining and flooding so I don’t need to touch the icing to spread it. Even so, the cookies turned out cute and I’m pleased with the results.