
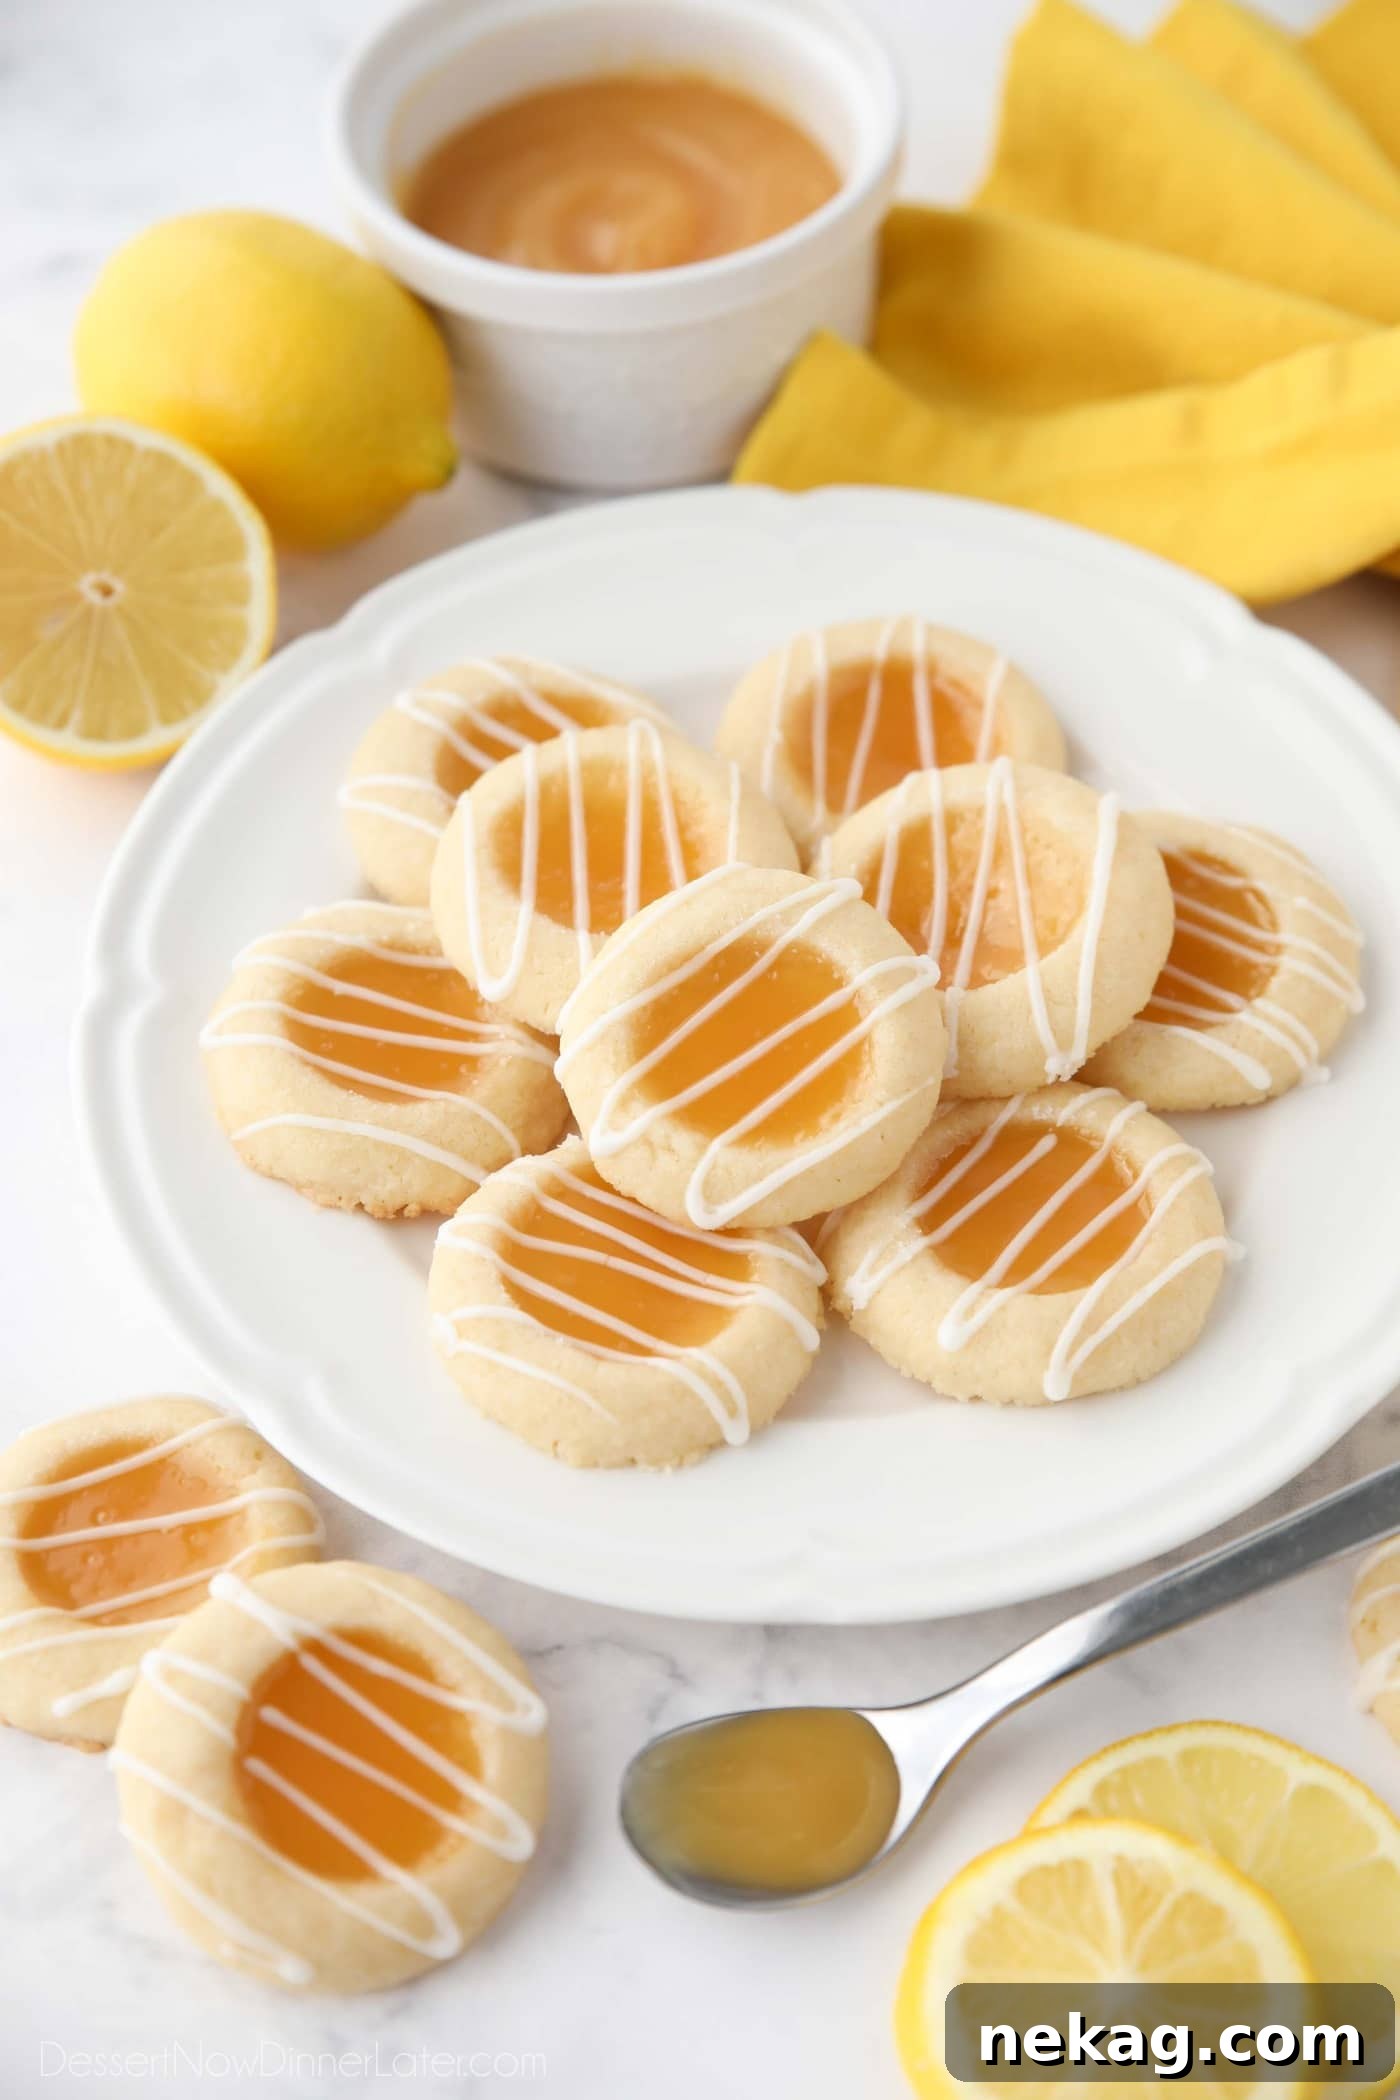
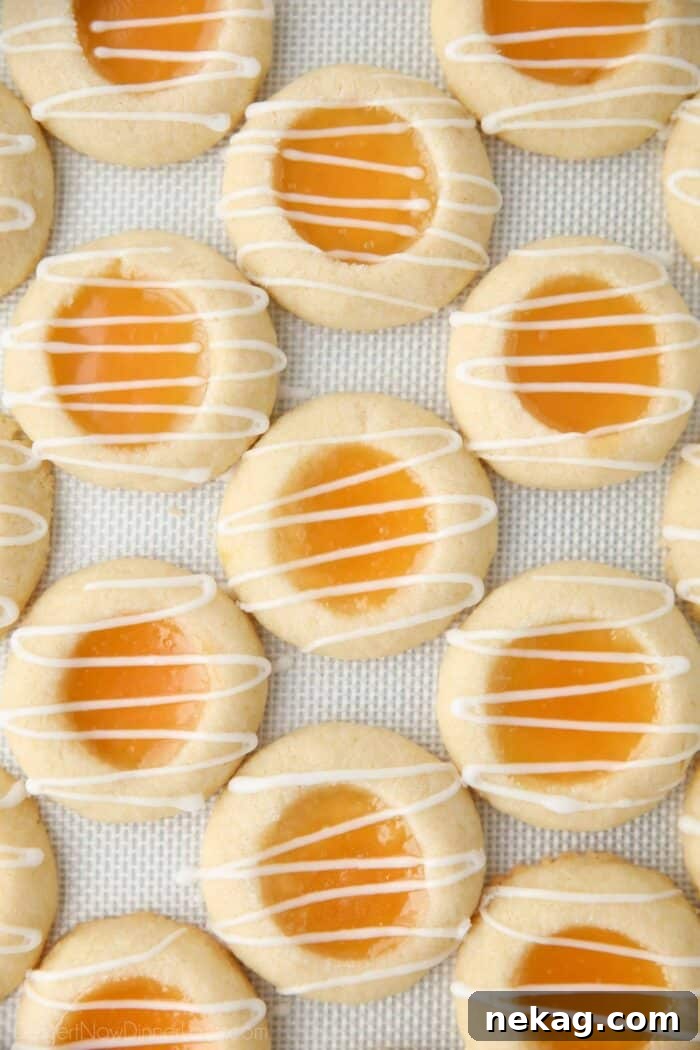
Indulge your senses with the most exquisite lemon curd thumbprint cookies you’ll ever taste! These delightful treats are a celebration of vibrant citrus flavor, featuring buttery, melt-in-your-mouth shortbread cookies, generously filled with luscious lemon curd, baked to golden perfection, and elegantly finished with a sweet, zesty lemon glaze. Every bite offers a harmonious balance of tangy and sweet, making these lemon curd cookies an absolutely irresistible sensation for any lemon enthusiast.
Craving more lemon-infused delights? Explore our other fantastic lemon cookie recipes! You might also love our Lemon Crinkle Cookies, famously soft Soft Baked Lemon Cookies, or the classic Lemon Sugar Cookies.
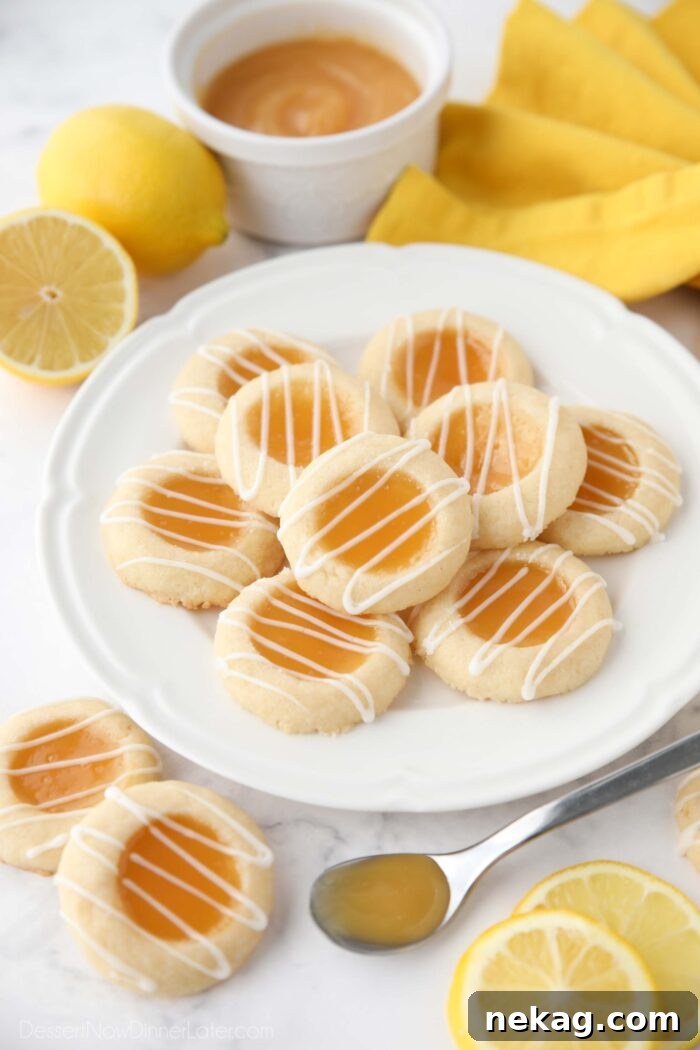
Why These Lemon Curd Thumbprint Cookies Are a Must-Bake
Lemon curd cookies are a truly special indulgence, perfectly marrying the bright, zesty notes of lemon curd with the comforting, rich texture of classic shortbread. These are not just any cookies; they are an experience, offering a delightful contrast between a tender yet sturdy cookie base and a burst of sunshine-yellow citrus filling. Here are even more compelling reasons why these lemon curd thumbprint cookies will quickly become a favorite in your baking repertoire:
- Explosion of Fresh Citrus Flavor: At the heart of each cookie lies a generous dollop of vibrant lemon curd, delivering an intense burst of tangy-sweet citrus. This is beautifully complemented by an optional, but highly recommended, lemon glaze, elevating the overall lemon profile to new heights. It’s a refreshing counterpoint to the richness of the buttery shortbread, making each bite utterly exhilarating. These cookies offer a taste of sunshine, perfect for brightening any day or occasion.
- Visually Captivating Appeal: These cookies are as pleasing to the eye as they are to the palate. The delicate golden hue of the shortbread, the cheerful, glossy yellow of the lemon curd center, and the elegant drizzle of the pristine white lemon glaze create a stunning visual presentation. They are perfect for impressing guests, adorning a dessert platter, or simply brightening up your day. Their intricate design makes them look far more complex to create than they actually are, making you look like a baking pro!
- Remarkable Versatility for Any Occasion: Whether you’re looking for an elegant addition to a holiday dessert table, a charming treat for afternoon tea, a delightful snack for school or work, or a thoughtful homemade gift, these lemon cookies fit the bill. Their balanced flavor and beautiful appearance make them suitable for both casual gatherings and more formal celebrations. Plus, the thumbprint concept itself is incredibly versatile; you can easily swap out the lemon curd for other fruit fillings, as demonstrated by our popular Raspberry Thumbprint Cookies, making this a base recipe for endless creativity.
- Effortlessly Achievable Elegance: Don’t let their sophisticated look fool you. This recipe is designed to be straightforward and accessible for bakers of all skill levels. With clear instructions and helpful tips, even novice bakers can achieve professional-looking and tasting cookies right in their home kitchen without any fuss. The steps are intuitive, and the results are consistently rewarding.
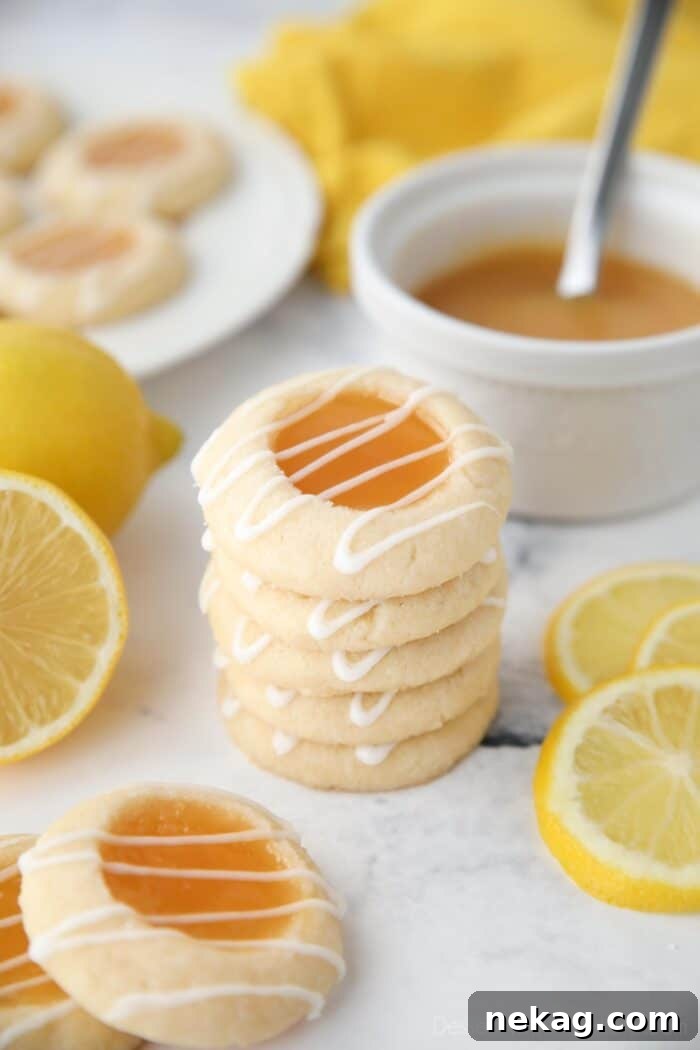
Essential Ingredients You’ll Need for Perfect Lemon Curd Cookies
Creating these delightful lemon curd cookies requires a selection of high-quality, readily available ingredients. While the full, precise measurements and step-by-step instructions are detailed in the printable recipe card below, here’s a closer look at what you’ll need and why each component is crucial for achieving that signature buttery, tangy perfection:
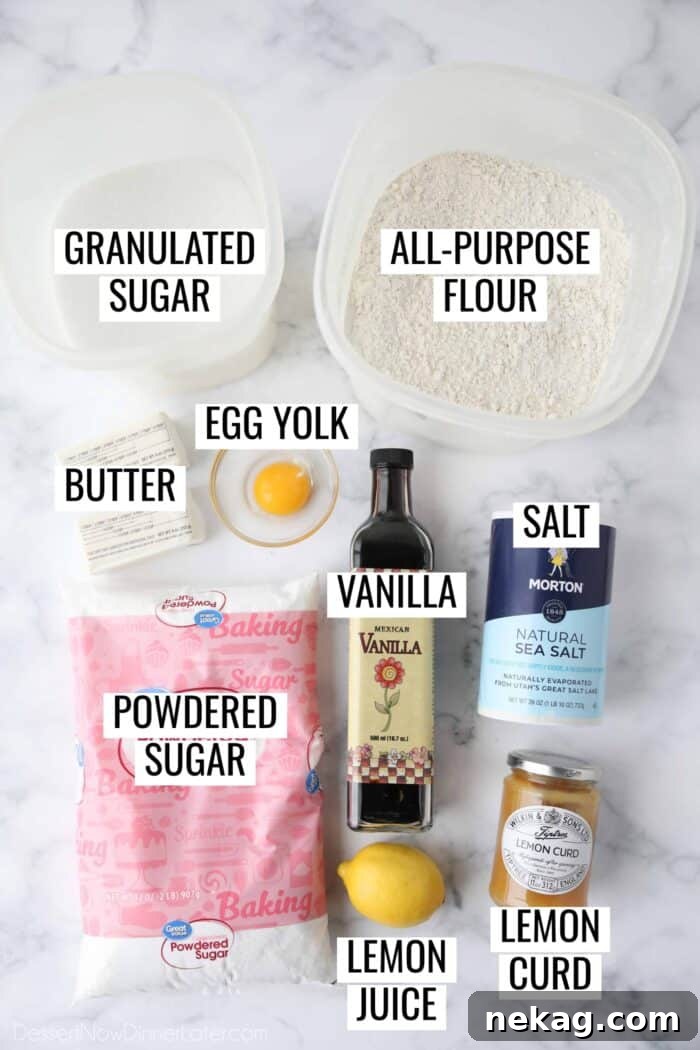
- Unsalted Butter: The very foundation of any good shortbread cookie is butter, and using unsalted butter gives you precise control over the overall saltiness of your cookies. It’s absolutely crucial that your butter is at room temperature – soft enough to easily make an indentation with your finger, but not so soft that it appears greasy or melted. This “room temperature soft” consistency is vital for achieving that light, fluffy texture when creamed with sugar, which translates to a tender, delicate cookie.
- Granulated Sugar: This provides the perfect sweetness to our buttery shortbread base. Fine-grain granulated sugar works best as it creams more effectively with the butter, creating tiny air pockets that contribute to a smoother dough and a more tender, melt-in-your-mouth crumb in the final cookie.
- Egg Yolk: While traditional shortbread often omits eggs for a crisper texture, incorporating just an egg yolk into this recipe is a clever trick. The yolk adds a touch of richness and acts as a binder, helping the cookie dough maintain its shape during baking and significantly preventing unsightly cracks, which is especially important for thumbprint cookies that need to hold a filling. It contributes to a slightly more tender and less crumbly cookie that holds its form beautifully.
- Vanilla Extract: A touch of pure vanilla extract enhances the overall flavor profile of the cookie dough. It adds a warm, subtle sweetness and depth that beautifully complements the bright lemon without competing with or overpowering the star citrus notes, creating a perfectly balanced flavor.
- All-Purpose Flour: The primary dry ingredient, providing essential structure to our shortbread. For best results and consistent baking, always measure your flour correctly. Stir the flour in its container, then spoon it gently into your measuring cup and level it off with a straight edge. For ultimate accuracy, especially in baking, weighing your flour with a food scale is highly recommended (270g for 2 ¼ cups). Incorrect flour measurement can lead to either too dry or too soft cookies.
- Salt: A small amount of salt is essential to balance the sweetness of both the sugar in the cookie and the lemon curd filling. It acts as a flavor enhancer, intensifying the buttery notes of the shortbread and making all the other flavors truly sing, preventing the cookies from tasting bland or overly sweet.
- Lemon Curd: The undisputed star of these thumbprint cookies! You have the option to use either high-quality store-bought lemon curd for ultimate convenience or make your own from scratch for an unparalleled fresh and vibrant flavor. If you’re feeling ambitious and have an abundance of lemons, consider trying my highly-rated stove top lemon curd recipe or a quicker microwave lemon curd recipe. Homemade truly offers a brighter, more intense lemon flavor that elevates these cookies to gourmet status.
- Powdered Sugar: Also known as confectioners’ sugar, this fine sugar is the ideal base for our simple yet elegant lemon glaze. Sifting it before mixing will ensure a super smooth, lump-free glaze that drizzles beautifully and sets perfectly on your cookies.
- Lemon Juice: The essential liquid for our glaze, providing that extra punch of lemon flavor and the necessary acidity to create a glossy, quick-setting finish. Freshly squeezed lemon juice is always preferred for the brightest, most authentic taste, but good quality bottled lemon juice can also be used in a pinch without compromising too much on flavor.
How to Craft Your Perfect Lemon Curd Thumbprint Cookies: A Detailed Guide
Creating these exquisite lemon curd cookies is a rewarding process that combines simple techniques with careful attention to detail. Follow these detailed steps to ensure perfectly baked, beautifully shaped, and irresistibly delicious treats. For a quick reference, remember that printable instructions are always available in the recipe card at the bottom of this page.
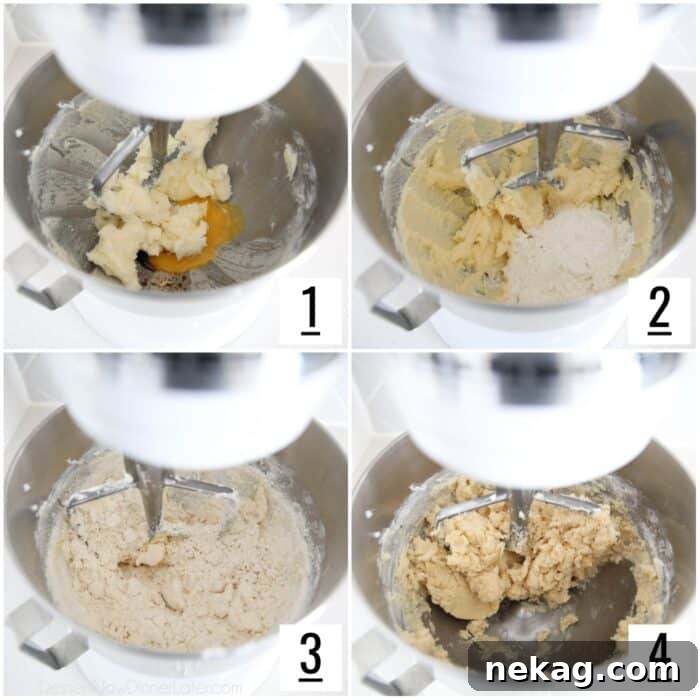
Preparing the Buttery Shortbread Dough
- Cream Butter and Sugar to Perfection: In the bowl of a stand mixer fitted with the paddle attachment, or using a robust hand mixer, cream together the softened unsalted butter and granulated sugar. Beat on medium-high speed until the mixture becomes wonderfully light, fluffy, and notably pale in color. This process, typically taking about 2-3 minutes, incorporates air into the butter, which is crucial for a tender, melt-in-your-mouth shortbread texture. Reduce the mixer speed to low, then add the single egg yolk and vanilla extract. Mix just until fully combined, being sure to scrape down the sides and bottom of the bowl as needed to ensure everything is evenly incorporated without overmixing.
- Gradually Incorporate Dry Ingredients: In a separate medium bowl, whisk together the all-purpose flour and salt until they are thoroughly combined. With the mixer on low speed, gradually add this dry flour mixture to the wet ingredients in the stand mixer. Add about one-third of the flour mixture at a time, allowing it to partially mix before adding the next portion. This gradual addition prevents the flour from flying out of the bowl and ensures even incorporation.
- Form the Cohesive Dough: Initially, the dough will appear dry and crumbly, much like coarse sand. This is completely normal and expected for shortbread dough due to its high butter content. Continue mixing on low speed, patiently scraping down the bowl frequently. Be persistent; the dough will eventually come together into a cohesive, soft ball that pulls away from the sides of the bowl. It should be pliable but not sticky. Avoid overmixing once the dough has formed, as this can develop too much gluten and result in tough, less tender cookies.
Perfectly Shaping and Chilling Your Thumbprint Cookies
Precision in shaping and strategic chilling are absolutely key to achieving beautifully uniform and crack-free lemon thumbprint cookies. Remember, these cookies are designed to be delicate, bite-sized treats, so resist the urge to make them overly large, which can lead to spreading and a less refined appearance.
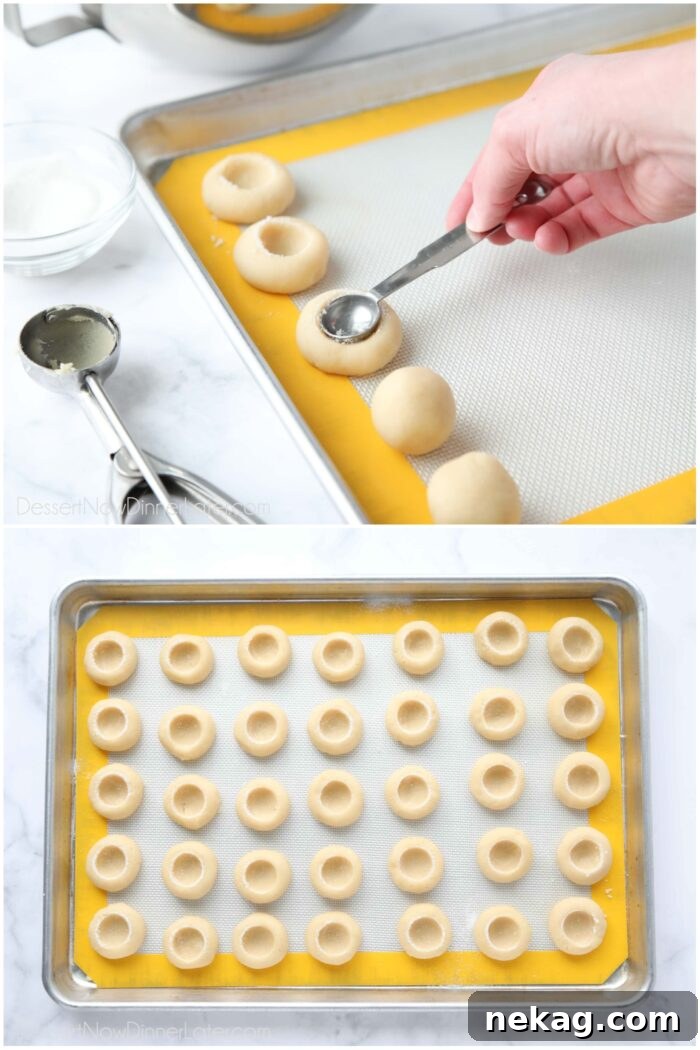
- Prepare Your Baking Sheet: Line a standard large sheet pan with parchment paper or a silicone baking mat. This crucial step is essential for preventing sticking, ensuring easy removal of your delicate cookies after baking, and promoting even browning on the bottom.
- Portion the Dough Evenly: Using a small #50 cookie scoop (which holds approximately 1 tablespoon of dough), portion out uniform balls of cookie dough. Gently place these dough balls onto the prepared cookie sheet, spacing them relatively close together for now, as they will all chill together on this one tray. Uniform portioning is vital for ensuring that all cookies bake evenly and have a consistent appearance.
- Roll and Indent with Care: Take each individual dough ball and roll it gently between your palms to smooth out any cracks or rough edges, creating perfectly round, even spheres. Immediately after rolling, while the dough is still slightly warm and pliable from your hands, use the back of a ½ teaspoon measuring spoon or your thumb to create a deep, even indentation in the center of each dough ball. This prompt indenting helps prevent the dough from cracking as it cools and firms up. If you find the spoon or your thumb sticking to the dough, lightly dip it into granulated sugar before pressing. Aim for a well that’s deep enough to hold a good amount of lemon curd without overflowing during baking.
- The Crucial Chilling Phase: Once all your dough balls are meticulously rolled and indented, place the entire sheet pan into the freezer for approximately 20 minutes. This chilling period is absolutely vital for success. It allows the butter in the dough to firm up considerably, which significantly helps prevent the cookies from spreading excessively during baking, thus maintaining their beautiful thumbprint shape. The dough should feel cold and firm to the touch when ready to bake. If your kitchen is particularly warm, you might extend the chilling time slightly.
Filling and Baking Your Lemon Curd Masterpieces
With your dough perfectly chilled and shaped, it’s time for the exciting part: filling and baking these delightful treats. Patience and careful attention to detail in this stage will result in perfectly baked cookies with luscious, golden lemon centers that are a joy to behold and even better to eat.
- Preheat Your Oven: While your cookie dough is chilling in the freezer, preheat your oven to 350 degrees Fahrenheit (175°C). It’s always a good practice to use an oven thermometer to ensure your oven is at the precise temperature for optimal baking results, as oven temperatures can sometimes vary.
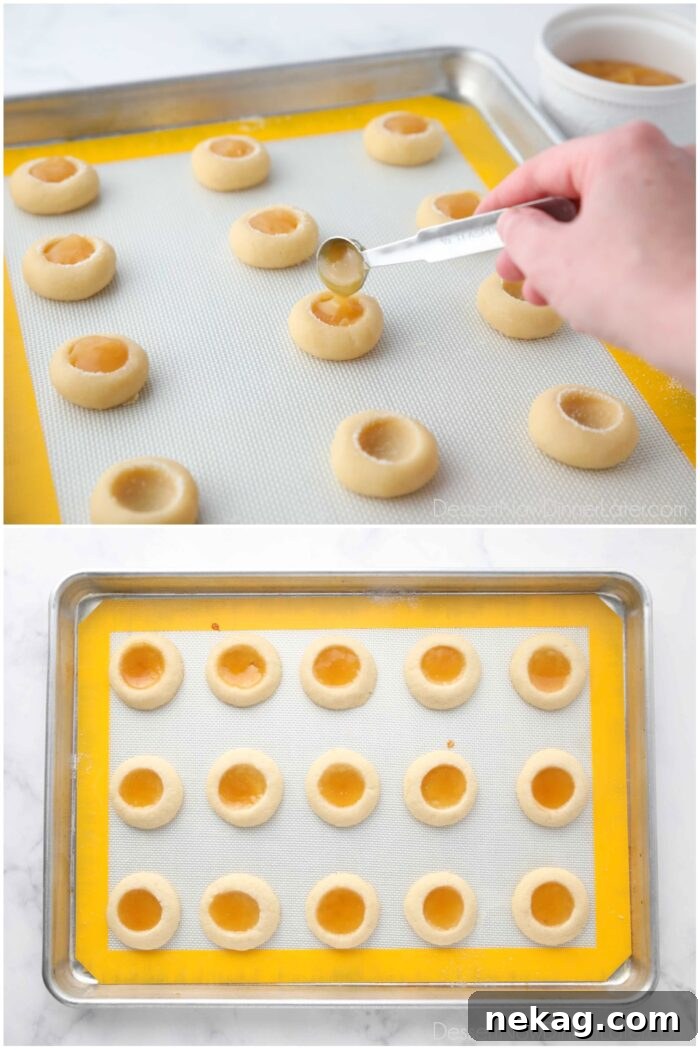
- Arrange Cookies for Baking: Transfer the chilled, indented cookie dough balls to a fresh parchment-lined or silicone baking mat-lined baking sheet, ensuring they are spaced 2 to 3 inches apart. It’s important not to overcrowd the baking sheet, as this can lead to uneven baking. If you have a larger batch, bake the cookies in multiple batches. I typically fit about 15 cookies comfortably on a standard half-sheet tray. Keep any unbaked cookies in the freezer until you are ready to bake them to maintain their crucial chilled state.
- Fill with Lemon Curd: Working quickly to keep the dough as cold as possible, spoon a rounded ½ teaspoon of lemon curd into the center of each cookie well. It’s perfectly okay if the curd slightly domes on top before baking, but it’s essential to avoid overfilling to prevent the curd from bubbling over and leaking during baking. The lemon curd will set beautifully and become slightly jammy as the cookies bake, creating a delightful texture.
- Bake to Golden Perfection: Place the baking sheet in your preheated oven and bake for approximately 14 minutes. The cookies are ready when their edges are very lightly browned and the shortbread itself appears set and slightly golden. The lemon curd center will also be set, possibly with a slight shimmer or gentle bubbling. Once baked, carefully remove the cookies from the oven and allow them to cool completely on the baking sheet. They are quite delicate when warm and firm up significantly as they cool, making them easier to handle.
The Optional (But Highly Recommended) Lemon Glaze
While delicious on their own, a delicate drizzle of lemon glaze adds an extra layer of citrusy sweetness and a beautiful aesthetic touch to your lemon curd cookies. This step is entirely optional, but it truly elevates the presentation and reinforces that bright lemon flavor, making your cookies even more special.
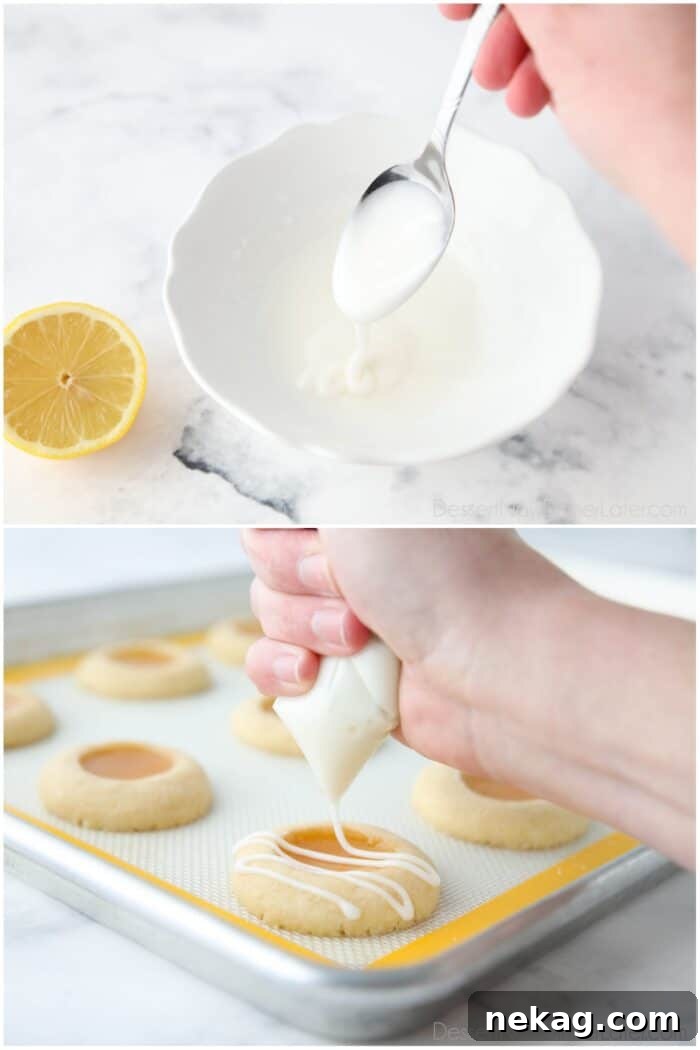
- Prepare the Glaze to Ideal Consistency: In a small bowl, combine the powdered sugar and lemon juice. Start by adding most of the lemon juice (e.g., 1.5 teaspoons), then slowly add more, a few drops at a time, until you achieve a smooth, pourable, but not too thin, consistency. You want it thick enough to visibly sit on the cookie and not completely run off, but thin enough to drizzle elegantly without clumping. Stir thoroughly until there are absolutely no lumps, ensuring a silky-smooth finish.
- Apply the Glaze Artfully: It is crucial that your lemon curd cookies are completely cooled before applying the glaze. Warm cookies will melt the glaze, creating a messy rather than elegant finish. You can either simply drizzle the glaze over the cookies using a spoon for a charming, rustic look, or for a more refined and controlled finish, transfer the glaze to a small zip-top bag. Snip a tiny corner off the bag to create a fine piping tip, and then pipe a delicate zig-zag pattern across each cooled cookie.
- Allow to Set Firmly: Let the glazed cookies rest undisturbed for at least 30 minutes, or until the glaze has fully set and hardened to the touch. This crucial step prevents smudging and ensures a clean, beautiful finish, allowing for easy stacking, serving, and storing.
Storing and Freezing Your Lemon Curd Cookies for Lasting Freshness
These delectable lemon curd thumbprint cookies are wonderful for making ahead, and knowing how to properly store them ensures their deliciousness lasts. Whether you plan to enjoy them within a week or save them for a future craving, here’s how to keep them fresh and flavorful:
- For Short-Term Storage (Room Temperature): Once your lemon curd cookies have completely cooled and the glaze (if you chose to use it) has fully set and hardened, store them in an airtight container at room temperature. There’s absolutely no need to refrigerate these cookies; in fact, refrigeration can sometimes alter the shortbread’s delicate texture. Stored properly, these cookies will retain their delightful buttery softness and tangy flavor for at least one week. Beyond this, they might begin to dry out slightly and become a bit more crumbly, though they will still be enjoyable.
- For Long-Term Storage (Freezing): These cookies freeze beautifully, making them perfect for meal prepping for future gatherings or simply saving for a personal treat. First, ensure the cookies have cooled for several hours, allowing the lemon curd center to fully set and firm up. Once completely cool, you can carefully stack them in an airtight freezer-safe container, placing a piece of parchment paper or wax paper between each layer to prevent sticking. They will maintain their excellent quality in the freezer for up to one month. If you plan to freeze the cookies, you might consider leaving the lemon glaze off until just before serving, as the glaze can sometimes become slightly tacky or develop condensation after thawing. Thaw frozen cookies at room temperature for a few hours before indulging.

Helpful Tools for Baking Success
Having the right tools can make all the difference in your baking experience, especially when striving for consistent and professional-looking results. Here are some indispensable tools that will assist you in making these lemon curd thumbprint cookies effortlessly and perfectly every time:
- An Electric Stand Mixer or Hand Mixer: Essential for creaming the butter and sugar efficiently and thoroughly, which is vital for the shortbread’s texture. A stand mixer offers hands-free convenience, allowing you to prep other ingredients, while a powerful hand mixer is a great alternative for smaller batches. Be aware that shortbread dough can be quite thick, so a robust mixer will save you considerable effort. If using a hand mixer and the dough becomes too stiff, you can always finish mixing it by hand to avoid straining your appliance.
- #50 Cookie Scoop (1 Tablespoon capacity): This tool is invaluable for portioning out uniform cookie dough balls. Consistent size ensures even baking, identical cook times, and a beautiful, professional appearance across your entire batch. While a #50 scoop is recommended for a standard thumbprint, a slightly smaller #60 scoop would also work wonderfully for daintier, more delicate cookies. Remember, you don’t always have to fill the scoop completely; a slightly scant scoop is often perfect for these delicate thumbprints.
- Durable Sheet Pans: High-quality baking sheets are crucial for even heat distribution, which prevents hot spots that can lead to unevenly baked or burnt cookies. Investing in sturdy, light-colored sheet pans will significantly improve your baking results and ensure consistent golden-brown bottoms.
- Silicone Baking Mats: These reusable mats offer excellent non-stick properties, making cleanup a breeze and ensuring your cookies release perfectly without sticking to the pan. They also provide a consistent baking surface, which helps in achieving that ideal golden-brown bottom and prevents excess spreading.
- Delicate Serving Spatula: A thin, flexible spatula is ideal for gently transferring your delicate, baked lemon curd cookies from the baking sheet to a cooling rack or serving plate. This minimizes the risk of breakage, especially when the cookies are still warm and most fragile.

Frequently Asked Questions About Lemon Curd Cookies
What else can I make with leftover lemon curd?
Lemon curd is incredibly versatile and delicious, making it a fantastic ingredient to keep on hand! Beyond this wonderful lemon curd cookies recipe, which typically uses about ½ cup, any leftover curd can be transformed into numerous other delightful treats. You can use it as a filling for our exquisite lemon curd dessert or these fantastic lemon curd bars. It’s also superb spread on toast, pancakes, waffles, scones, or biscuits for a bright breakfast or brunch. Layer it into parfaits with yogurt and berries, or use it as a vibrant filling for cakes, cupcakes, or tarts. For a quick and elegant sauce, fold it into freshly whipped cream to top fresh berries, shortcake, or pound cake. You can even use it to fill donuts or cream puffs. Its tangy sweetness brightens almost any sweet application you can imagine, proving that homemade lemon curd is surprisingly versatile!
Why did my thumbprint cookies spread too much while baking?
If your thumbprint cookies spread excessively, several factors could be at play. The most common reasons include butter that was too warm (not firm enough from insufficient chilling), an oven temperature that was either too high or inconsistent, or placing the dough on a warm baking sheet. To prevent spreading, ensure your shaped dough balls are thoroughly chilled and firm to the touch (ideally, freezing them for 20 minutes is best) before baking. Always use an oven thermometer to verify your oven’s accuracy, as many ovens can be off by several degrees. Lastly, make sure to use a cool baking sheet for each batch of cookies; never place fresh dough on a hot or even slightly warm tray, as this will cause the butter to melt too quickly.
How can I prevent the lemon curd from leaking out of my thumbprint cookies?
The key to preventing any delicious lemon curd from leaking out of your cookies is careful and precise portioning of the filling. Ensure you only fill the indentation with the amount of curd that comfortably fits without overflowing. I highly recommend using a ½ teaspoon measuring spoon to create your indents, as this provides a consistent well size, making it much easier to gauge the perfect amount of filling. A rounded ½ teaspoon of lemon curd per cookie is usually ideal. It’s perfectly fine for the curd to be slightly mounded or domed on top before baking, as it will set and settle nicely into the cookie during the baking process without spilling over.
What should I do if I forgot to add the lemon curd before baking the thumbprint cookies?
Don’t worry, even experienced bakers make mistakes, and all is not lost! If you accidentally baked your thumbprint cookies without their lemon curd filling, you can carefully re-indent the cookies immediately after they come out of the oven, while they are still warm and pliable. Then, simply fill the newly made wells with your lemon curd. Keep in mind that since the filling wasn’t baked along with the cookie, it might remain slightly tackier in texture than if it had been baked. For optimal safety and texture, it would be wise to refrigerate these cookies after filling to help the curd set properly and firm up.
Can I use other fruit fillings instead of lemon curd in these thumbprint cookies?
Absolutely! The beauty and versatility of thumbprint cookies lie in their adaptability to various fillings. While lemon curd is a fantastic choice for its bright, tangy flavor, you can easily substitute it with your favorite jam, jelly, or fruit preserves. Raspberry, apricot, strawberry, or even a mixed berry jam would be utterly delightful and provide a wonderful twist. For best results with jam, especially thicker ones, it’s a good idea to warm it slightly in a microwave-safe bowl for 5-10 seconds and stir until it reaches a smoother, more fluid consistency before filling the cookie wells. This helps it settle nicely into the indentations and ensures a more pleasant texture after baking.
What makes shortbread cookies different from other cookie types?
Shortbread cookies are distinct due to their remarkably high butter content, which is primarily responsible for their rich, crumbly, and melt-in-your-mouth texture. Unlike many other cookie types, traditional shortbread typically contains no chemical leavening agents (like baking powder or baking soda) and often either no eggs at all, or minimal egg yolk as included in this recipe. This unique composition results in a dense yet exceptionally tender cookie that doesn’t spread much during baking and has a distinctively crisp snap. This sturdy yet delicate structure makes shortbread an ideal base for holding a delicious filling like lemon curd without falling apart.

Lemon Curd Cookies
Amber Brady
25 mins
15 mins
20 mins
1 hr
Pin
Rate
Save
35
cookies
Ingredients
Cookies
- 1 cup (226 g) unsalted butter, (2 sticks) room temperature
- ⅔ cup (134 g) granulated sugar
- 1 large egg yolk, no whites
- ½ teaspoon vanilla extract
- 2 ¼ cups (270 g) all-purpose flour, stir, spoon & level
- ½ teaspoon salt
- ½ cup (155 g) lemon curd
Glaze
- ½ cup (60 g) powdered sugar
- 2 teaspoons lemon juice
Equipment
-
KitchenAid 5-Qt. Stand Mixer
-
Half Sheet Pans
-
Silicone Baking Mats
-
#50 Scoop
Instructions
- Cream the butter and sugar together in a stand mixer with the paddle attachment until fluffy and light. Add the egg yolk and vanilla extract. Mix to combine.
- In a separate bowl, mix together the flour and salt. Gradually add to mixer, scraping the bowl as needed. Dough will be dry and crumbly at first. Keep mixing until the dough comes together.
- Line a sheet pan with parchment paper or a silicone baking mat. Use a small #50 scoop to portion cookie dough balls, about 1 Tablespoon each, and place onto the prepared cookie sheet. NOTE: Fit all cookies on the same tray for now, so the dough balls can chill all at once.
- Roll balls with hands to smooth the outside completely. Then make a dent in the center of each dough ball with a ½ teaspoon or your thumb. TIP: Indent immediately after rolling the balls, while the cookie dough is still warm from your hands, to help prevent cracks. Dip the spoon, or your thumb, in granulated sugar if it sticks to the dough.
- CHILL the indented dough balls for 20 minutes in the freezer until cold and firm to the touch. This helps prevent spreading too much.
- While the dough is chilling, preheat the oven to 350 degrees Fahrenheit.
- Place cookies 2 to 3 inches apart on a parchment or silicone lined baking sheet. (Do not bake the cookies all at once on the same tray they were frozen on. I fit 15 cookies on my half-sheet tray.) Leave remaining cookies in freezer until ready to bake.
- Quickly fill cookie wells with a rounded ½ teaspoon of lemon curd. Bake in batches at 350˚F for 14 minutes or until cookies are set and edges are very lightly browned. Allow cookies to cool on the cookie sheet.
- In a small bowl, stir together the powdered sugar and lemon juice to form a glaze. Drizzle glaze over the cookies OR place the glaze in a zip-top bag, make a small cut in the corner, and pipe a zig-zag over the cooled cookies. Allow the glaze to set before eating or storing.
Notes
- You may use any jam, jelly, or preserves with or without seeds to fill these thumbprint cookies with. If using jam, place it in a small microwave-safe bowl. Nuke for 5-10 seconds, and stir until jam is smooth. The jam should not be hot, but be more fluid.
- To Store: Store these lemon thumbprint cookies in an airtight container at room temperature. There’s no need to refrigerate them. These cookies will keep for at least a week before starting to dry out and get crumbly.
- To Freeze: Allow cookies to cool for a few hours so the curd sets, then stack the cookies in an airtight container with parchment paper between the layers. The cookies will keep in the freezer for up to 1 month. NOTE: You may want to leave the glaze off if choosing to freeze the cookies.
Nutrition
Calories: 113 kcal |
Carbohydrates: 13 g |
Protein: 1 g |
Fat: 6 g |
Saturated Fat: 4 g |
Polyunsaturated Fat: 2 g |
Cholesterol: 30 mg |
Sodium: 44 mg |
Sugar: 7 g
Disclaimer: Nutritional values were calculated using a third-party tool and are provided as an estimation only.
Sharing this recipe with a link is both encouraged and appreciated. Copying/pasting and/or screenshots of full recipes to any social media is strictly prohibited. Content and photographs are copyright protected.
Did you make this?
Don’t forget to leave a rating below and make sure to follow on Pinterest and Instagram for more!