
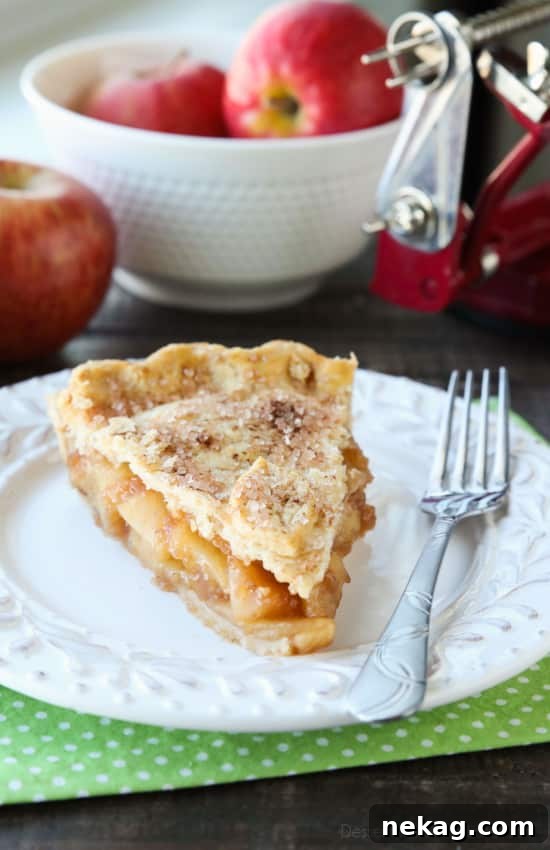
The Ultimate Homemade Apple Pie: A Timeless Classic Recipe
There’s nothing quite like a slice of warm, homemade apple pie. This iconic dessert, deeply rooted in American culinary tradition, embodies comfort and nostalgia. Our ultimate homemade apple pie recipe delivers an irresistible experience: a gorgeously flaky pie crust, perfectly seasoned with a hint of cinnamon-sugar, cradling a rich, extra-fruity apple pie filling that strikes the ideal balance of sweetness and tartness, all enveloped in just the right amount of luscious, thickened sauce.
From family gatherings to holiday celebrations, especially Thanksgiving, apple pie holds a special place at the table. Its universal appeal lies in its comforting simplicity and satisfying flavors. The contrast between a tender, buttery crust and a sweet, cinnamon-spiced apple filling is simply unparalleled, making it understandable why it consistently ranks as one of the most beloved pies worldwide.
Why Apple Pie Reigns Supreme
“As American as apple pie” isn’t just a saying; it’s a testament to the dessert’s enduring cultural significance. While apple pies originated in Europe, American bakers embraced and adapted the recipe, making it a symbol of home, warmth, and traditional values. Each bite tells a story, evokes memories, and creates new traditions. It’s a dessert that transcends generations, bringing smiles to faces young and old. The aroma alone, filling your kitchen with notes of baked apples and warm spices, is enough to evoke feelings of coziness and happiness. Beyond its delicious taste, the act of baking an apple pie from scratch is a rewarding experience, transforming simple ingredients into something truly extraordinary.
Crafting the Perfect Apple Pie: An Overview
The secret to an exceptional apple pie lies in the harmony between its two main components: a robust, flavorful filling and a perfectly textured, flaky crust. While many recipes exist, one critical decision lies in how you prepare your apple filling. Some bakers prefer to cook the apples entirely within the pie during baking, while others, like us, opt for a pre-cooked (or par-cooked) approach for the filling.
We lean towards pre-cooking the apple pie filling before it even touches the crust. This method allows for greater control over the apple’s tenderness and, crucially, the consistency and amount of sauce. By cooking the apples down gently on the stovetop, you achieve a softer apple texture and a more generous, well-integrated sauce that won’t leave your pie dry or overly crunchy. This technique also helps prevent the dreaded “gap” that can form between the filling and the top crust as raw apples cook down and shrink in the oven. While some recipes, like a classic Dutch Apple Cream Pie, might call for a more fruit-heavy, less saucy filling, for a traditional apple pie, a luscious, saucy interior is often preferred.
The Heart of the Pie: Choosing Your Apples
Selecting the right apples is paramount to the success of your apple pie. The ideal candidates are those that offer a balance of tartness and semi-sweetness, hold their shape well during baking, and contribute a complex flavor profile. Granny Smith apples are a top choice for their firm texture and distinct tartness, which beautifully cuts through the pie’s sweetness. Other excellent varieties include Jonagold, Honeycrisp, Braeburn, and Golden Delicious (not to be confused with Red Delicious!). Using a combination of two or three different apple varieties can add depth and complexity to your filling, creating a more dynamic flavor experience. For example, pairing a tart Granny Smith with a sweeter Fuji or Honeycrisp can achieve a perfectly balanced filling.
It’s important to steer clear of apples that become mushy when cooked, such as Red Delicious. These varieties lack the necessary firmness to maintain their structure, resulting in a mealy and unappealing filling. Feel free to adjust the sugar content in your recipe based on the natural sweetness of the apples you choose. If using sweeter apples, you might slightly reduce the amount of added sugar. For slicing, aim for uniform thickness (about ¼ to ⅓ inch) to ensure even cooking and a consistent texture throughout the pie.
Mastering the Flaky Pie Crust
A truly spectacular apple pie starts with a flawless crust. The goal is a crust that is tender, buttery, and incredibly flaky. Achieving this requires attention to a few key details. Firstly, ensure all your ingredients, especially butter or shortening, are ice-cold. Cold fat is crucial because it creates steam pockets during baking, which leads to those coveted flaky layers. Using butter-flavored shortening can add a lovely richness while still providing excellent flakiness.
When incorporating the fat into the flour, use a pastry blender, two forks, or a food processor to cut it in until it resembles coarse crumbs with some pea-sized pieces of fat remaining. Avoid overmixing, as this develops gluten and can lead to a tough crust. The addition of an egg and a touch of white vinegar also plays a role; the egg adds richness and helps bind the dough, while vinegar inhibits gluten development, contributing to a more tender crust. Gradually add ice-cold water, just enough for the dough to come together into a shaggy ball. Divide the dough into two discs, wrap them tightly, and chill them thoroughly in the freezer for at least 15 minutes (or refrigerator for longer). This chilling period relaxes the gluten and firms up the fat, making the dough easier to roll and ensuring maximum flakiness.
When it’s time to roll, work on a lightly floured surface, rolling from the center outwards, rotating the dough frequently to prevent sticking. Aim for an even 1/8-inch thickness. Carefully transfer the rolled dough to your 9-inch pie dish, gently fitting it to the bottom and sides without stretching. Trim any excess, leaving about a ½-inch overhang for crimping. For the bottom crust, you can also consider blind-baking if your filling is particularly wet, though with a pre-cooked filling, it’s often not necessary. Properly sealing the edges is vital to contain the delicious filling during baking.
Assembling Your Masterpiece: Filling and Topping
With your apple pie filling perfectly prepared and cooled, and your flaky pie crust ready, it’s time to bring it all together. First, ensure your pre-cooked apple pie filling has cooled to at least room temperature. This is crucial; warm filling can melt the fat in your pie crust, leading to a soggy bottom. Spoon the delicious filling evenly into your prepared bottom pie shell, mounding it slightly in the center.
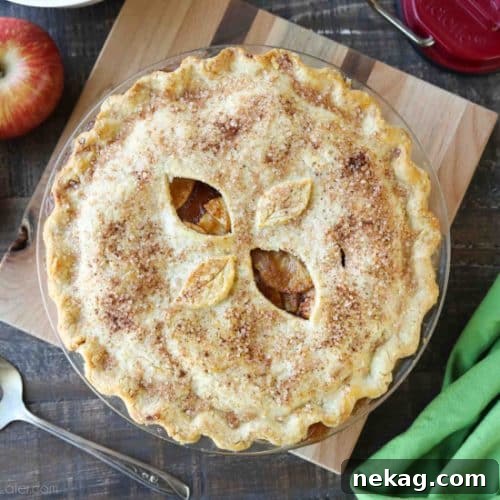
Next, roll out the second disc of pie dough for the top crust. Here, you have options for presentation. A classic solid top crust is simple and elegant; just remember to cut several slits into it to allow steam to escape during baking. Without these vents, your pie could explode or become excessively soggy. Alternatively, for a more intricate look, consider a beautiful lattice top, which not only looks stunning but also naturally provides ventilation. You can also get creative by cutting out decorative shapes (like leaves or small apples) from the dough to adorn your top crust.
Before placing the top crust, lightly brush the edges of the bottom crust with a whisked egg (known as an egg wash). This acts as a “glue,” helping the top and bottom crusts adhere firmly together. Once the top crust is in place, trim any excess dough, then seal and crimp the edges using your fingers or a fork for a decorative finish. Finally, brush the entire top surface of the pie with more egg wash – this will give your crust a beautiful, golden-brown sheen as it bakes. For an extra layer of flavor and a delightful textural crunch, generously sprinkle the egg-washed crust with a mixture of granulated or coarse sugar and cinnamon. This simple step elevates the pie, making it even more appealing. Now your apple pie is ready for the oven!
Baking for Perfection: Tips for Success
Baking your apple pie to perfection requires careful attention to temperature and timing. Begin by preheating your oven to 350 degrees Fahrenheit (175 degrees Celsius). Baking at this temperature allows the crust to brown evenly and the filling to bubble and set without burning. Typically, a homemade apple pie will bake for about 1 hour to 1 hour and 10 minutes, but ovens vary, so it’s essential to watch for visual cues.
The pie is done when the filling is visibly bubbling in the center through the vents, indicating that the juices have thickened and are hot enough. The crust should be a rich, golden brown, not pale or burnt. If you notice the crust browning too quickly before the filling is fully cooked, don’t panic! Simply create a foil tent by loosely covering the edges of the pie with aluminum foil. This shields the crust from direct heat, allowing the filling to continue cooking without over-browning the crust. You can also place the pie on a baking sheet to catch any potential drips from the bubbling filling, making cleanup easier.
Once baked, the hardest part is waiting! It’s crucial to cool the pie completely, preferably to room temperature, before slicing and serving. This allows the filling to fully set and solidify, ensuring clean, beautiful slices. Cutting into a hot pie will result in a messy, runny filling. Patience is truly a virtue when it comes to serving a perfect slice of apple pie.
5 out of 5 stars from 1 rating
Apple Pie Recipe
Ingredients
Apple Pie Filling:
- 5-6 medium apples, peeled, cored, and sliced
- 1 Tbsp lemon juice
- ½ cup (100 g) brown sugar
- ¼ cup (50 g) granulated sugar
- 2 tsp ground cinnamon
- ¼-½ tsp ground nutmeg, to taste
- ½ tsp salt
- 2 Tbsp (28 g) butter
- 2 Tbsp cornstarch
- 1 ½ cups (355 ml) water or apple juice*, (see notes)
Perfect Pie Crust:
- 3 cups (360 g) all-purpose flour
- 1 tsp salt
- 1 cup (226 g) shortening, (I prefer butter flavored, if you have it.)
- 1 large egg
- 1 Tbsp white vinegar
- 5 Tbsp + ice-cold water
Extras:
- 1 egg, whisked (egg wash)
- 2 Tbsp granulated/coarse sugar
- 1 tsp cinnamon
Instructions
Apple Pie Filling:
-
Peel, core, and slice apples. Toss with lemon juice, both sugars, cinnamon, nutmeg, and salt in a large bowl.
-
In a large skillet or saucepan over medium heat, melt the butter and add the apples. Cover and cook for 3 minutes.
-
Place cornstarch in a large bowl. Slowly whisk the water (or apple juice) into the cornstarch until combined. Add to apples. Continue cooking for an additional 5 minutes, stirring frequently, until apples are fork tender and sauce is thickened. (*Add more water/juice, if needed, for desired sauce consistency.)
-
Cool the apple pie filling to at least room temperature before using for the pie.
Perfect Pie Crust:
-
Combine flour and salt in a large bowl. Stir. Cut in shortening with a pastry blender, two forks, or pulse in a food processor until pea-sized chunks are achieved.
-
Add the egg, vinegar, and 5 Tbsp of ice-cold water. Mix with your hands. Add more water 1 Tbsp at a time until the mixture comes together in a ball. Empty the contents from the bowl onto a floured surface.
-
Cut dough in half and flatten each half into a flat disc. Wrap the discs with plastic wrap, and place them in the freezer for 15 minutes. (For a full Pie Crust Tutorial, see here.)
-
Once the dough has chilled, remove one piece at a time. Flour your surface and rolling pin. Roll dough from the center outwards, rotating and adding extra flour as needed until 1/8-inch thin.
-
Carefully transfer the dough to the standard 9-inch pie dish. Shape the crust to the bottom and sides of the pie dish. Trim excess crust.
Assembly:
-
Fill the pie shell with the cooled apple pie filling. Roll out the second half of the pie dough for the top. (Cut out designs if desired [i.e. leaves] and set aside.) Lightly brush the edges of the bottom pie crust with a whisked egg (egg wash). Lay the top pie crust over the apples. Trim, seal, and crimp the edges.
-
Cut slits in the top of the pie crust (if you didn’t cut out any designs). Brush the top and edges of the crust with egg wash. (Attach the designs now, if desired.) Combine 1 tsp of cinnamon and 2 Tbsp granulated/coarse sugar. Sprinkle generously over the pie crust.
-
Bake in a preheated 350 degrees Fahrenheit oven for 1 hour + until the filling is bubbling in the center and the crust has browned. If crust browns before filling bubbles, cover the pie with foil and continue baking. Cool pie to room temperature before slicing and serving.
Notes
*Use half as much of the sugars if using apple juice instead of water.
*For very soft apples, only mix ¼ cup of the water with the cornstarch to make a slurry/paste. Set aside. Simmer apples, covered, with the remaining water until desired tenderness. Then add the cornstarch slurry and heat to boiling to thicken the sauce.
*For a raw/no-cook filling, use the apple pie filling in this recipe.
Sharing this recipe with a link is both encouraged and appreciated. Copying/pasting and/or screenshots of full recipes to any social media is strictly prohibited. Content and photographs are copyright protected.
Serving Suggestions and Variations
A slice of homemade apple pie is delicious on its own, but it truly shines with the right accompaniments. The most classic pairing is a scoop of creamy vanilla bean ice cream, often referred to as “à la mode.” The cold, melting ice cream creates a delightful contrast with the warm, spiced apples. Another traditional (and surprisingly good) accompaniment, especially in some regions, is a slice of sharp cheddar cheese – its tanginess complements the pie’s sweetness beautifully. For a decadent touch, drizzle your pie with caramel sauce or a dollop of freshly whipped cream. You can also sprinkle a little extra cinnamon or a pinch of sea salt for added depth.
If you’re feeling adventurous, consider variations to customize your pie. For a different texture, you could swap the top crust for a streusel or crumb topping, made with flour, butter, sugar, and often oats or nuts. Experiment with additional spices like a touch of allspice, cloves, or cardamom for a more complex flavor profile. You could also introduce other fruits into the filling, such as a handful of cranberries for a tart kick, or some thinly sliced pears for added sweetness and texture. These small adjustments can transform a classic into your unique signature dessert.
Storage and Reheating Tips
Proper storage ensures your delicious apple pie remains fresh and enjoyable for longer. A freshly baked apple pie can typically be stored at room temperature for up to 2 days, loosely covered with foil or plastic wrap. For longer storage, or if your kitchen is particularly warm, it’s best to refrigerate the pie. When refrigerated, it will stay fresh for up to 4-5 days. Be sure to cover it tightly to prevent it from drying out or absorbing other odors from the fridge. For extended preservation, you can freeze whole baked pies or individual slices for up to 3 months. Wrap the pie securely in plastic wrap and then in aluminum foil before freezing.
To reheat a refrigerated pie, place it in a preheated oven at 300°F (150°C) for about 15-20 minutes, or until warmed through and the crust is crisp again. For a frozen pie, you can reheat it directly from the freezer in a 325°F (160°C) oven for about 45-60 minutes, or until it’s hot in the center. Loosely cover with foil if the crust starts to brown too much. Reheating in the oven helps to restore the flaky texture of the crust, making it taste almost as good as fresh out of the oven.
Troubleshooting Common Apple Pie Problems
Even experienced bakers can encounter issues with apple pie. Here are some common problems and their solutions:
- Soggy Bottom Crust: This is a frequent complaint! To prevent it, ensure your apple filling is fully cooled before adding it to the pie shell. You can also blind-bake the bottom crust slightly before filling it, or sprinkle a thin layer of breadcrumbs or crushed cereal on the bottom before adding the filling to absorb excess moisture. Using cold butter or shortening in your crust and not overworking the dough also helps.
- Watery Filling: A runny filling is often due to insufficient thickener or apples that release too much moisture. Make sure you use the specified amount of cornstarch (or flour) and pre-cook your filling as described in our recipe to ensure it thickens properly on the stovetop. If using very juicy apples, you might need an extra tablespoon of thickener.
- Crust Shrinking: A shrinking crust usually indicates that the dough wasn’t sufficiently chilled or was overworked. Always allow your pie dough ample time to chill in the freezer or refrigerator, and handle it as little as possible to avoid developing the gluten too much.
- Burnt Edges: If the edges of your pie are browning too quickly, use aluminum foil to create a protective “tent” around the rim of the pie. This shields the delicate edges while allowing the rest of the pie to continue baking until golden.
Conclusion
Baking a homemade apple pie is a labor of love that yields truly delicious rewards. From selecting the perfect blend of apples to mastering a flaky crust and simmering a luscious filling, each step contributes to creating a dessert that is more than just food – it’s an experience. We hope this comprehensive guide, complete with detailed tips and our favorite recipe, empowers you to bake the ultimate apple pie that will impress your family and friends. Dive into your kitchen, embrace the warmth, and enjoy every flavorful slice of this timeless American classic!