
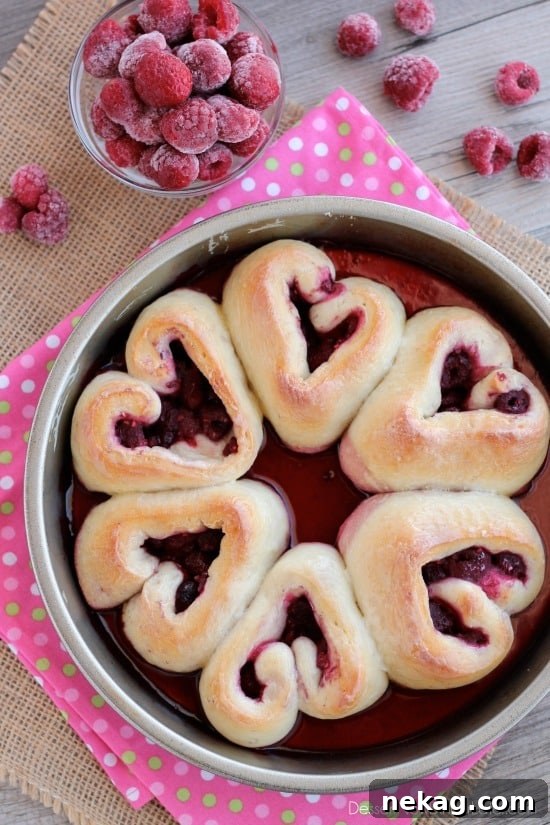
Welcome to a world where breakfast and dessert intertwine in a symphony of flavors and heartfelt presentation! These delightful heart-shaped raspberry rolls are more than just a sweet treat; they’re a warm, loving gesture, especially perfect for celebrating your sweetheart this Valentine’s Day. Imagine waking up to the aroma of freshly baked rolls, soft and tender, bursting with juicy raspberries, and topped with a naturally pink, sweet glaze. It’s an experience that truly says, “I love you.”
*This post is brought to you by Rhodes Bake-N-Serv, making homemade baking simpler and more accessible for everyone. We appreciate their support in bringing delicious recipes to your table.
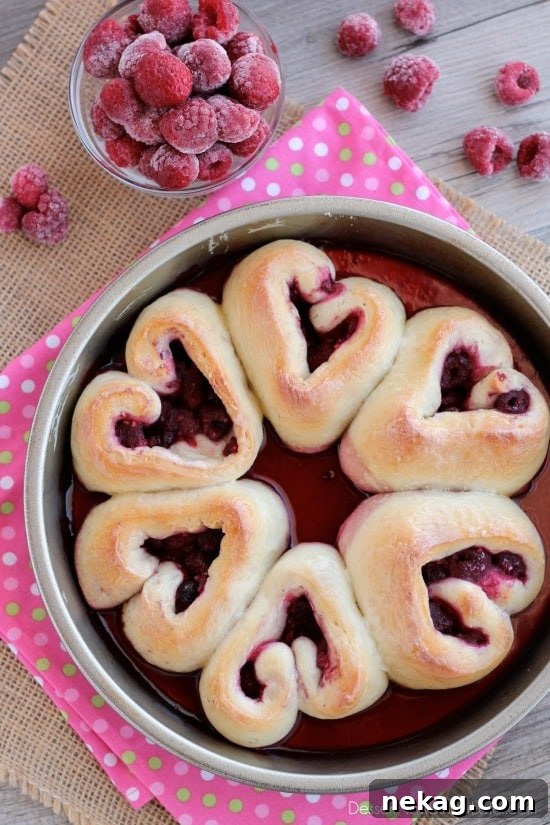
There’s something undeniably enchanting about heart-shaped confections. They instantly elevate any occasion, transforming a simple meal into a memorable celebration. Just like our popular red velvet cake hearts, these raspberry rolls bring a smile to everyone’s face, especially the little ones. The joy of creating something beautiful and delicious with your own hands, especially when it carries such a symbolic shape, is incredibly rewarding. This year, we’re taking that beloved heart shape and infusing it into a fluffy, sweet roll that serves equally well as a decadent breakfast pastry or a charming dessert.
Valentine’s Day Raspberry Rolls: A Sweet Expression of Love
Forget the ordinary this Valentine’s Day and surprise your loved ones with these extraordinary raspberry rolls. While cakes are always a classic choice, these sweet rolls offer a unique twist, providing a delightful alternative that can be savored any time of day. Picture a cozy Valentine’s breakfast, complete with steaming coffee and these warm, tender rolls, or a romantic dessert shared after a special dinner. Their versatility is just one of their many charms.
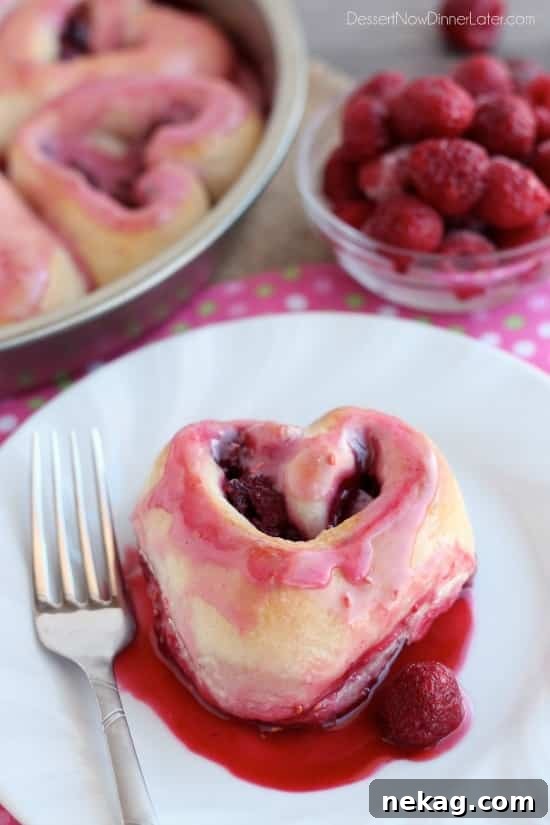
One of the most appealing aspects of these rolls is their gorgeous, naturally pink glaze. We achieve this lovely hue by incorporating a few frozen raspberries directly into the glaze mixture. This simple technique means you can enjoy a vibrant, festive color without resorting to any artificial food coloring. The subtle tang of the raspberries perfectly complements the sweetness of the glaze, creating a balanced and irresistible topping that truly enhances the overall flavor of the rolls.
And don’t worry about leftovers! These raspberry rolls are incredibly forgiving. We’ve discovered that a quick reheat in the microwave brings them back to their freshly baked glory, making them taste just as good as when they first came out of the oven. This means you can enjoy them for days, extending the sweetness of Valentine’s Day far beyond the holiday itself. They’re not just a one-time treat; they’re a lasting indulgence.
Gathering Your Ingredients: Simplicity Meets Sweetness
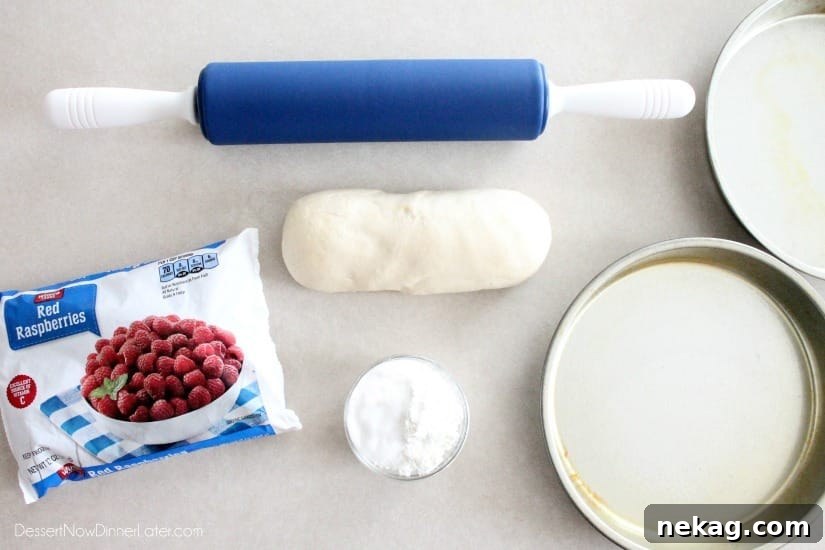
Creating these heavenly raspberry rolls is surprisingly simple, especially with a little help from our friends at Rhodes Bake-N-Serv. For those who aren’t seasoned bread makers, or simply want to save time without compromising on quality, Rhodes frozen dough is an absolute game-changer. We’ve used Rhodes White Bread for this recipe, which yields wonderfully soft and fluffy rolls. If the white bread loaf isn’t readily available in your local grocery store, you can easily substitute it with Rhodes Dinner Rolls, which are more widely distributed and work just as beautifully for this recipe. For reference, you’ll find that approximately 12 Rhodes Dinner Rolls are equivalent to one loaf of Rhodes White Bread, providing the perfect amount of dough for our heart-shaped creations.
12 Rhodes Dinner Rolls = 1 Loaf Rhodes White Bread
Beyond the convenience of the pre-made dough, the rest of your ingredient list is delightfully straightforward. For the luscious filling, you will need a bag of frozen raspberries. Using frozen berries is key here, as they help manage the moisture content during the preparation process, preventing the dough from becoming overly sticky too quickly. You’ll also need granulated sugar to sweeten the berries and a touch of cornstarch, which acts as a thickening agent, ensuring the raspberry juices create a beautiful, jam-like consistency rather than making your rolls soggy. For the naturally pink glaze that crowns these rolls, you’ll combine essential pantry staples: delicate powdered sugar for its fine texture, a splash of milk to achieve the perfect drizzly consistency, and, of course, a few of those delightful frozen raspberries, thawed, to impart their natural color and fruity essence. This simple combination of ingredients promises a sweet and satisfying outcome, proving that you don’t need a lengthy list to create something truly special.
Crafting Your Heart-Shaped Delights: A Step-by-Step Guide
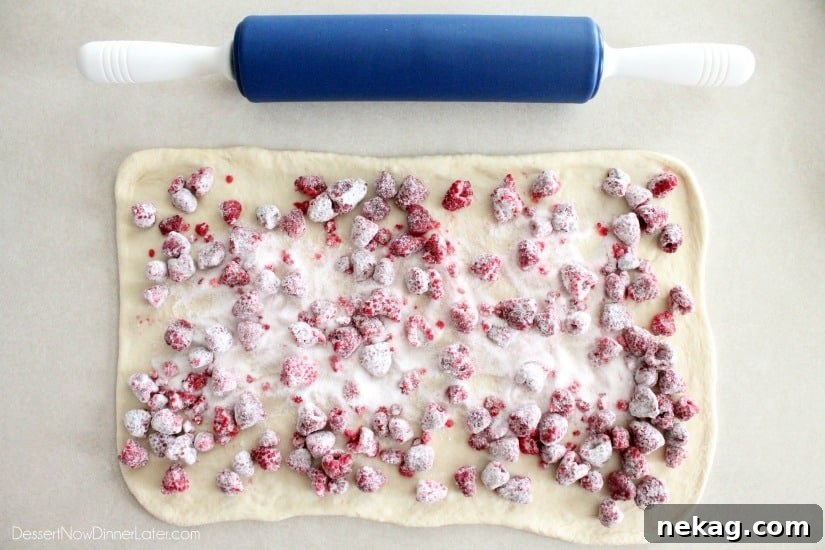
The magic of these rolls begins with transforming simple dough into a canvas for your sweet masterpiece. First, take your thawed loaf of Rhodes bread dough and gently roll it out into a generous rectangle. Aim for a thickness of about ¼ to ½-inch. This ensures you have enough surface area for the delicious raspberry filling and a good dough-to-filling ratio in each bite. A well-floured surface will be your best friend during this step to prevent sticking and allow for smooth rolling.
Once your dough rectangle is ready, it’s time for the star of the show: the raspberry filling! In a bowl, gently toss your frozen raspberries with the granulated sugar and cornstarch. This coating helps distribute the sweetness and, importantly, prevents the berries from releasing all their liquid too soon. Evenly sprinkle this vibrant mixture over the entire surface of your rolled-out dough, leaving a small border around the edges. This border will help seal the filling in as you roll.
NOTE: It’s crucial to keep those raspberries in the freezer until the very last moment before you add them to the dough. Raspberries, once thawed and mixed with sugar, will quickly begin to macerate and release their juices, becoming quite messy and difficult to work with. Speed and efficiency are key in this step to ensure your filling remains manageable and your dough stays intact. Work quickly but carefully to spread the berries before they thaw too much.
Now comes the unique technique for creating the beloved heart shape. Begin by taking one of the long edges of your raspberry-laden dough. Carefully tuck as many raspberries as you can right into that edge, pressing them gently into the dough. This creates the ‘bumpy’ top of the heart. Start rolling the dough inward from this long edge, moving towards the center of the rectangle. Roll it snugly but not too tightly, ensuring the filling stays encased. Stop when you reach the approximate center of the dough sheet.
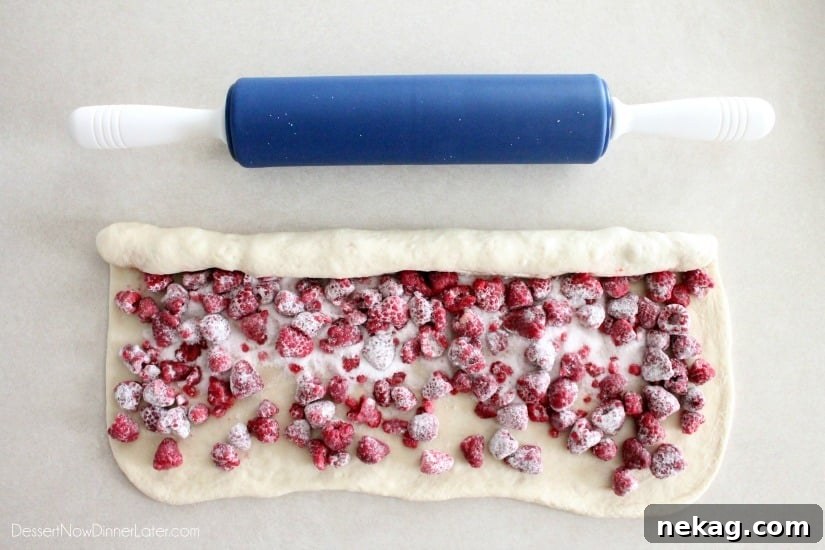
Next, repeat this process with the other long edge of the dough. Again, tuck plenty of berries into this edge as you begin to roll inward towards the center. Visualize creating a double scroll, with both ends meeting in the middle. The two rolled sections, side by side, will form the distinct top curves of our heart shape. The precision in this step is what gives the rolls their charming, romantic appearance.
NOTE: Achieving the perfect heart shape relies heavily on the distribution of your raspberry filling. You’ll want to concentrate more berries along the outer sections of the dough that you roll in towards the center. These berries will create the lovely, rounded ‘bumps’ at the top of the heart. Conversely, aim for fewer berries in the very middle section of your dough. This central area will eventually become the pointed bottom tip of each heart, so a less bulky filling there allows for a more defined point. This strategic placement ensures each roll bakes into a beautifully recognizable heart.
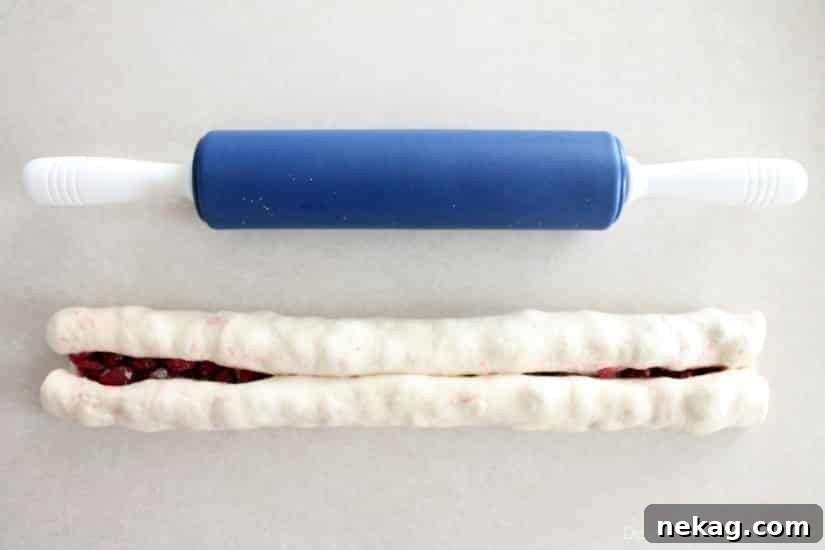
Precision Cutting for Picture-Perfect Hearts
Once your raspberry-filled dough log is beautifully rolled, the next step is to transform it into individual heart-shaped rolls. Precision in cutting is key here to maintain the integrity of the shape and ensure even baking. You’ll want to slice the entire log into 12 equal pieces. A simple way to achieve this is to first cut the long log exactly in half. Then, take each of those halves and cut them in half again. Finally, divide each of those four smaller segments into three equal pieces. This method helps in getting consistently sized rolls.
PRO TIP: To achieve impeccably clean cuts without squashing your soft, filled dough, I highly recommend using unflavored dental floss. This ingenious trick prevents the rolls from being compressed or losing their precious filling, which can happen with a knife. To use this method, simply slide a long piece of dental floss underneath the dough log at the point where you intend to make a cut. Bring the ends of the floss up over the top of the log, criss-cross them, and then pull firmly and swiftly. The floss will slice through the dough cleanly, leaving you with perfectly shaped rolls. If you notice the floss starting to stick to the dough, a light dusting of flour on the floss can help prevent this. This technique ensures each heart retains its beautiful form, ready for baking.
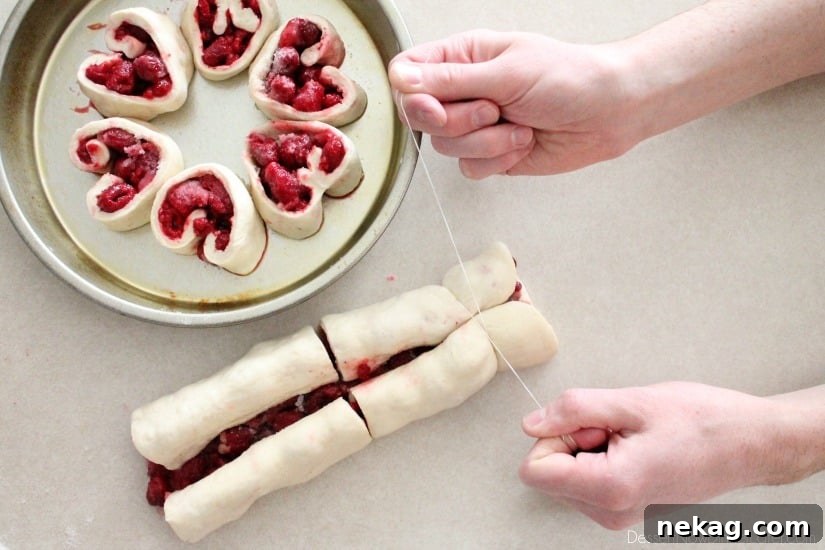
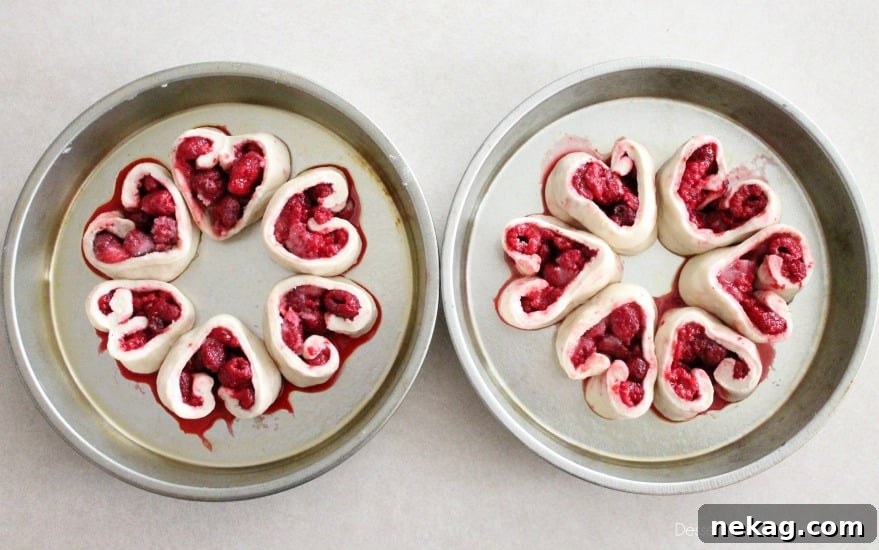
After cutting, it’s time to arrange your newly formed hearts. Lightly grease two round cake pans. Carefully place 6 rolls into each pan, ensuring they are evenly spaced. Now, for the final touch to truly accentuate their heart shape: gently pinch and point the bottom edge of each roll slightly, pulling the two rolled sections apart at the top to emphasize the characteristic heart indent. This simple adjustment will make all the difference in their final appearance. Once arranged, cover the pans loosely with plastic wrap or a clean kitchen towel and allow the rolls to rest in a warm place for about 1½ to 2 hours. This resting period allows the yeast in the dough to work its magic, giving the rolls their light and airy texture.
NOTE: Due to the presence of frozen berries in the filling, you might notice that the dough doesn’t rise quite as dramatically as it would with a plain sweet roll. Don’t be alarmed by this; it’s entirely normal. What you will observe, however, is a significant release of juices from the raspberries during this resting period. These vibrant raspberry juices will beautifully pool and fill most of the bottom of the cake pans, creating a wonderfully flavorful syrup that will infuse into the rolls as they bake, adding an extra layer of deliciousness and moisture. This liquid is a key part of the incredible flavor profile, so embrace it!
Baking and Glazing: The Sweet Finale
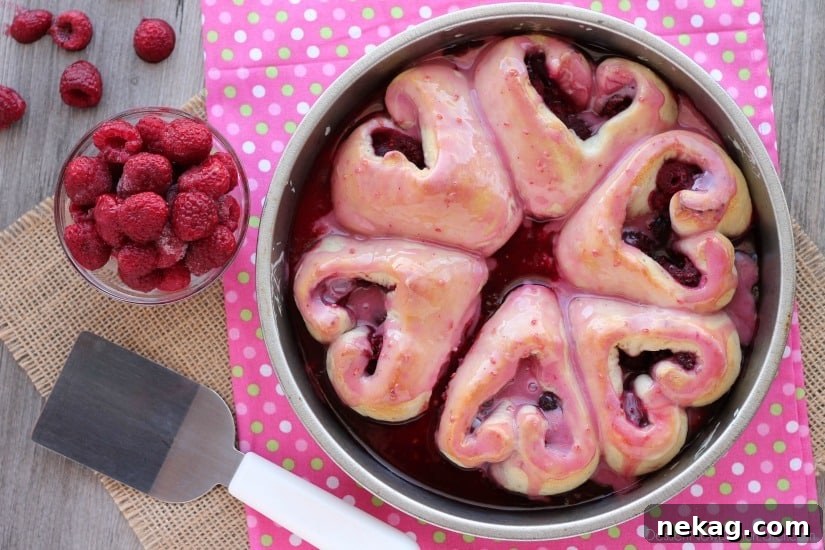
The anticipation builds as your heart-shaped raspberry rolls enter the oven. Preheat your oven to 350 degrees Fahrenheit (175 degrees Celsius). Bake the rolls for approximately 25 to 30 minutes. You’ll know they’re perfectly done when the dough turns a beautiful golden brown, and the raspberry filling is visibly bubbling, indicating it has cooked down into a sweet, thick syrup. The aroma filling your kitchen at this stage is absolutely intoxicating!
Once baked, remove the pans from the oven and allow the rolls to cool slightly. While they are still warm but not scorching hot, prepare your glorious raspberry glaze. In a food processor, combine the powdered sugar, milk, and the reserved thawed raspberries. Pulse until the mixture is smooth and the raspberries are fully incorporated, creating that stunning, natural pink color. If you don’t have a food processor, simply whisk the powdered sugar and milk together in a bowl, then add the thawed raspberries and mash them thoroughly with a fork until the color is consistent. The goal is a pourable, yet thick enough glaze that will generously coat each roll.
With the glaze ready, it’s time for the final flourish. Generously spoon the vibrant pink glaze over the warm edges of the rolls, allowing it to cascade down into the crevices and coat every part of the tender pastry. These Heart Shaped Raspberry Rolls are truly best enjoyed warm, directly from the oven, or reheated slightly to bring back their fresh-baked goodness. The warmth enhances their softness and allows the sweet, tart raspberry flavors to truly shine. Enjoy every blissful bite!
Should you be lucky enough to have any leftovers (though they rarely last long!), store them in an airtight container in the refrigerator for up to 3 days. To reheat and bring back that delightful warmth and softness, simply microwave individual rolls for about 10-20 seconds. They’ll taste almost as good as fresh, allowing you to extend the joy of this special treat.
Explore More Valentine’s Day Delights
If these heart-shaped raspberry rolls have sparked your creativity and sweet cravings, you’re in luck! We have a treasure trove of other delightful recipes perfect for celebrating love and special moments. Whether you’re planning a romantic dinner, a festive brunch, or simply want to bake something with love, these ideas are sure to inspire. Explore these other fantastic Valentine’s Day treats to make your celebrations even sweeter:
- Heart Shaped Breadsticks
- Valentines Cheesecake
- Strawberry Swirl Bread
- Chocolate Cheesecake Stuffed Strawberries
- Strawberry Cupcakes
- Raspberry Breakfast Braid
- Strawberry Cake with Jello
- Cheesecake Stuffed Strawberries
- Chocolate Covered Strawberries
Valentine’s Day Raspberry Rolls
Pin
Rate
Save
Ingredients
- 1 loaf Rhodes White Bread, thawed
- 10-12 oz bag FROZEN raspberries, (save 6 berries for glaze)
- ¼ cup plus 2 Tbsp granulated sugar
- 1 Tbsp cornstarch
Raspberry Glaze:
- 1 cup powdered sugar
- 2 Tbsp milk
- 6 raspberries, thawed
Equipment
-
Rolling Pin
-
8-inch Round Cake Pans
Instructions
-
Roll the thawed loaf of bread into a large rectangle about ¼ to ½-inch thick. Toss the raspberries with the sugar and cornstarch; sprinkle evenly over the rectangle. NOTE: Keep the raspberries in the freezer until ready to add the filling. Once the berries start to thaw and macerate with the sugar, it gets messy, so move quickly.
-
Next, tuck as many raspberries as you can into one of the long edges and start rolling towards the center; then stop at the center.
-
Repeat with the other long edge, tucking lots of berries into it as you roll towards the center, like a scroll. NOTE: The berries help make the bumps of the heart. You will want more berries along the sides of the dough that you roll in towards the center, and less berries in the very middle. Since the middle of the dough will create the bottom point of the heart.
-
The next step is to cut the log you just created into 12 equal pieces. To do this, cut the log in half, then each half into half, and then each of those pieces into thirds. PRO TIP: I use unflavored dental floss to cut the rolls. Simply place the floss underneath the log where you want to make a cut, criss cross it over the top, and pull the ends to cut the rolls without smashing them. You may need a little flour on the floss if it starts sticking to the rolls.
-
Place 6 rolls each into two round cake pans that have been lightly greased. Point the edges at the bottom so the rolls look like hearts. Cover and let rest for 1½ to 2 hours. NOTE: The dough won’t rise very much because of the frozen berries, but the berries will release a LOT of juices. The raspberry juices will fill most of the bottom of the cake pans.
-
Bake at 350 degrees Fahrenheit for 25 to 30 minutes until the dough is cooked and the filling is bubbling.
-
Allow rolls to cool slightly, then mix up the glaze ingredients in a food processor or whisk them together in a bowl and mash the berries with a fork. Spoon the glaze over the edges of the rolls. These Raspberry Rolls are best served warm or heated up slightly. Enjoy!
Notes
- Store any leftovers in an airtight container in the refrigerator up to 3 days. Reheat individual portions for 10-20 seconds in the microwave for best results.
Nutrition
Calories: 226kcal |
Carbohydrates: 46g |
Protein: 6g |
Fat: 2g |
Polyunsaturated Fat: 1g |
Sodium: 310mg |
Fiber: 3g |
Sugar: 16g
Disclaimer: Nutritional values were calculated using a third-party tool and are provided as an estimation only.
Sharing this recipe with a link is both encouraged and appreciated. Copying/pasting and/or screenshots of full recipes to any social media is strictly prohibited. Content and photographs are copyright protected.
Did you make this?
Don’t forget to leave a rating below and make sure to follow on Pinterest and Instagram for more!